Group Sessions & Co-Treatment
Last updated: September 23, 2026
This guide covers two related billing workflows in Alpaca Health: running a group session under CPT code 97154 or 97158, and applying the co-treatment (XP) modifier when ABA is delivered alongside OT or SLP. Follow the steps in order; each screenshot shows exactly where to click.
Group Codes
A group session is one appointment for each child, delivered together. When you book a group, Alpaca creates a separate appointment per client and links them. You run them all from a single screen, but each child keeps their own note, their own billed units, and their own claim.
That one idea explains most of what follows. A group of four children is four notes to sign, not one — and a child who arrives late is billed for the time they were actually there, not for the group's full window.
Two CPT codes bill a group session: 97154 (Group RBT Session) and 97158 (Group Protocol Modification Session). Only these two appear in the CPT Code list once you switch to a group session. A group holds 2 to 10 clients.
Heads up:Don't confuse 97154 (Group RBT Session) with 97153 (Direct Session), which is for a single client, or 0373T (Joint Direct Session), which is two clinicians and one client.
Schedule the group session
On the calendar, click an open time slot in the clinician's column (or click the green Schedule button in the top-right).
Set Session type to Group session.
Under Clients, add every child in the group. Each selected client shows as a chip.
Under CPT Code, choose a group code. The sheet confirms what that means: A group code creates one appointment per client. Each client's time, claim and reminder is their own.
Set Location, Date & Time and Clinician. These apply to every child — the sheet labels the time Applies to all N clients.
Click Schedule.

Booking is all or nothing. If any child's appointment cannot be created, Alpaca rolls the others back rather than leaving you with half a group.
Note:The per-client Authorized hours panel (97158) gives each child their own reading, because each child draws against their own authorization. Per-client validation is summarised — 3 of 4 clients clear — only what needs a look is listed — so only what needs a decision is on screen.
Heads up:Group sessions cannot be booked as a recurring series, and Session type is fixed once the appointment is booked. Book each occurrence separately.
Give one child a different time
Children do not always arrive and leave together. Click Give clients different times (For a late arrival or an early pickup), select the child's row in the Individual times panel, then either type their start and end times or use the adjustment buttons: −15m, −30m and −1h join that long after the group starts; Ends 30m early leaves 30m before the group ends; +30m stays 30m after. Reset all to shared returns every child to the Shared range.
Each row shows how that child differs — Joins 1h late, Leaves 30m early, or Same as group — alongside their own duration. A staggered child's units are calculated from their own time, not the group's.
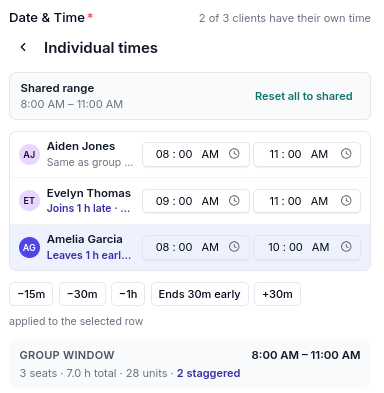
Heads up:Every child must be in the room with the others at some point — Alpaca requires one instant that all seats share. Two children whose times do not overlap at all are two separate sessions, not a group, and the booking is refused.
Find the group on your schedule
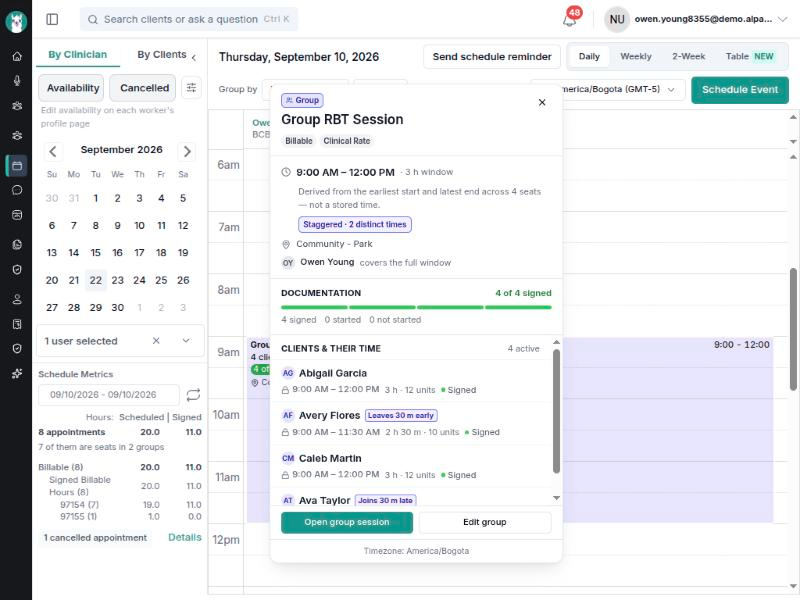
A group appears as one block in the clinician's column rather than a stack of overlapping appointments. The block shows the session type, how many clients are in it, and how far the documentation has got — 2 of 4 signed, or Not started.

Clicking the block opens the group panel: the window (with a Staggered badge when children differ), the clinician and whether they cover the full window, Documentation counts, and Clients & their time — one row per child with their own times, duration, units and note status. The list shows four children, then collapses the rest behind +N more.
A child's note status reads Signed, Unconverted or Not Started — the same words the single-appointment view uses.
Note:If cancellations leave a single active seat, the panel warns Group of 1. A group code bills as a group service, so a one-child booking is a claim risk — add a client back, or rebook that seat as a single-client session.
Start the session
From the group panel, click Open group session.
Alpaca opens the group console with one tab per client, alphabetical by name. For each client, the Start of Session Information dialog asks for Recent Events or Changes and Initial Observations. Enter at least 3 words in each field, then click Start Session.
Fill in recent events and initial observations for each client.

Tip:These notes feed the AI-generated session note, so be specific — the more detail you give, the better the note.
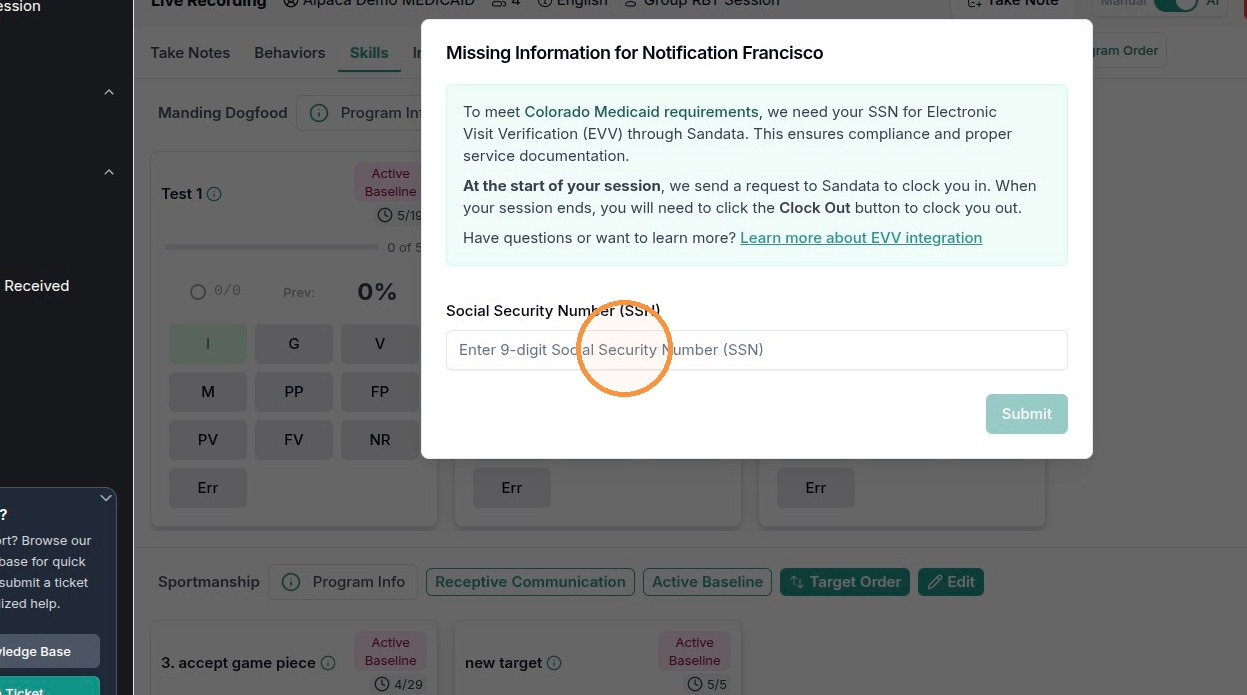
If a client's payer requires Electronic Visit Verification (e.g. Colorado Medicaid via Sandata), a Missing Information dialog asks for that client's 9-digit Social Security Number. Enter it and click Submit. Alpaca clocks you in with Sandata; a green “Live EVV Sandata Session started…” banner confirms it.
Enter the 9-digit SSN when a Medicaid/EVV client requires it.
Record data during the session
Use the client tabs at the top to switch between clients — you document each one individually. Nothing you have entered is lost when you switch, and a recording in progress keeps running. Each tab carries that child's own time range plus their offset badge if they are staggered, and marks itself when that child has updates you have not seen.
On a large group the tab strip scrolls, and any children past the end sit behind a +N chip — click it to jump straight to one of them.
Switch clients with the top tabs; record behavior data under Behaviors.

Within each client, use Take Notes to jot quick notes and highlight key moments as the session runs.
Take Notes: quick notes and key-moment highlights.
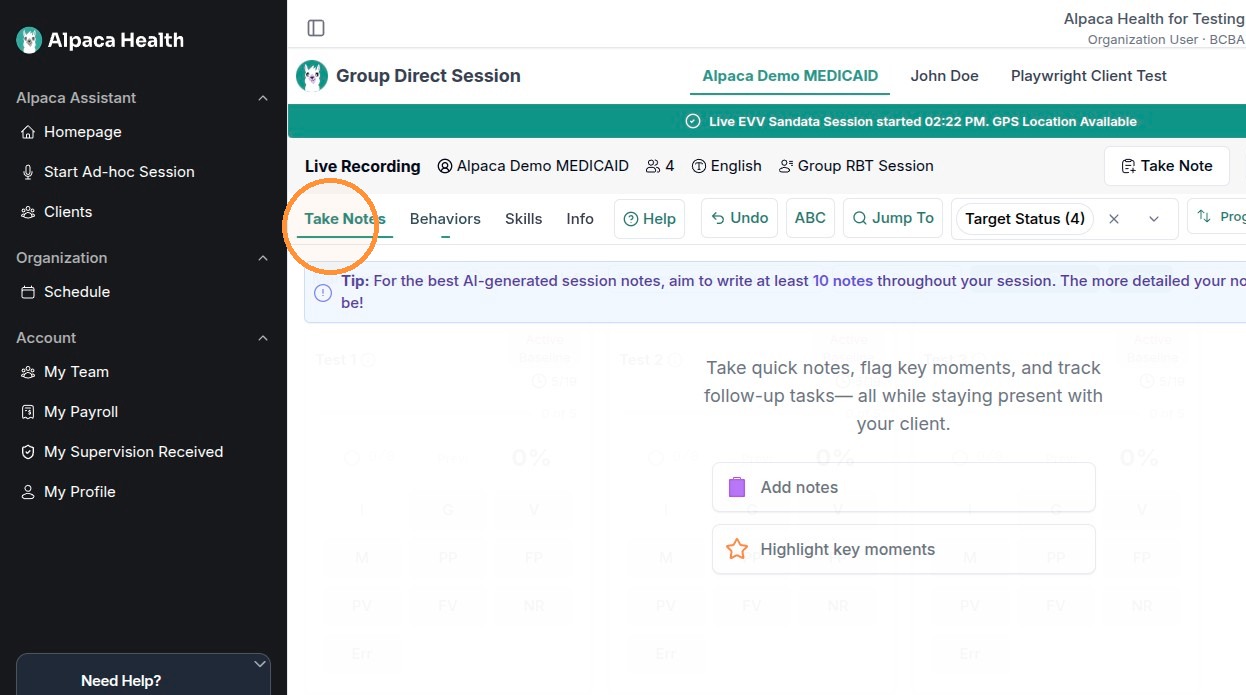
Tip:Aim for at least 10 notes across the session for the best AI-generated summary.
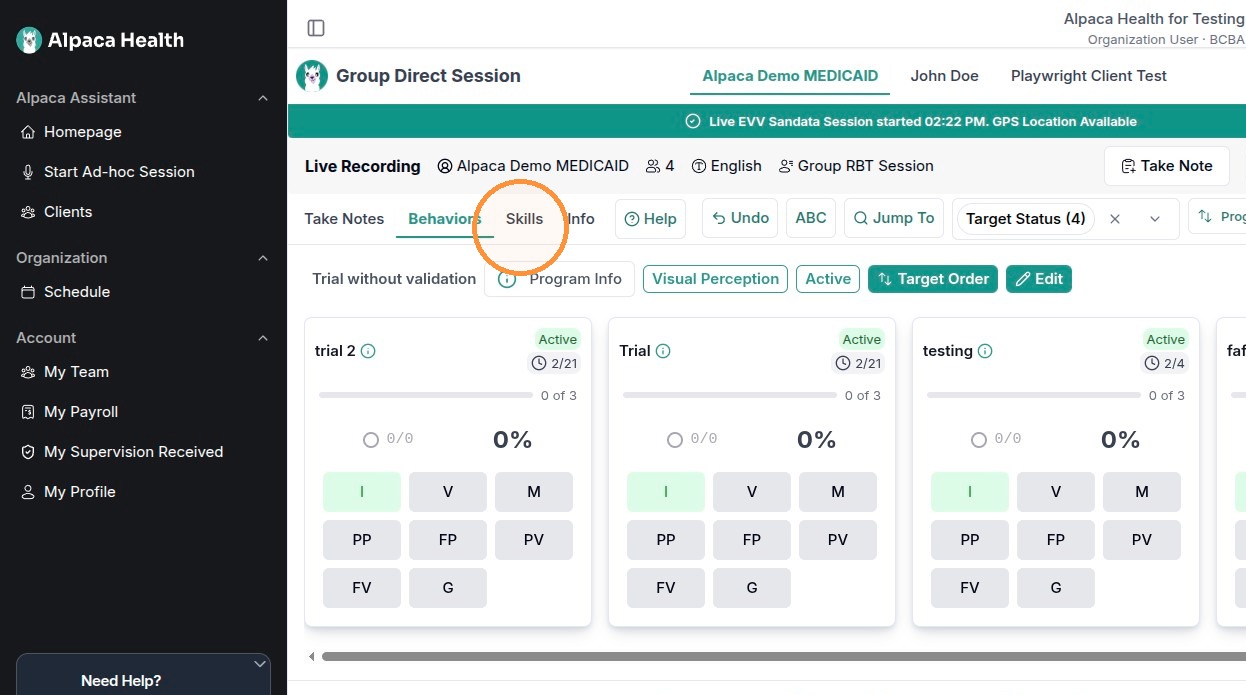
Use the Behaviors and Skills tabs to record data on each target — tap the trial buttons (I, G, V, M, …) to log responses per program target. The Info tab shows program details.
Record skill-acquisition trials under Skills.
End and review the session
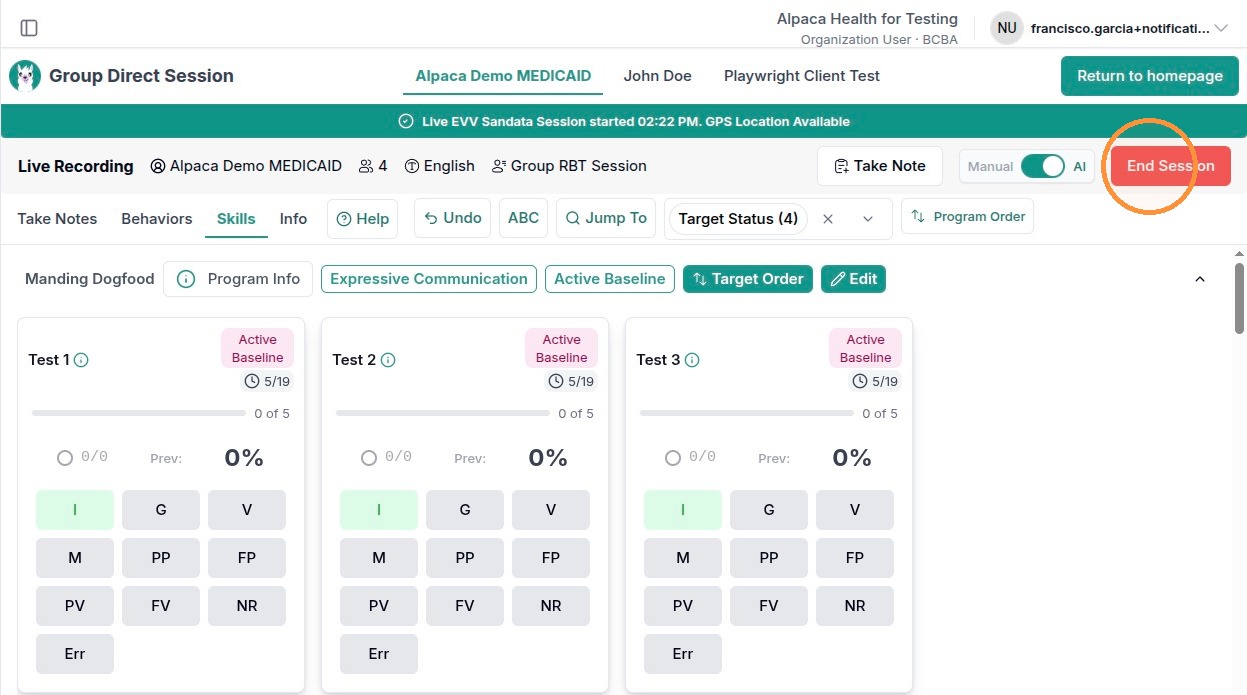
Ending is per child. On a child's tab, click End Session (End Recording if you are recording audio).
Click End Session when that child is finished.
The dialog names the session in bold under the title — the client, the date and the time range, for example Ava Taylor · Saturday, September 5 · 07:00 AM – 09:30 AM PDT. Read that line before you confirm. Every tab in a group console shows an identical dialog, and that heading is the only thing that tells you which child you are finalising.
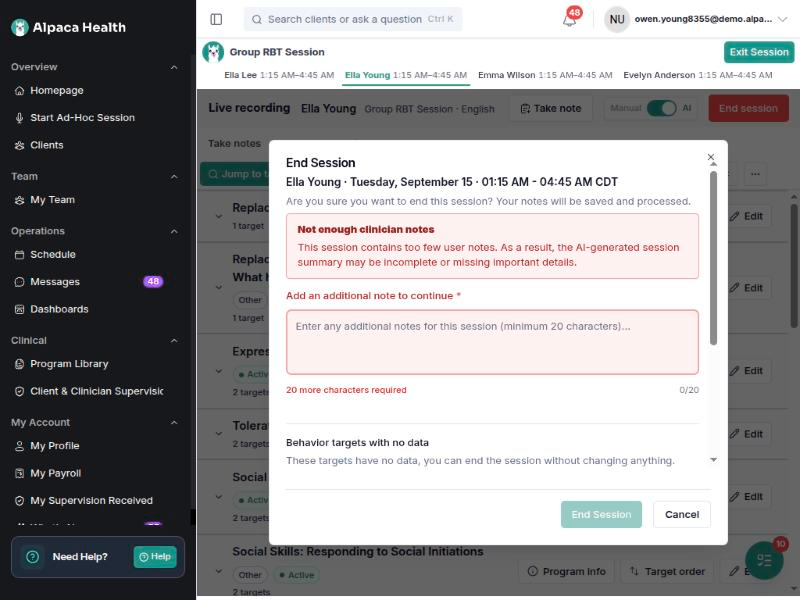
Add the required closing note (minimum 20 characters) and complete any Program Ratings. When the note is valid you'll see “Note is ready to be saved.” Click End Session to confirm.
Note:Alpaca may warn “Not enough clinician notes” if few notes were logged. The note field stays on screen while you type; the warning clears once you have written enough.
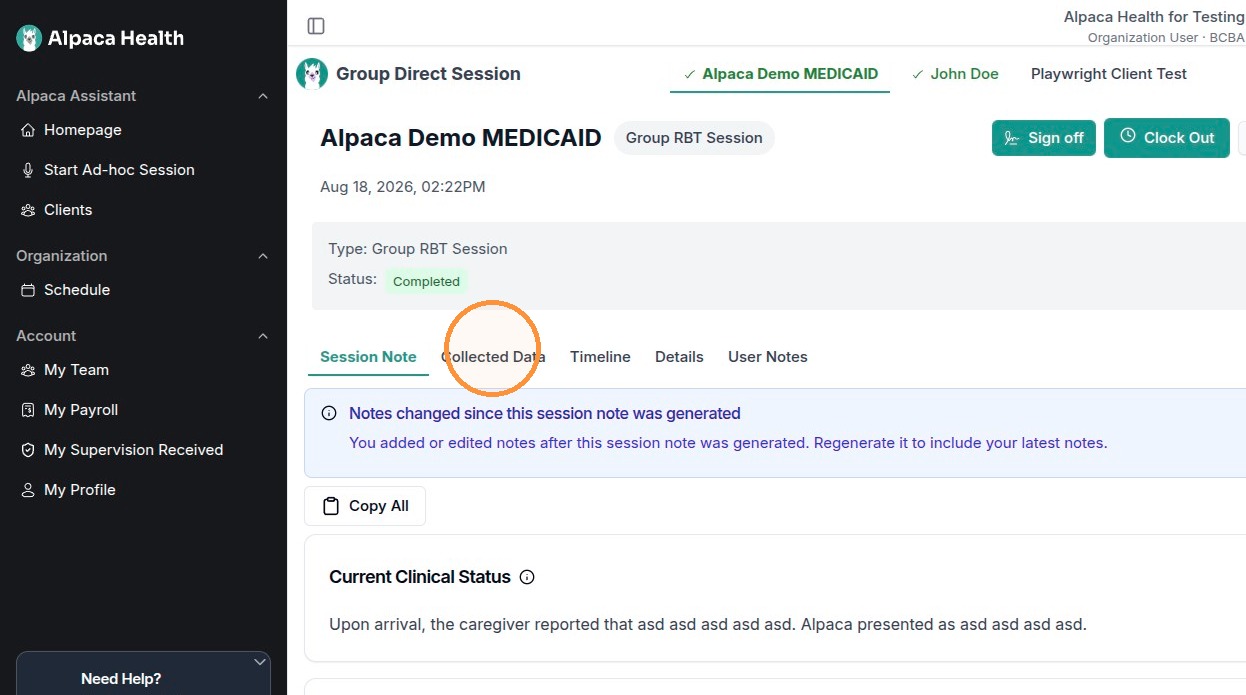
Each client's session now shows Status: Completed. Review the documentation with the tabs: Session Note (use Regenerate Session Note if you edited notes after it was generated), Collected Data, Timeline, Details, and User Notes.
Completed session: review the note and data; Sign off / Clock Out on the right.
The Timeline tab shows every data-collection event in order.

Change or cancel one child
Click Edit group in the panel to open Edit group session. It holds the per-child seat times, Add a client to this group (at capacity the picker reads Full — 10 clients), and Shared for every seat — Location and Clinician, written to every active seat. CPT code is read-only here: changing a group's billed code changes what every seat claims, so that is a rebooking rather than an edit.
Saving reports each seat separately. If one child's change fails — an overlapping appointment, say — the dialog stays open and names that child and the reason, so nothing fails silently.
To cancel one child without touching the rest, use Cancel appointment on their row in the panel. The cancelled seat stays visible, greyed, with Restore this seat.
Heads up:A child whose note is signed cannot be moved — their row reads Signed — locked. While any seat is signed, Location and Clinician are locked for the whole group too: changing them would rewrite a signed claim, and applying them only to the unsigned seats would put one group in two places. Void the signature on the note first.
From the completed view, Clock Out to close the Sandata/EVV clock for Medicaid clients, and Sign off on each client's note to finalize it. Signing off is also where you flag co-treatment — see the next section.
Co-treatment
Co-treatment is when ABA is delivered at the same time as another discipline — Occupational Therapy (OT) or Speech-Language Pathology (SLP) — but documented as a separate, distinct service. When the claim is generated, Alpaca adds the XP modifier (*Separate Practitioner*) to the ABA claim lines for that session.
Two things must both be true for co-treatment to bill correctly: (1) the client's payer must have co-treatment enabled under Insurance Providers, and (2) the clinician must flag the session as co-treatment at sign-off. This section covers both.
Step 1 · Enable co-treatment on the payer (admin)
Please contact alpaca support to enable co-treatment for an specific payer.
Step 2 · Apply the co-treatment at sign-off
This is done by the clinician on the client's Session Notes tab, on the note being signed off.
Open the client (Clients → the client's name), then click the Session Notes tab.
Open the client and go to the Session Notes tab.
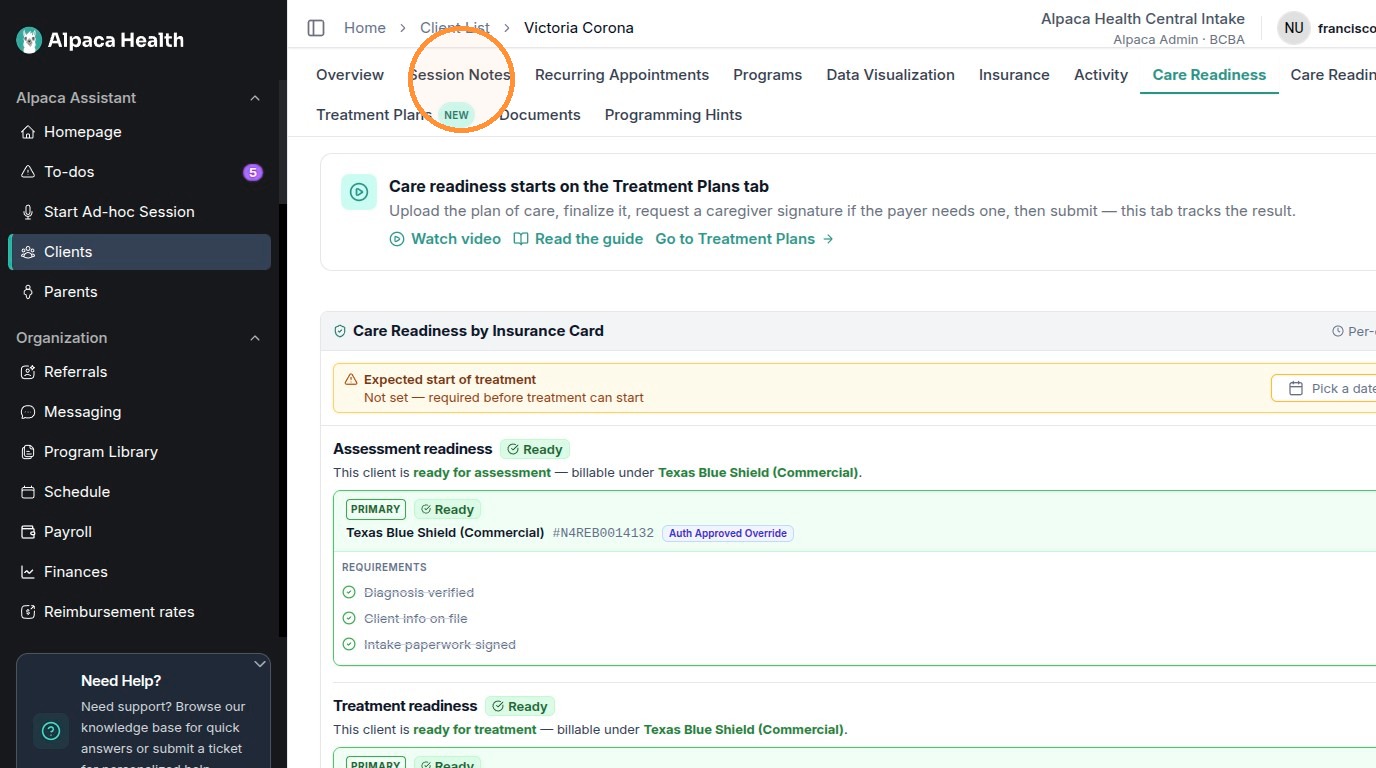
In the notes list, select the completed session you want to bill, then click Sign off in the top-right.
Select the completed note and click Sign off.

Note:You can only sign off a completed note. A session still in progress shows End Session and Process Note instead — finish it first.
In the sign-off panel, verify the session Date, Units, and Start/End times (click Verify Time if prompted), then scroll to the Co-treatment box and check Co-treatment with SLP or OT. The box explains it adds the XP (Separate Practitioner) modifier to this session's claim.
Check “Co-treatment with SLP or OT” in the sign-off panel.

Heads up:This option only works for payers with co-treatment enabled. A yellow note in the box names the eligible payer (here, Texas Blue Shield (Commercial)) — at this time, co-treatment session notes are only available with Texas Blue Shield.
Select the discipline the ABA session was co-treated with.
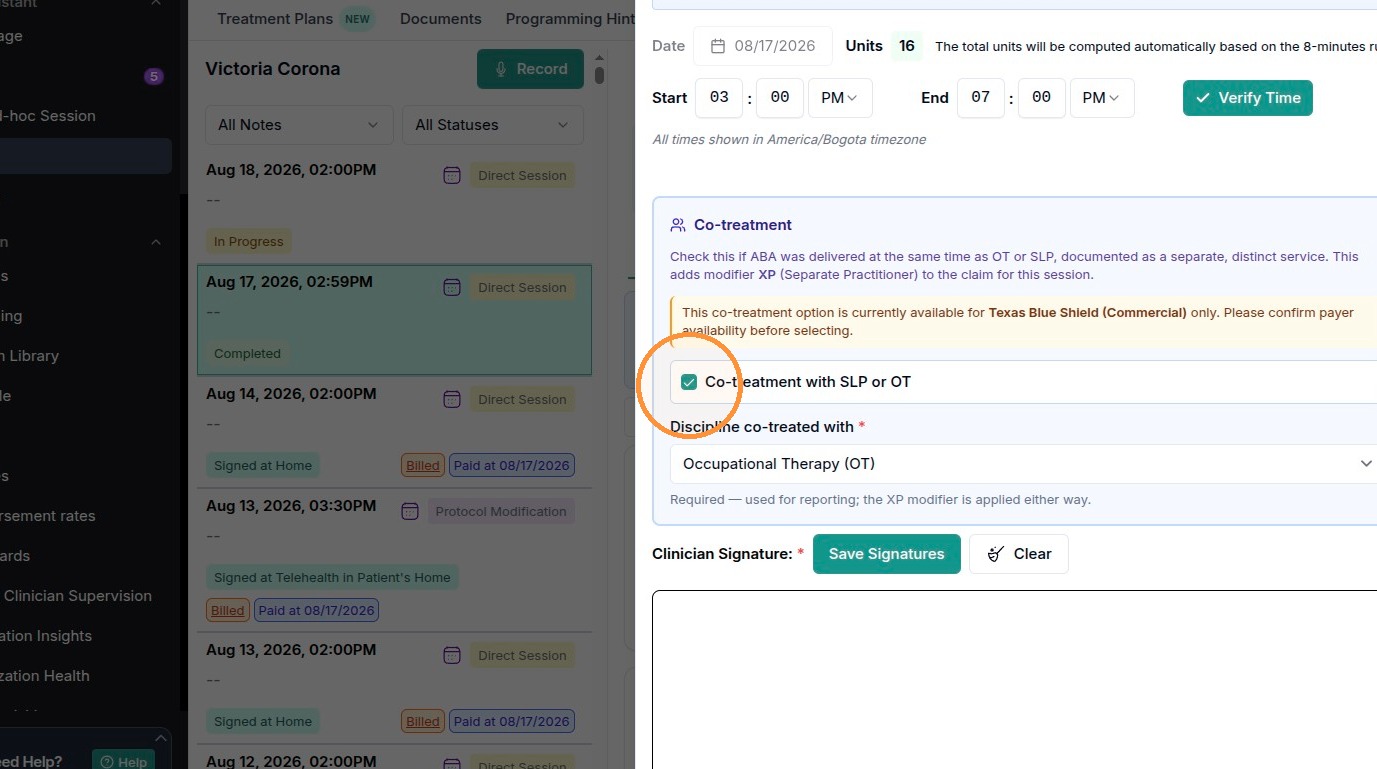
Note:This field is required for reporting, but the XP modifier is applied either way once the box is checked.
Add the clinician signature and finish the sign-off. The claim generated for this session will now carry the XP modifier.