Updating Your Child's Information and Therapy Preferences
Last updated: August 21, 2026
A step-by-step guide for parents using the Alpaca Health parent portal: set the days and times you're available for therapy, keep your child's doctors and therapists on file, upload important medical documents, and record diagnoses and medications — all from one place.
Overview
The Alpaca Health parent portal is where you manage your child's care information. From the left-hand menu you can set your therapy availability, list your child's service providers, upload documents your care team needs, and record medical history. This guide walks through each of those tasks in order. You can do them in any order and come back any time — nothing here has to be finished in one sitting.
NOTE Everything in this guide lives in the parent portal, not the clinician app. If a screen looks different from what's shown here, make sure you're signed in to the parent portal with your parent account.
1. Open the portal and choose your child
Step 1. Sign in to the Alpaca Health parent portal. You'll land on the Overview page, which shows a summary of your child's care journey — insurance and costs, any action items, and matched providers.
Step 2. If you have more than one child, pick the right one from the tabs across the top. Each child appears as a tab (with their initials and name) along the top of the page. The tab you're currently viewing is highlighted. Everything you change applies to the child whose tab is selected, so confirm the correct name is showing before you edit anything.
The parent portal. Your children are the tabs across the top; the left menu is grouped into Patient Progress, Parent Tools, and Patient information. Start from Overview.

The left menu is your map for everything in this guide. Under the Patient information heading near the bottom you'll find the four pages this guide covers:
Patient Information — your child's doctors and therapists.
Medical History — diagnoses and medications.
Medical Documents — files you upload for your care team.
Therapy Preferences — the days and times you're available.
WARNING The section heading “Patient information” (lowercase) and the menu item “Patient Information” (capitalized) sit right next to each other. The one you click is the menu item — the section heading is just a label for the group.
2. Set your therapy preferences (availability)
Therapy Preferences is where you tell the clinic which days and times your child is available for appointments. Keeping this current helps the scheduling team book sessions that actually work for your family.
Step 1. In the left menu, under Patient information, click Therapy Preferences. It's the last item in that group.
Step 2. Decide whether you have set availability or are open to any time. At the top of the page is an Open Availability toggle with the note “Turn this on if you are available at any time. You won't need to set specific days or times.”
The Therapy Preferences page. The Open Availability toggle is at the top; the day-by-day schedule is below it.
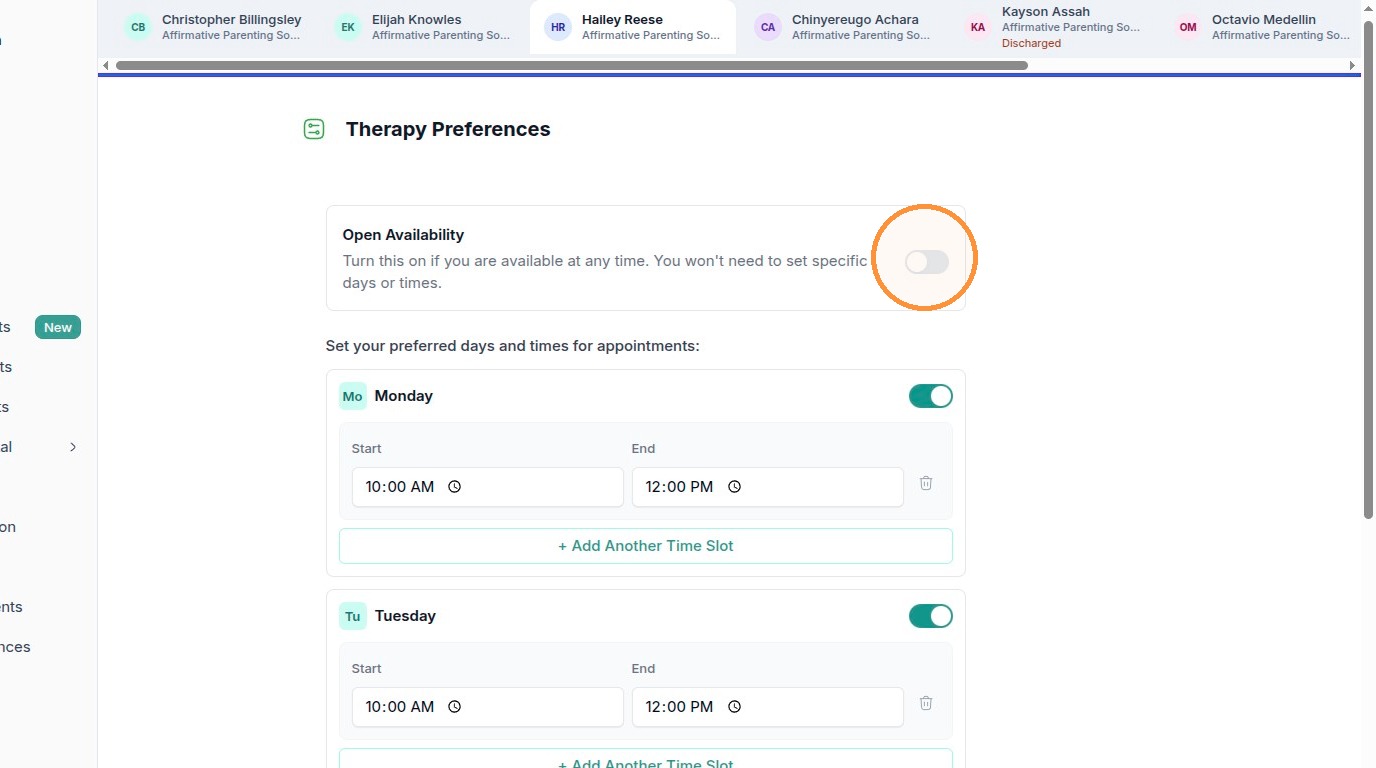
TIP Turn Open Availability ON only if your child is genuinely free at any time. When it's on, the specific day and time settings below aren't needed. If your availability is limited, leave it OFF and set your days and times below.
Step 3. For each day your child is available, make sure that day's toggle is switched ON. Every day of the week has its own on/off toggle. A day toggled ON is green and shows time fields; a day toggled OFF is grey and hides its times, meaning you're not available that day.
Each day has its own toggle. Here Monday has been switched OFF (grey), so its time fields disappear; Tuesday and Wednesday stay ON (green).
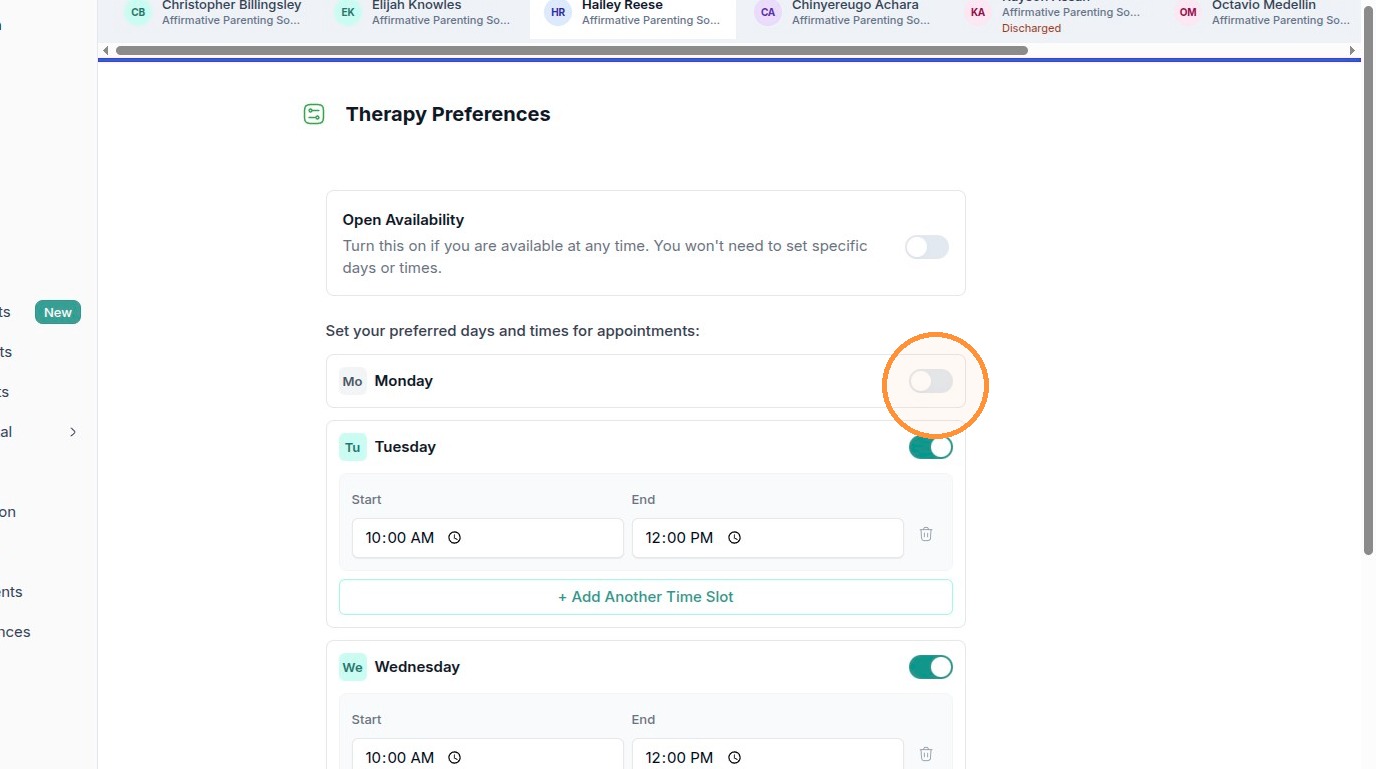
Step 4. Set the Start and End time for each available day. Click the Start field and type or pick a time, then click the End field and set the time the availability window closes. The time boxes are split into hour, minute, and AM/PM — click each part to change it. A day isn't complete until both Start and End are filled in (an unset time shows as “--:-- --”).
Setting times on a day: fill in the Start time, then click the End field and set the closing time. Both must be filled for the window to count.
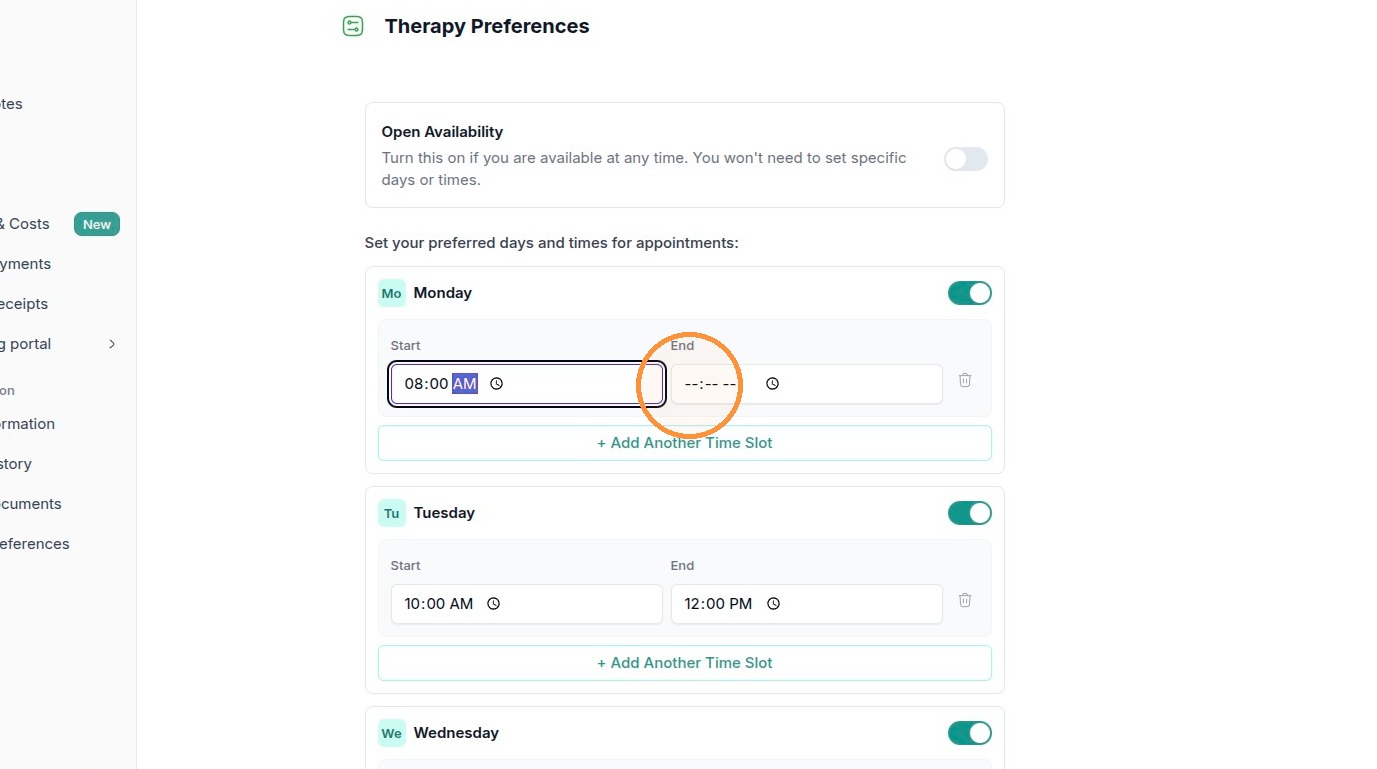
Step 5. Add a second window on any day with “+ Add Another Time Slot.” Use this when you're available in, say, the morning and again in the evening but not in between. The trash icon next to a time slot removes it.
3. Add your child's service providers
The Patient Information page keeps a list of everyone involved in your child's care — pediatricians, therapists, and clinics. A complete list helps your whole care team stay connected and share updates.
Step 1. In the left menu, under Patient information, click Patient Information.
The Patient Information page. It has two separate sections: “Who are your child's pediatricians?” at the top and “Who are your other service providers?” below.

NOTE This page has two independent sections. Use the top section (“Who are your child's pediatricians?”) to add doctors, and the bottom section (“Who are your other service providers?”) for therapists, clinics, and everyone else. They're added in slightly different ways, described below.
Add a pediatrician
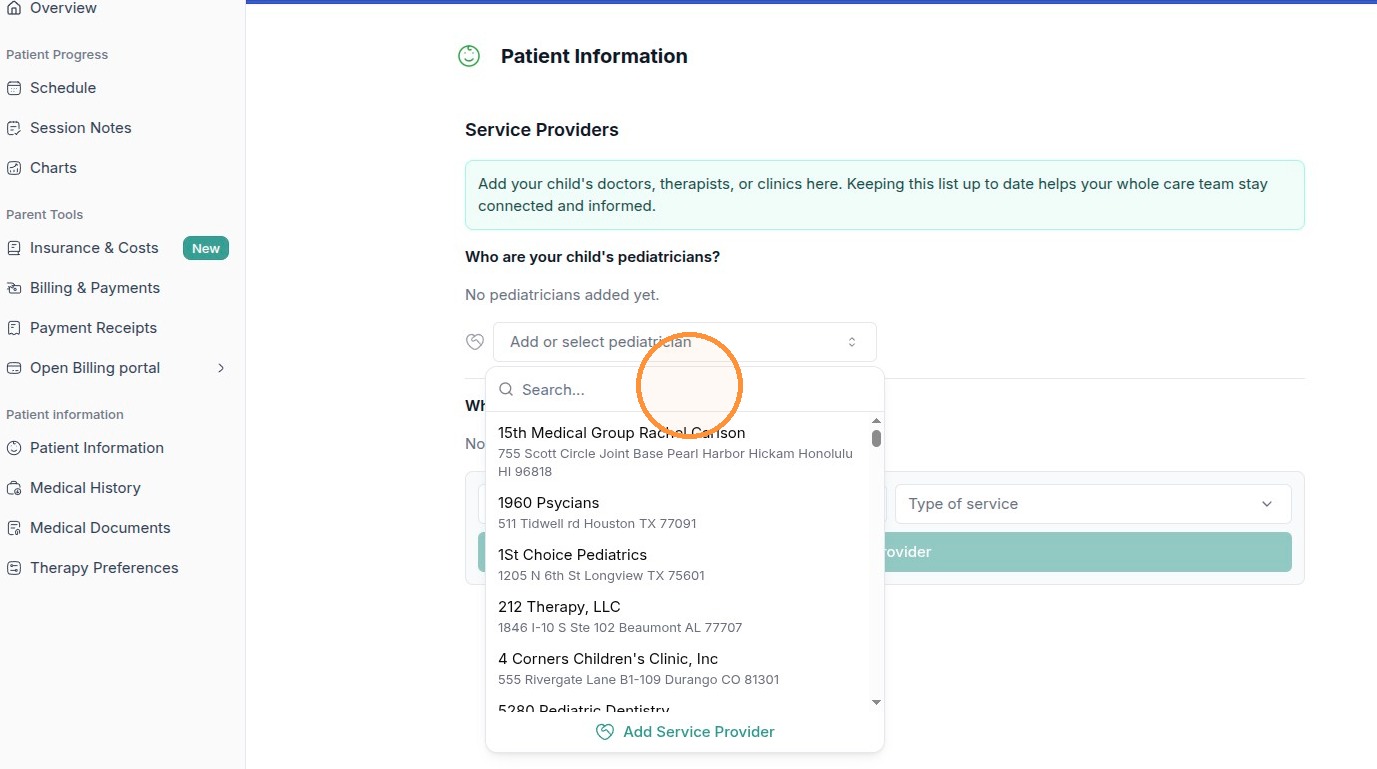
Step 1. Click the “Add or select pediatrician” box in the pediatricians section. A searchable list of providers opens.
Click the “Add or select pediatrician” box to open the provider picker.
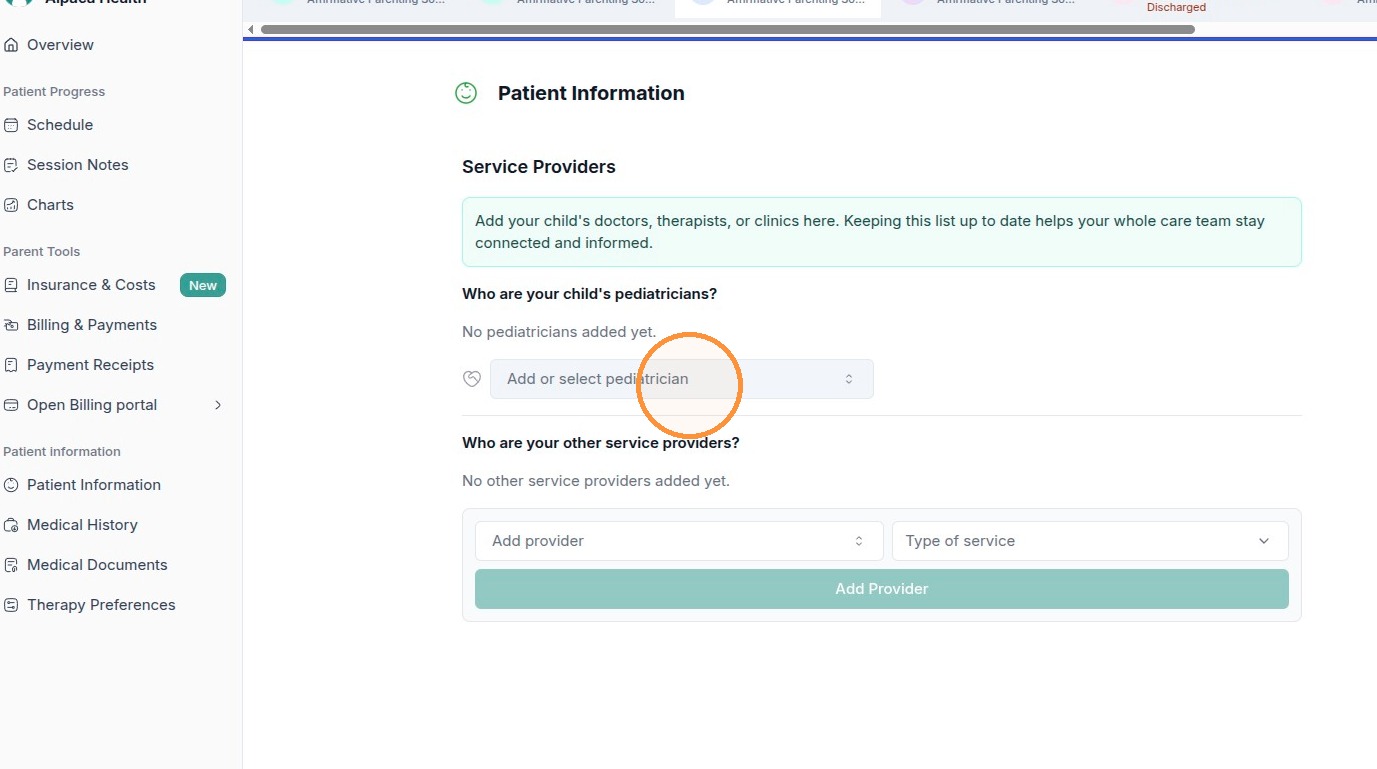
Step 2. Start typing the practice name in the Search field to narrow the list. The list filters as you type. Click the matching practice to add it — that's all it takes, and you'll briefly see an “Adding pediatrician…” message before the provider's card appears.
The provider picker with a Search box at the top. Type to filter, then click a result to add it.
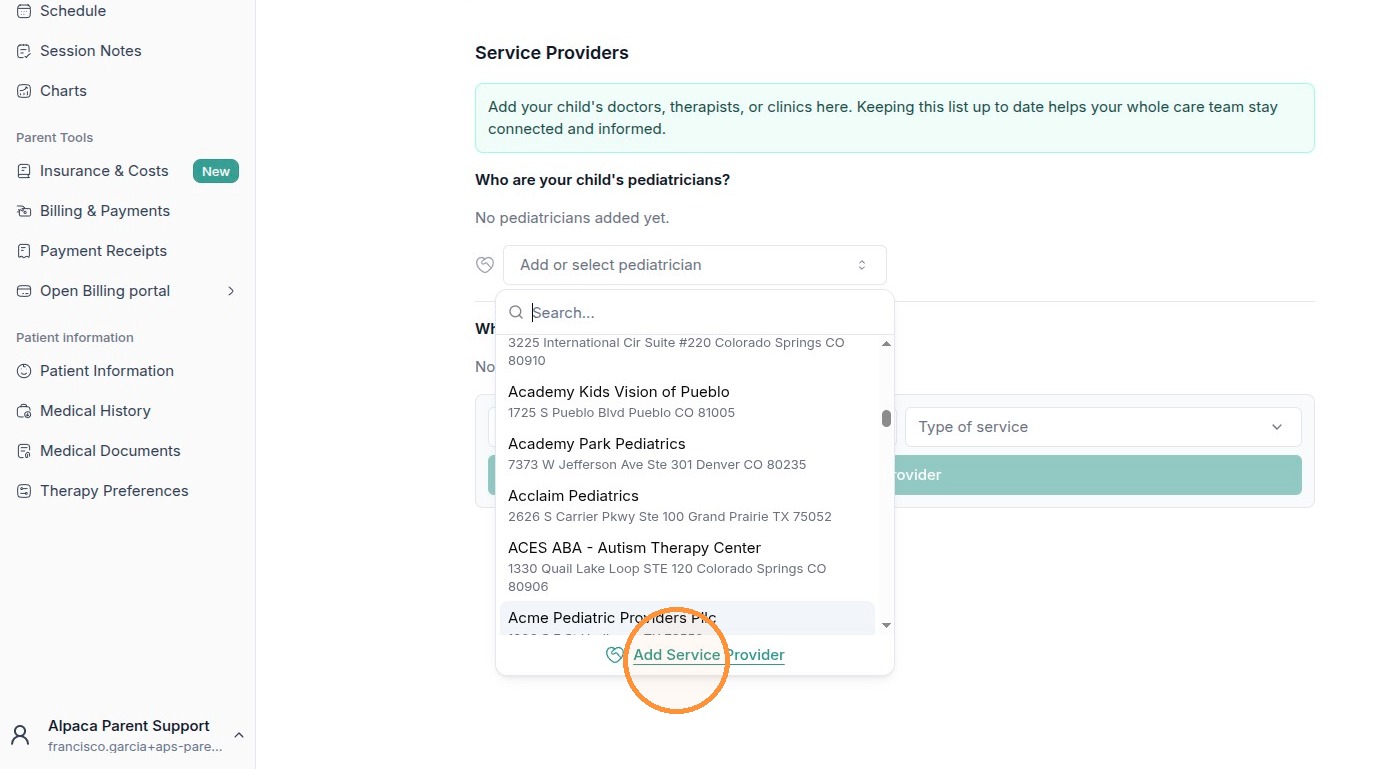
Step 3. Can't find the provider? Click “Add Service Provider” at the bottom of the list. This opens a form where you enter the provider yourself.
If the practice isn't listed, use “Add Service Provider” at the bottom of the open list to create it manually.
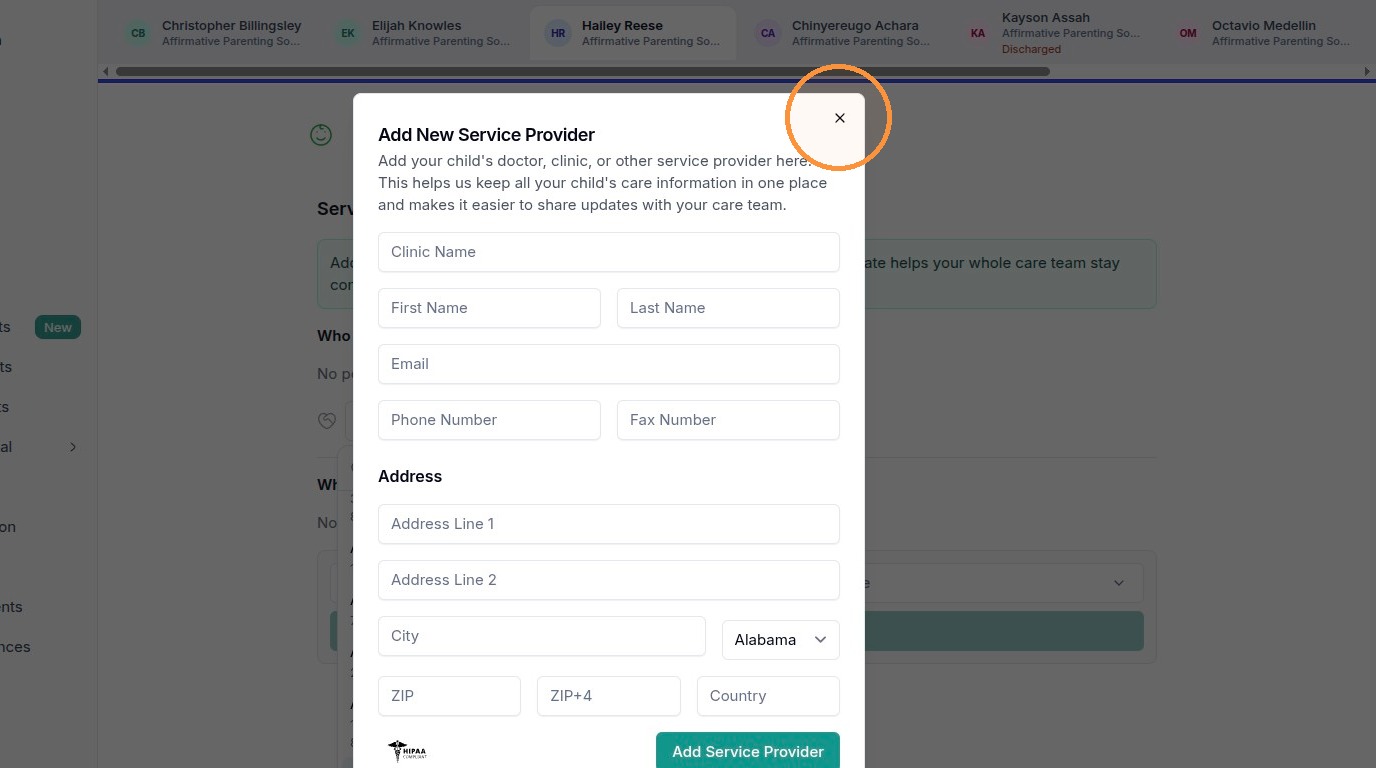
Step 4. Fill in the “Add New Service Provider” form, then click Add Service Provider. Enter the clinic name, the provider's name, and contact and address details. The State field starts on “Alabama,” so remember to change it to the correct state. Click the green Add Service Provider button at the bottom to save. (Use the X in the top-right corner to close the form without saving.)
The “Add New Service Provider” form. Complete the fields, change the State if needed, and click Add Service Provider to save.
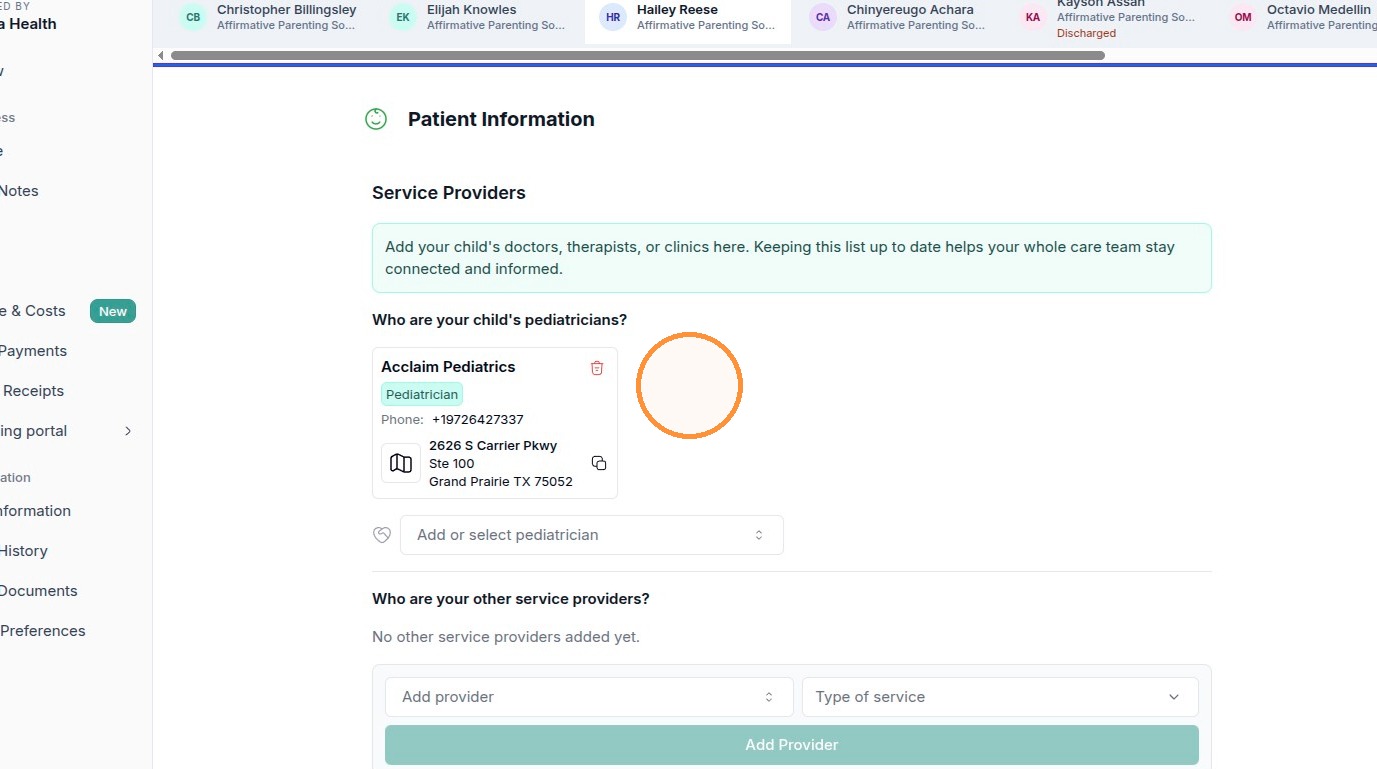
Once added, each provider shows as a card with their type, phone, and address. You can repeat these steps to add more pediatricians, or remove one with the trash icon on its card.
A saved pediatrician card showing the provider's type, phone, and address. Use the trash icon to remove it.
Add another service provider (therapist, clinic, and more)
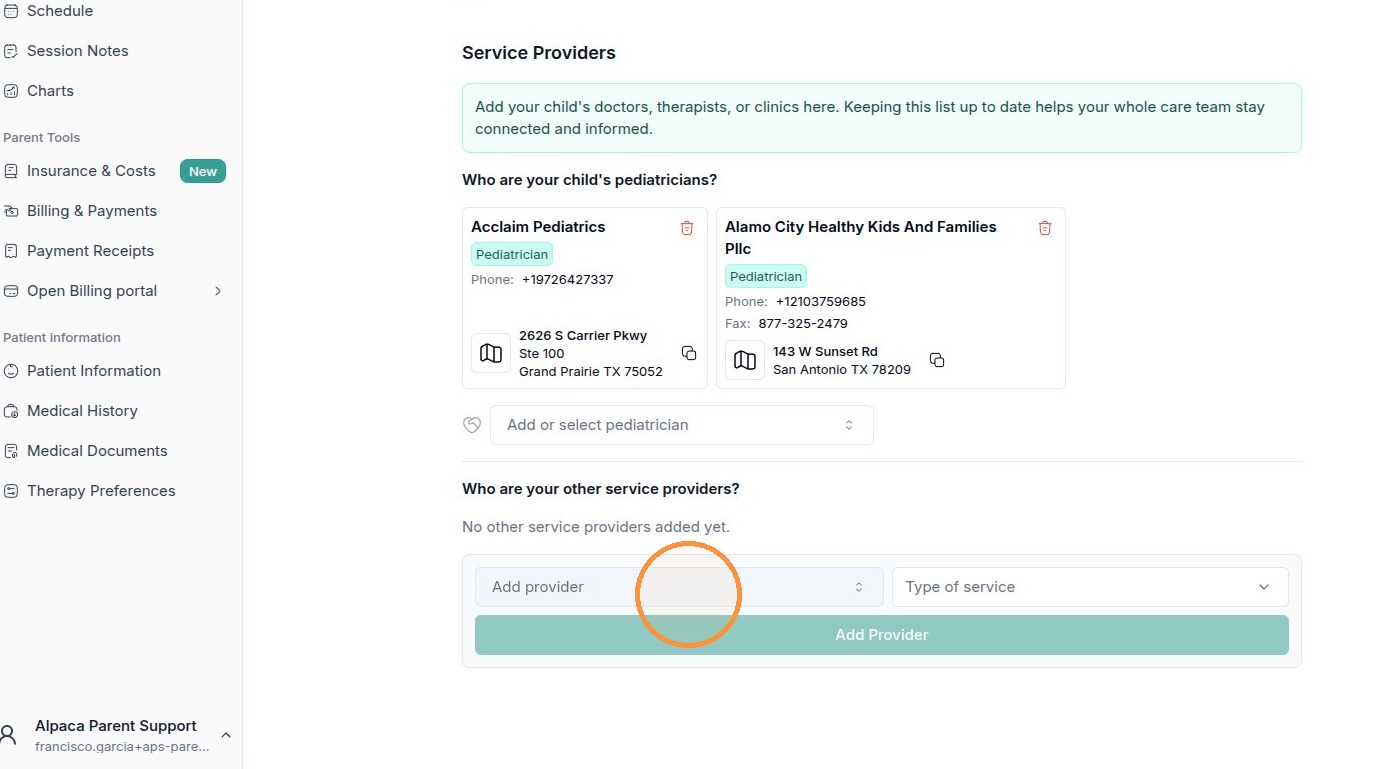
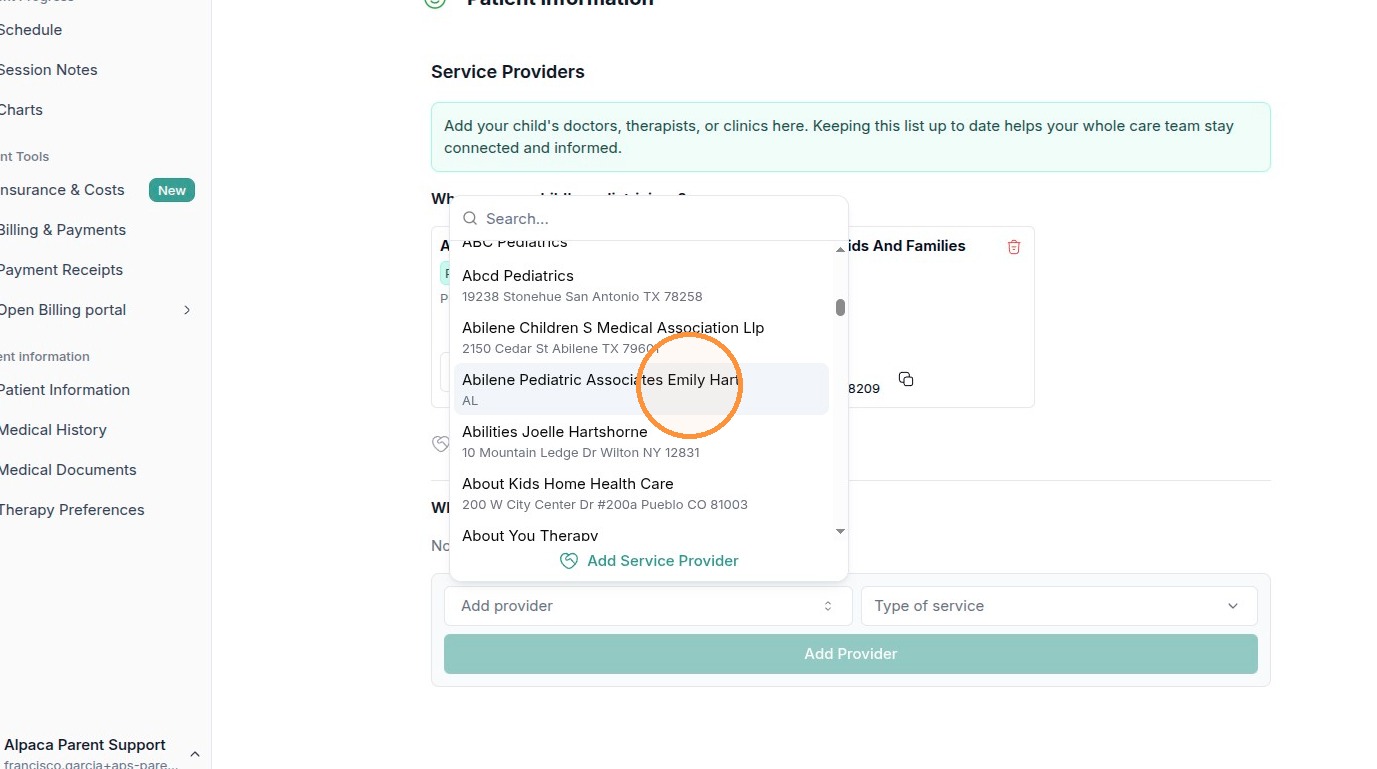
Step 1. In the lower section, click the “Add provider” box and pick the provider. This works just like the pediatrician search — type to filter, then click the provider. As with pediatricians, if they aren't listed you can use “Add Service Provider” at the bottom of the list to enter them yourself.
In “Who are your other service providers?”, click the “Add provider” box to search for and select a provider.
Type in the search box and click the matching provider to select it.
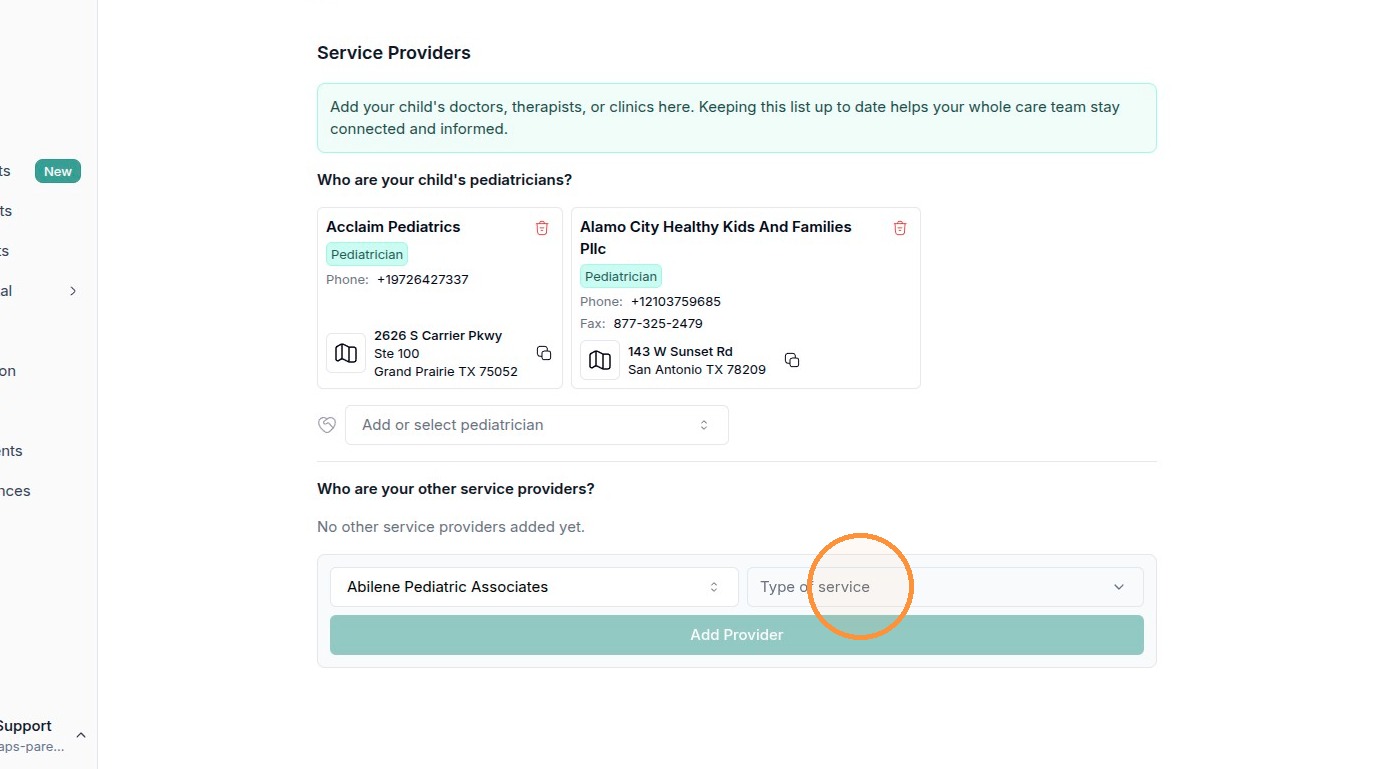
Step 2. Choose the “Type of service” this provider gives. Click the Type of service box to open the list, then check one or more roles — for example, Occupational Therapist, Physical Therapist, or Home Health Agency.
Click the “Type of service” box to choose what kind of provider this is.
The Type of service list. Check the role that applies — here, Occupational Therapist.

NOTE Type of service lets you check more than one role. Each choice you check appears as a green tag, and you can remove one with the “x” on the tag. Click Close (or Clear to start over) when you're done choosing.
Step 3. Click the green Add Provider button to save the provider. The button stays greyed out until you've both selected a provider and chosen at least one type of service — once both are set, it turns green.
With a provider and a service type selected, the Add Provider button turns green. Click it to save.

The saved provider appears as a card under “Who are your other service providers?”, tagged with its service type.
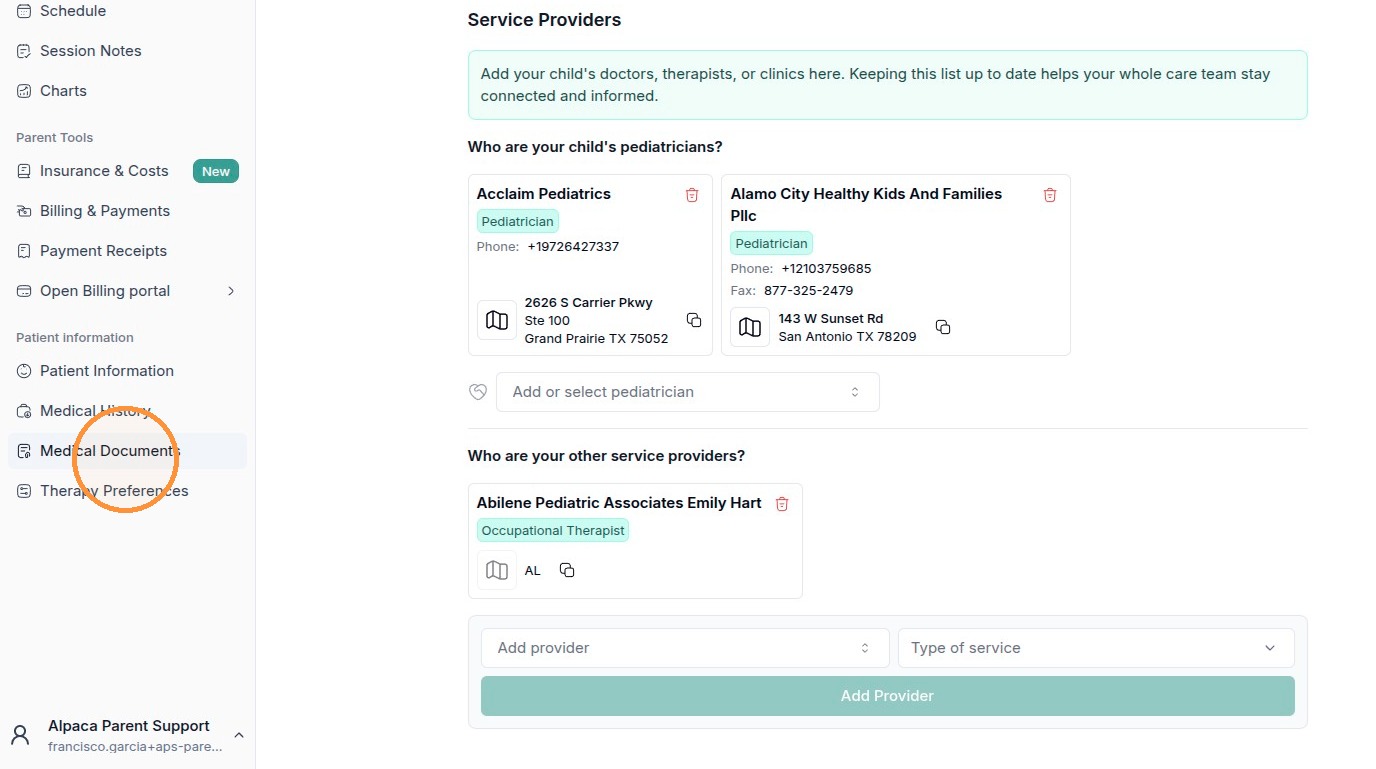
WARNING There are several similarly named buttons on this page — don't mix them up. “Add or select pediatrician” and “Add provider” are the boxes you click to search. “Add Service Provider” is only for entering a provider that isn't in the list. “Add Provider” (the green button) is the one that actually saves a provider you've selected in the lower section.
4. Upload and view medical documents
Medical Documents is where you keep files your care team needs — insurance cards, an IEP (Individualized Education Program), a diagnosis letter, and anything else relevant to your child's treatment.
Step 1. In the left menu, under Patient information, click Medical Documents. The page has two parts: Uploads (files you've already added) and Required Documents (a checklist of what the clinic still needs).
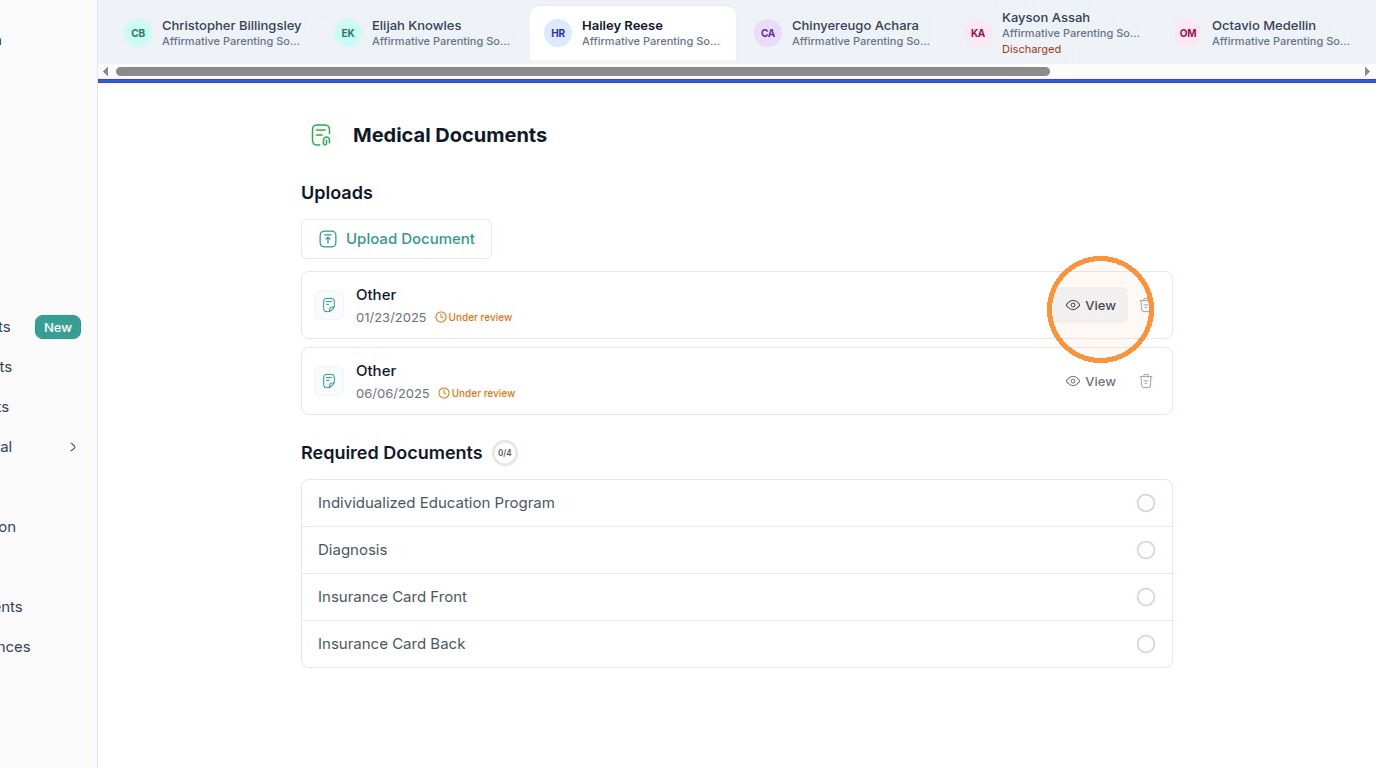
The Medical Documents page. Files you've uploaded are listed under Uploads; the Required Documents checklist shows what's still outstanding (here, 0 of 4).

The Required Documents checklist tracks four items the clinic looks for: Individualized Education Program, Diagnosis, Insurance Card Front, and Insurance Card Back. The counter (for example “0/4”) shows how many you've provided.
Step 2. To view a document you've already uploaded, click View on its row. Uploaded files show a status such as “Under review” along with the date added.
Click View (the eye icon) on a document's row to open it.
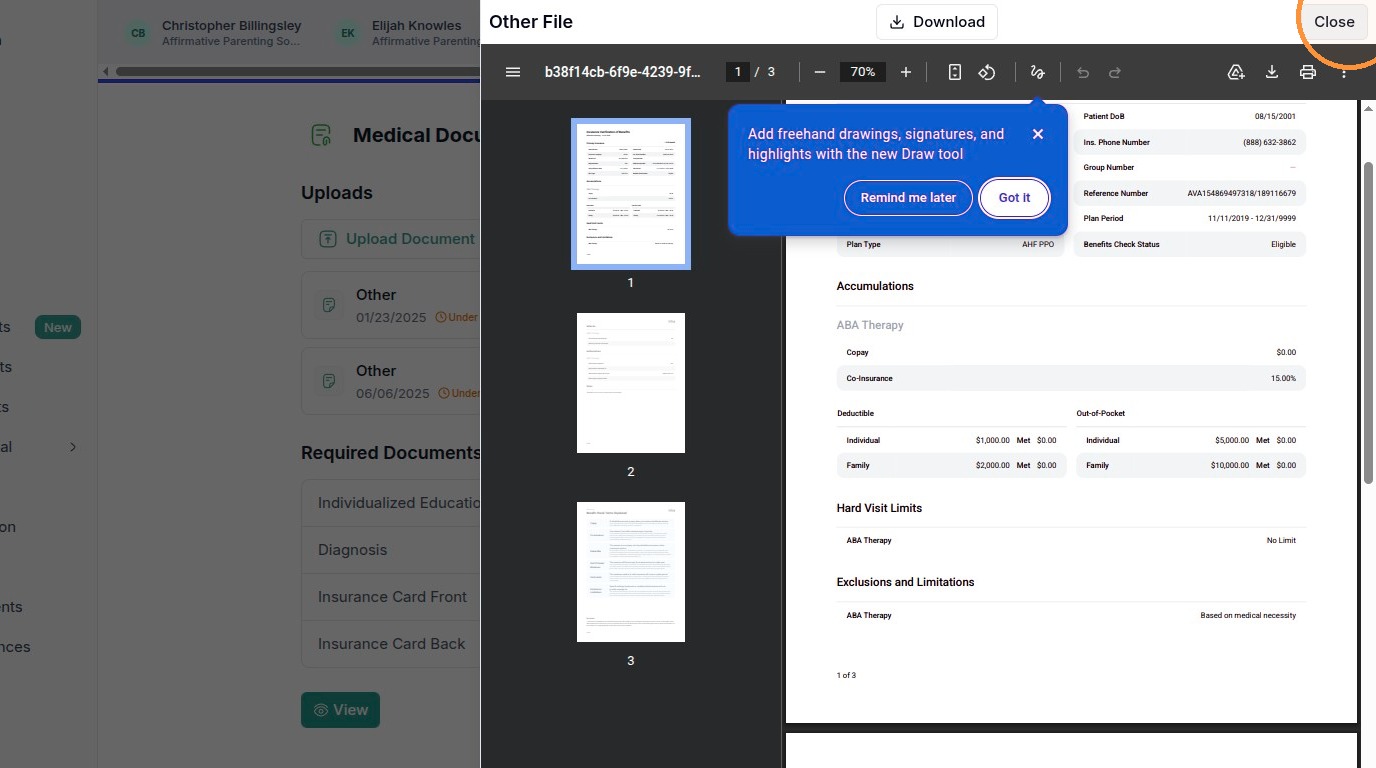
Step 3. Read the document in the viewer, then click Close in the top-right corner. The viewer opens on top of the page. You can page through a multi-page file and use Download if you need a copy. When you're finished, click Close in the top-right — use that button rather than your browser's back button so you return to the right place.
The document viewer. Page through or Download the file, then click Close (top-right) to return to the page.
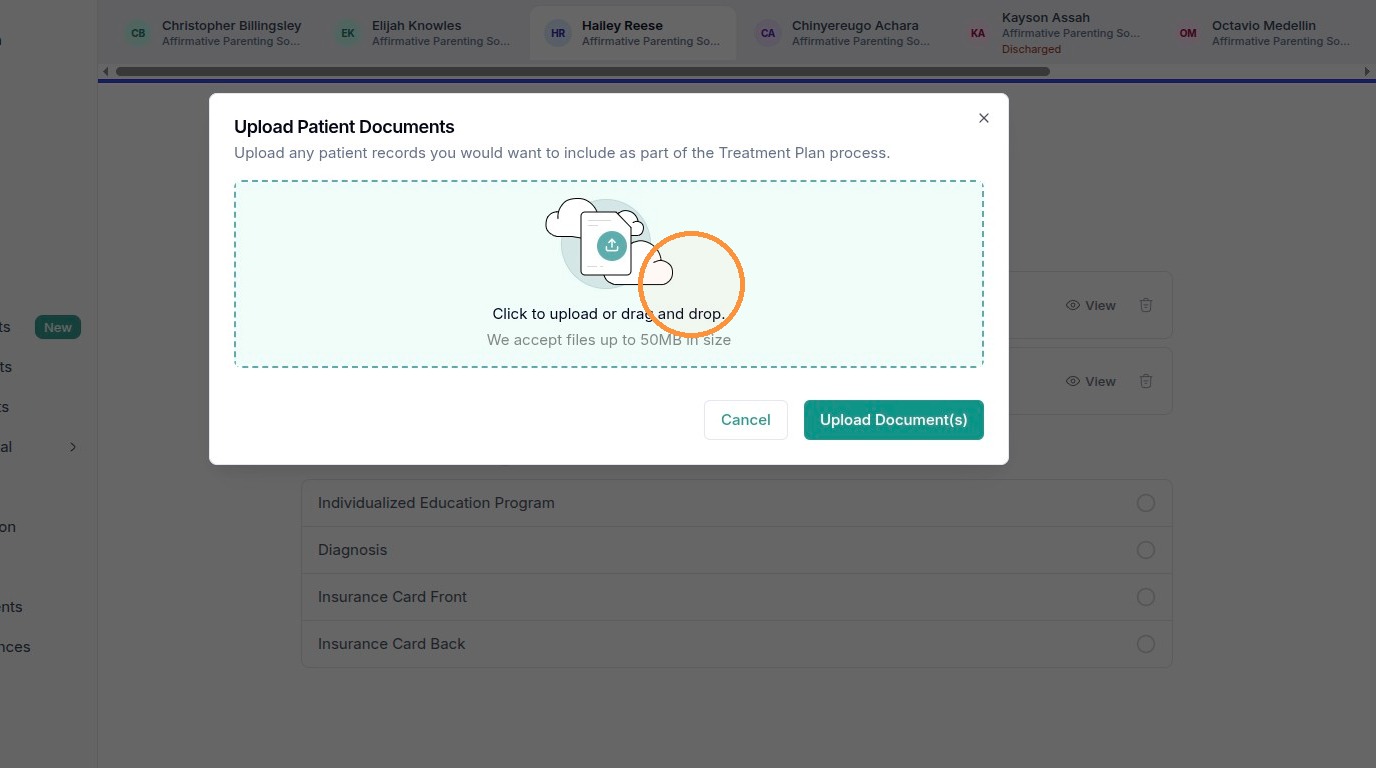
Step 4. To add a new file, click Upload Document. The green Upload Document button sits at the top of the Uploads section.
Step 5. Click the upload area to browse, or drag a file onto it, then click Upload Document(s). You can either click the dashed box to pick a file from your device or drag and drop a file onto it. Files can be up to 50MB each. Click Upload Document(s) to finish, or Cancel to back out.
The upload window. Click the dashed area to browse or drag a file onto it (up to 50MB), then click Upload Document(s).
5. Record medical history (diagnoses and medications)
Medical History keeps your child's diagnoses and current medications in one place, so your care team has an accurate picture of your child's needs.
Step 1. In the left menu, under Patient information, click Medical History.
The Medical History page. Patient Diagnoses appear at the top; the Medications section is below, where you add what your child is currently taking.
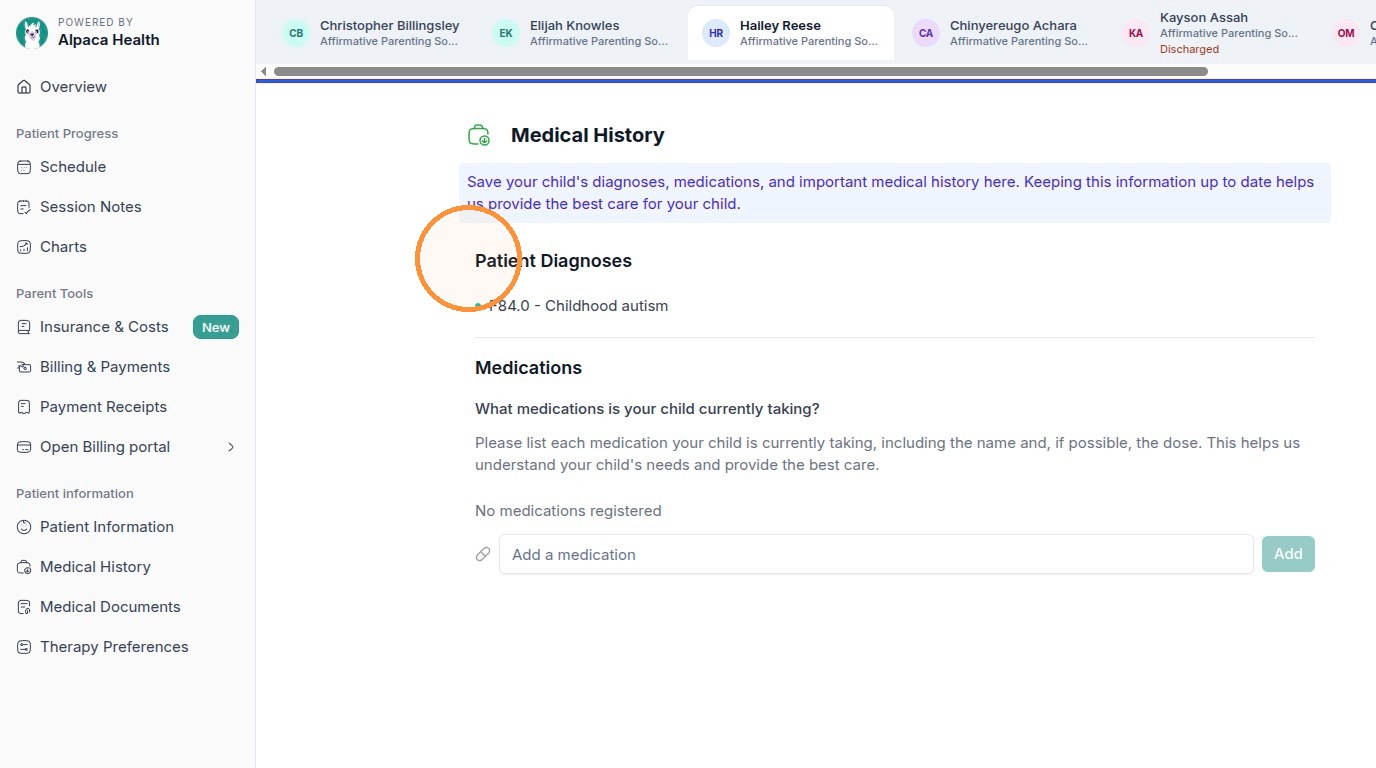
The Patient Diagnoses section lists diagnoses on file (for example, “F84.0 - Childhood autism”). These are maintained by your care team, so it's a read-only list here — if something is wrong or missing, let your clinician know.
Step 2. In the Medications section, click the “Add a medication” field and type the medication name. Type the name and, if you know it, the dose. This is a free-text box, so what you type is exactly what's saved — double-check the spelling before adding it.
Type the medication into the “Add a medication” field. The Add button stays greyed out until you've entered text, then turns green.

Step 3. Click Add to save the medication. Repeat for each medication your child is currently taking. The Add button only becomes active once there's text in the field.
TIP Keep this list current as medications change — it's one of the fastest ways to help your care team make safe, informed decisions.
Frequently asked questions
Q: What's the difference between Open Availability and setting specific days?
A: Open Availability tells the clinic your child can attend at any time, so you don't need to fill in days or times. If you turn it off, you set your availability day by day: switch on the days that work and give a Start and End time for each. Use whichever matches your real schedule — most families set specific days and times.
Q: There are two spots to add providers — which one do I use?
A: Use the top section, “Who are your child's pediatricians?”, for doctors, and the bottom section, “Who are your other service providers?”, for therapists, clinics, and everyone else. In the bottom section you also pick a Type of service (like Occupational Therapist) before saving with the green Add Provider button.
Q: The provider I need isn't in the list. What do I do?
A: Open the search list and click “Add Service Provider” at the very bottom. That opens a form where you can enter the clinic name, provider name, and contact and address details yourself. Remember the State field starts on “Alabama,” so change it to the correct state before saving.
Q: Why is the Add Provider button greyed out?
A: The green Add Provider button only turns on once you've both selected a provider and chosen at least one Type of service. Fill in both and it becomes clickable.
Q: What file types and sizes can I upload?
A: You can upload files up to 50MB each. Click the dashed upload area to browse your device, or drag and drop a file onto it, then click Upload Document(s). Newly uploaded files usually show an “Under review” status until your care team has looked at them.
Q: Can I add or change my child's diagnosis myself?
A: No — the Patient Diagnoses list is maintained by your care team and is read-only in the portal. You can add medications yourself, but if a diagnosis looks wrong or is missing, contact your clinician to update it.