Patient Information and Medical Information
Last updated: August 21, 2026
This guide shows parents how to keep their child's care details current in the Alpaca Health parent portal. You'll learn how to record your child's service providers (pediatricians, therapists, and clinics), track diagnoses and medications, and view or upload medical documents. Everything covered here lives in the left-hand menu under the “Patient information” heading.
Before you start
Log in to the Alpaca Health parent portal.
Make sure the correct child is selected. The child you're viewing is shown near the top of the page (for example, “Viewing Hailey”). If you care for more than one child, switch between them using the tabs across the top of the screen before you make any edits.
Finding the Patient information menu
Look at the menu along the left side of the screen. Below “Overview” and the “Patient Progress” and “Parent Tools” groups, you'll see a heading called “Patient information.” It has four links: Patient Information, Medical History, Medical Documents, and Therapy Preferences. This article covers the first three.
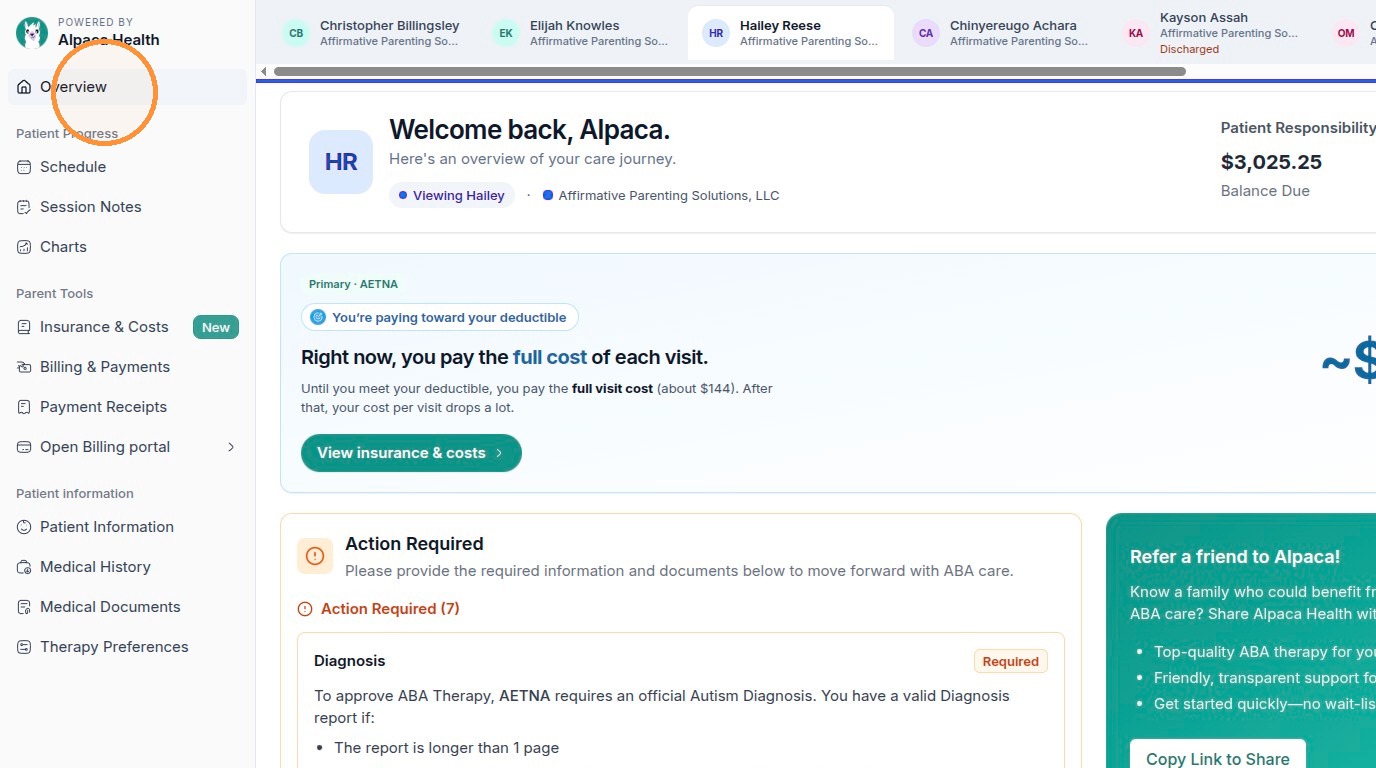
Part 1: Patient Information (service providers)
In the left menu, under “Patient information,” click “Patient Information.” This page is where you list everyone involved in your child's care — doctors, therapists, and clinics. Keeping it up to date helps your whole care team stay connected and informed. The page has two sections: “Who are your child's pediatricians?” and “Who are your other service providers?”
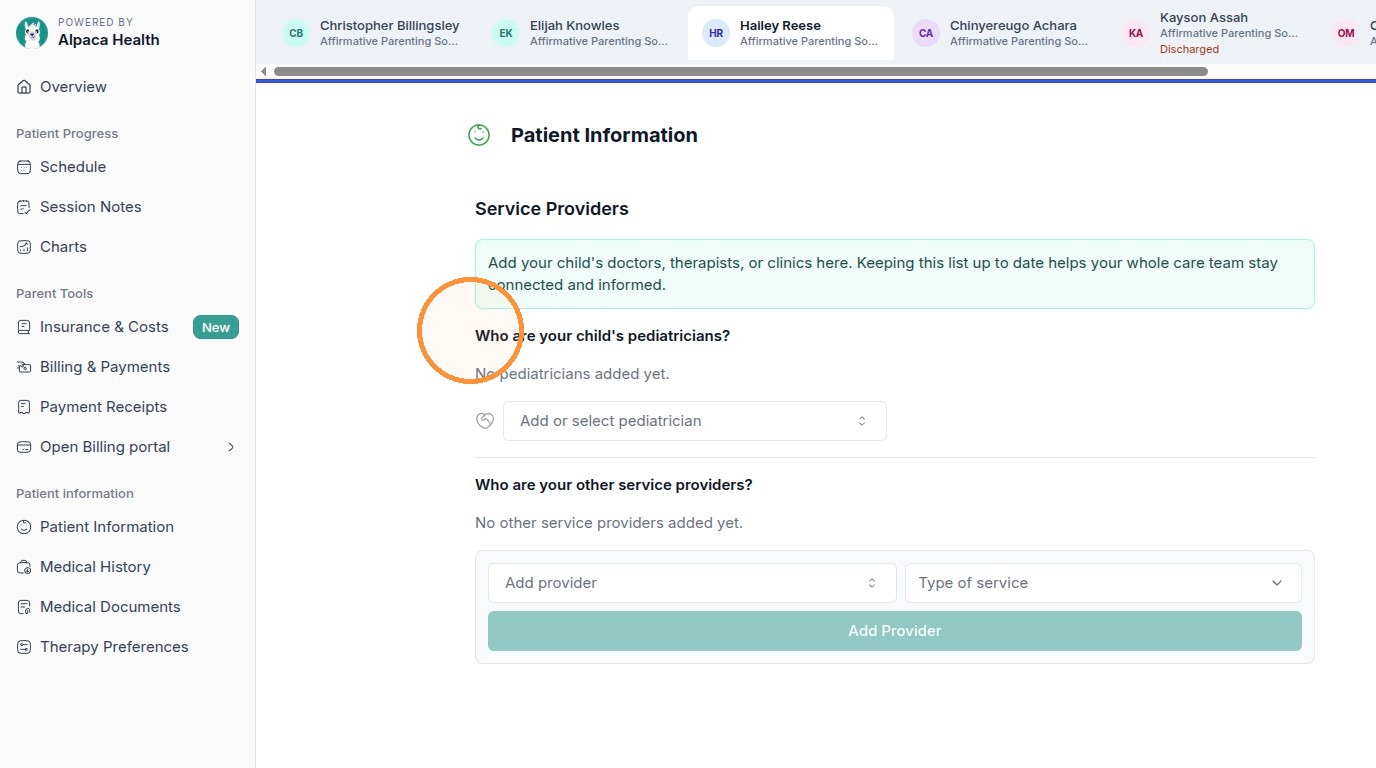
Add a pediatrician
Under “Who are your child's pediatricians?”, click the “Add or select pediatrician” box.
A search box opens with a long list of clinics and providers. Type a name in the “Search…” field to narrow the list, then click the provider you want.
Alpaca adds the provider right away and shows a card with their phone number and address. To add another pediatrician, click “Add or select pediatrician” again and repeat.

Search for a provider, then click their name in the list.
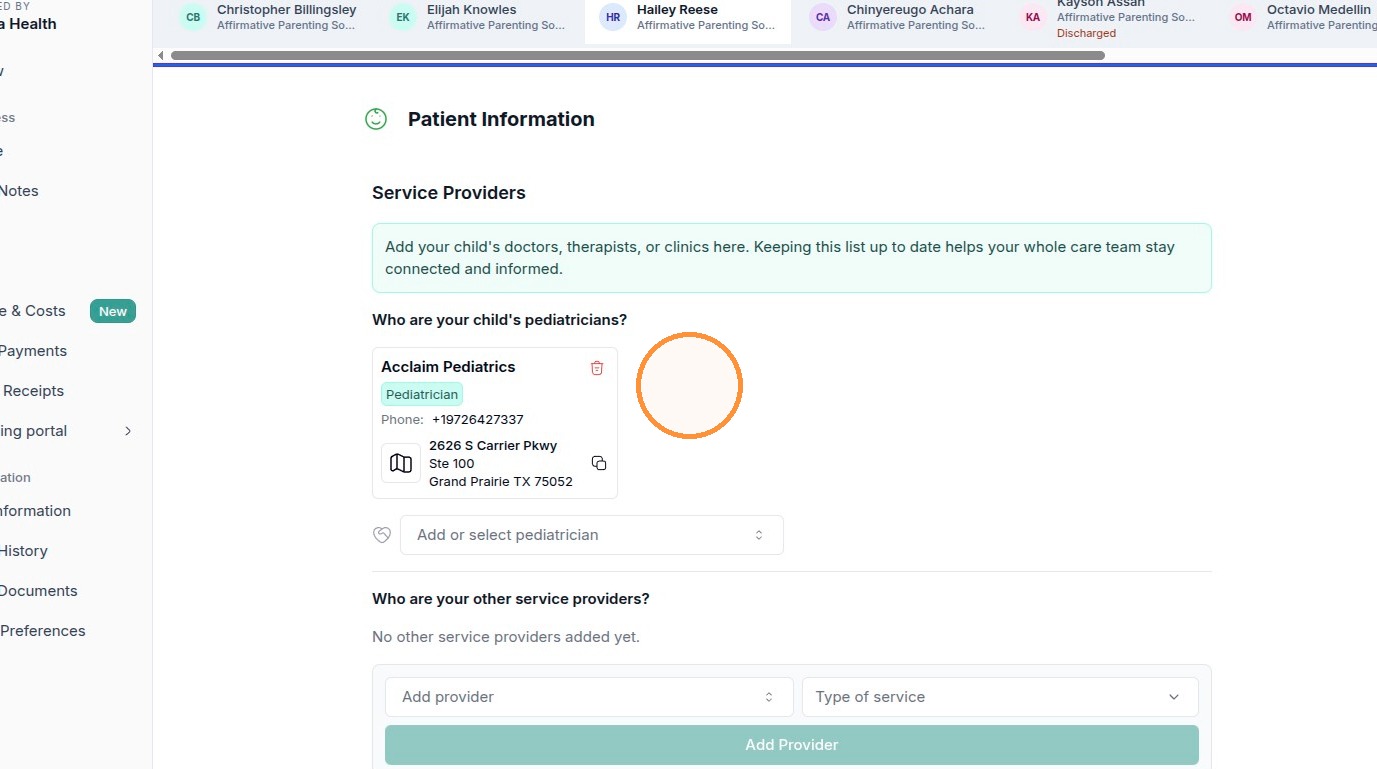
Each provider you add appears as a card with their contact details.
Can't find your pediatrician? Add them manually
If the provider isn't in the list, click “Add Service Provider” at the bottom of the dropdown. An “Add New Service Provider” window opens where you can type the clinic name, the doctor's first and last name, email, phone, fax, and full address. When everything is filled in, click “Add Service Provider” at the bottom of the window to save.
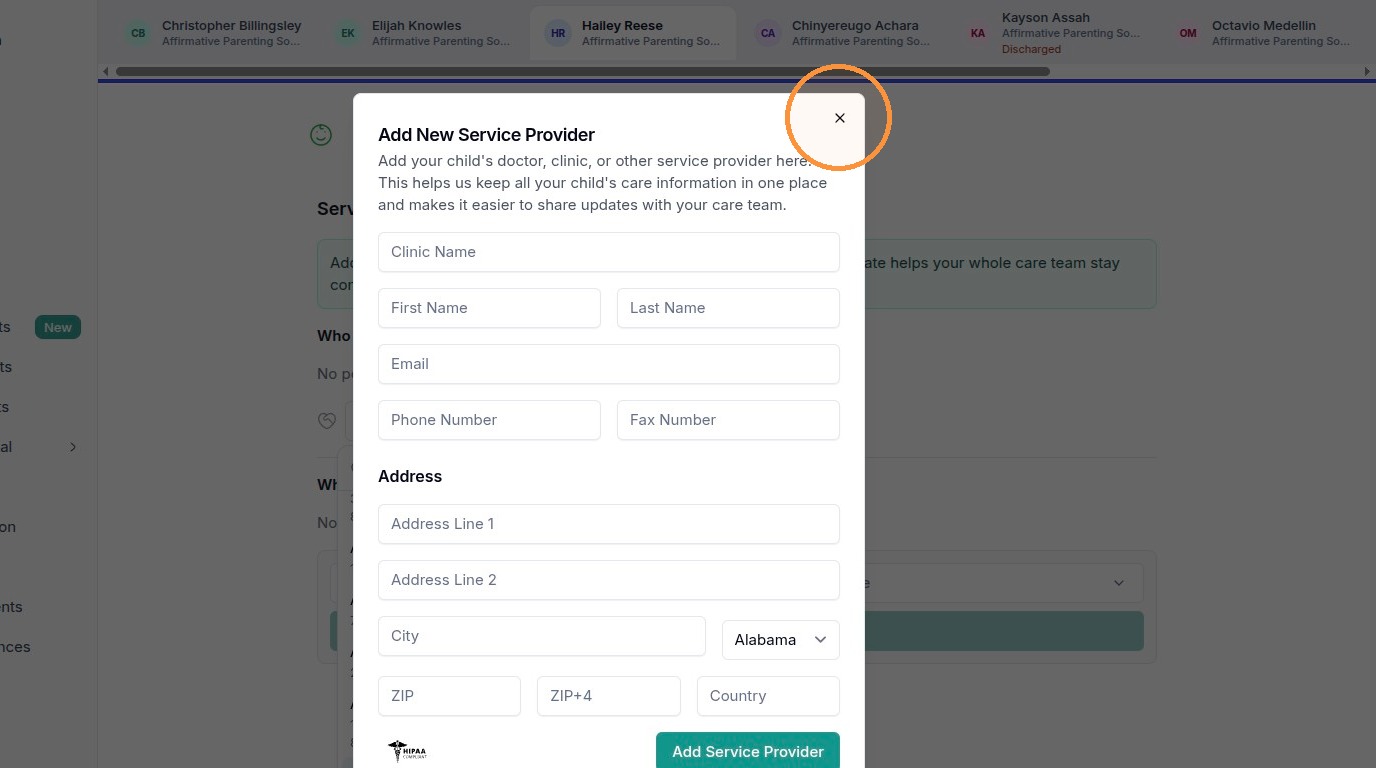
Warning The “X” in the top-right corner (circled above) closes this window without saving. If you've typed in any details, click “Add Service Provider” at the bottom first — clicking the X will discard everything you entered.
Add other service providers (therapists, specialists, clinics)
Use the “Who are your other service providers?” section for anyone who isn't a pediatrician.
Click the “Add provider” dropdown on the left and choose the provider (search the same way you did for a pediatrician).
Click the “Type of service” dropdown on the right and check the role that fits — for example, “Occupational Therapist.” You can select more than one. Click “Close” when you're done choosing.
Once both a provider and a type of service are selected, the “Add Provider” button turns green. Click “Add Provider” to save them to the list.
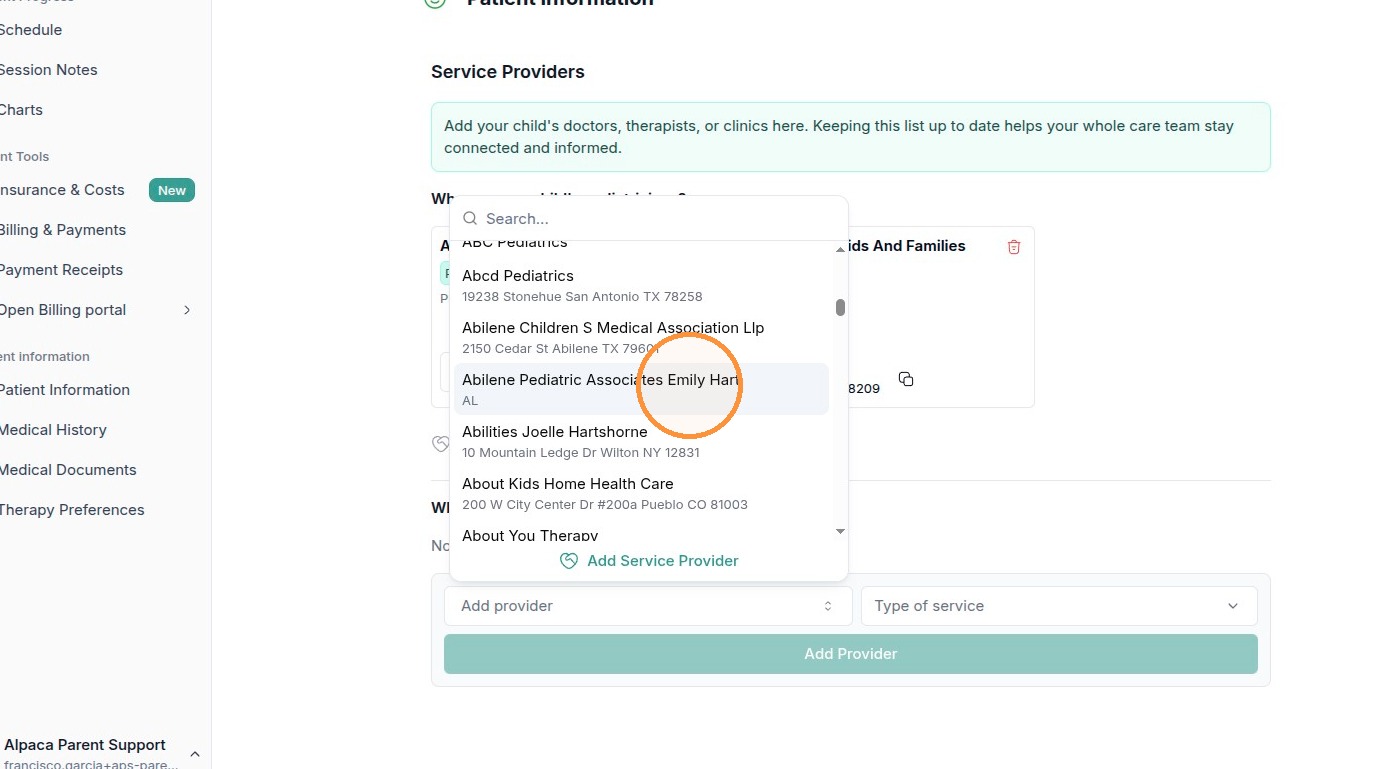
Pick the provider in the “Add provider” dropdown.
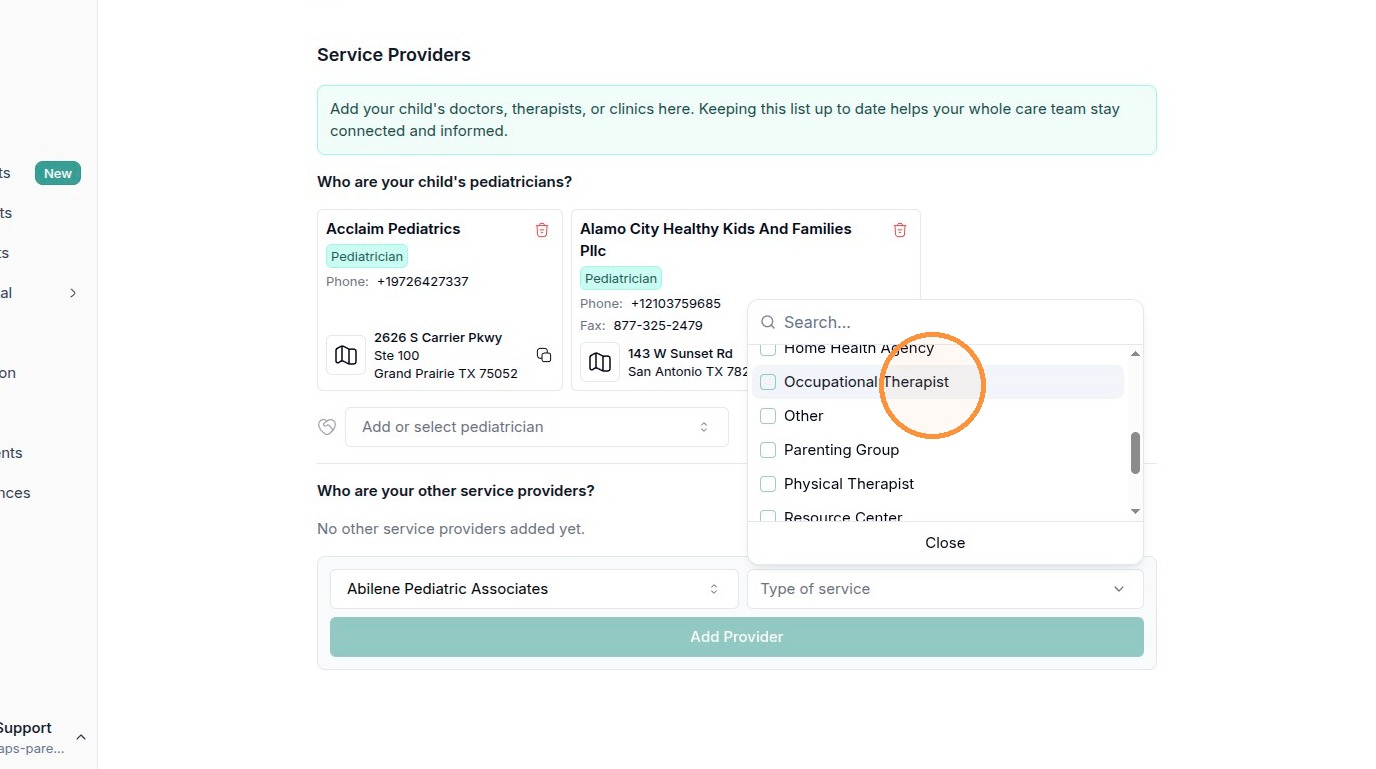
Then check one or more roles in the “Type of service” dropdown.
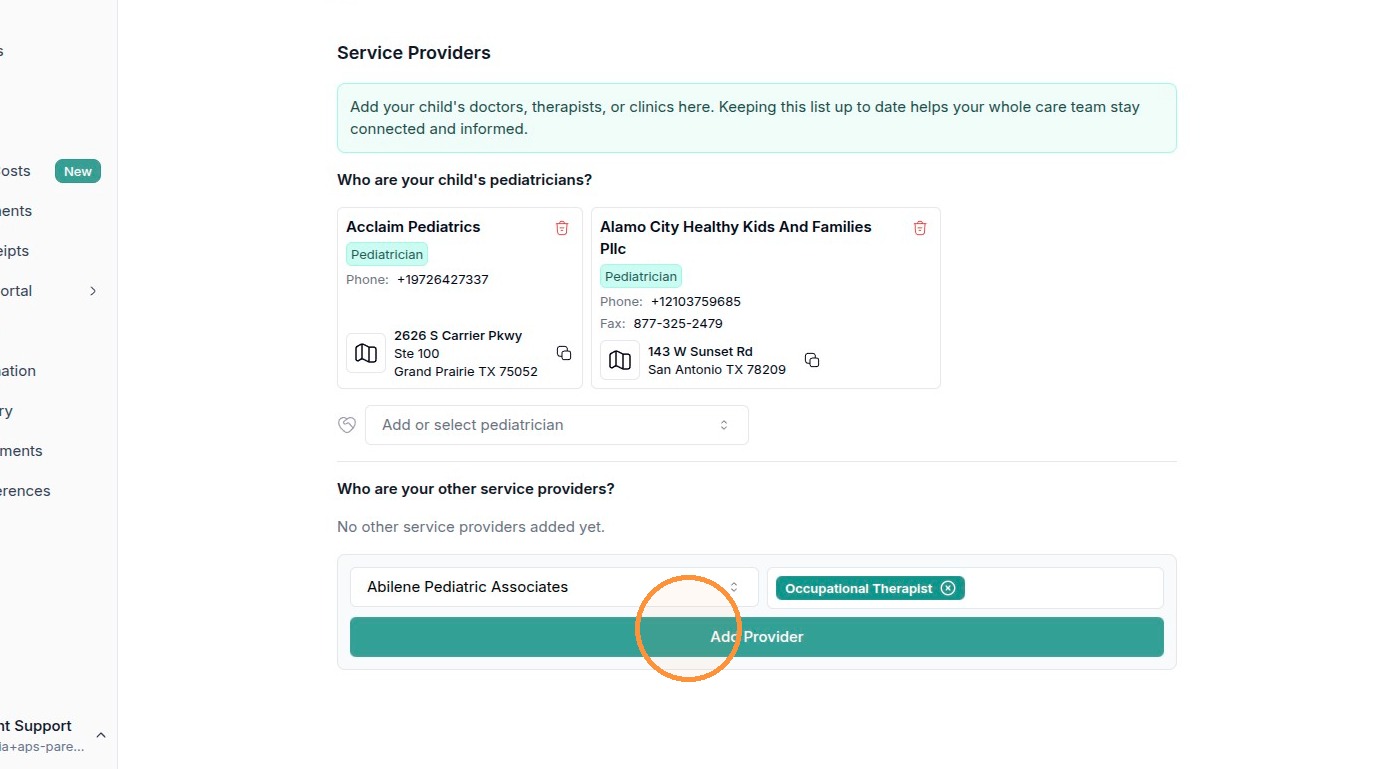
When both fields are set, “Add Provider” turns green — click it to save.
TipThe “Add Provider” button stays greyed-out until you've selected both a provider and at least one type of service. To remove any provider later, click the small trash-can icon in the top-right corner of their card.
Part 2: Medical History (diagnoses & medications)
In the left menu, under “Patient information,” click “Medical History.” Use this page to keep your child's diagnoses and current medications up to date so your care team has the full picture.
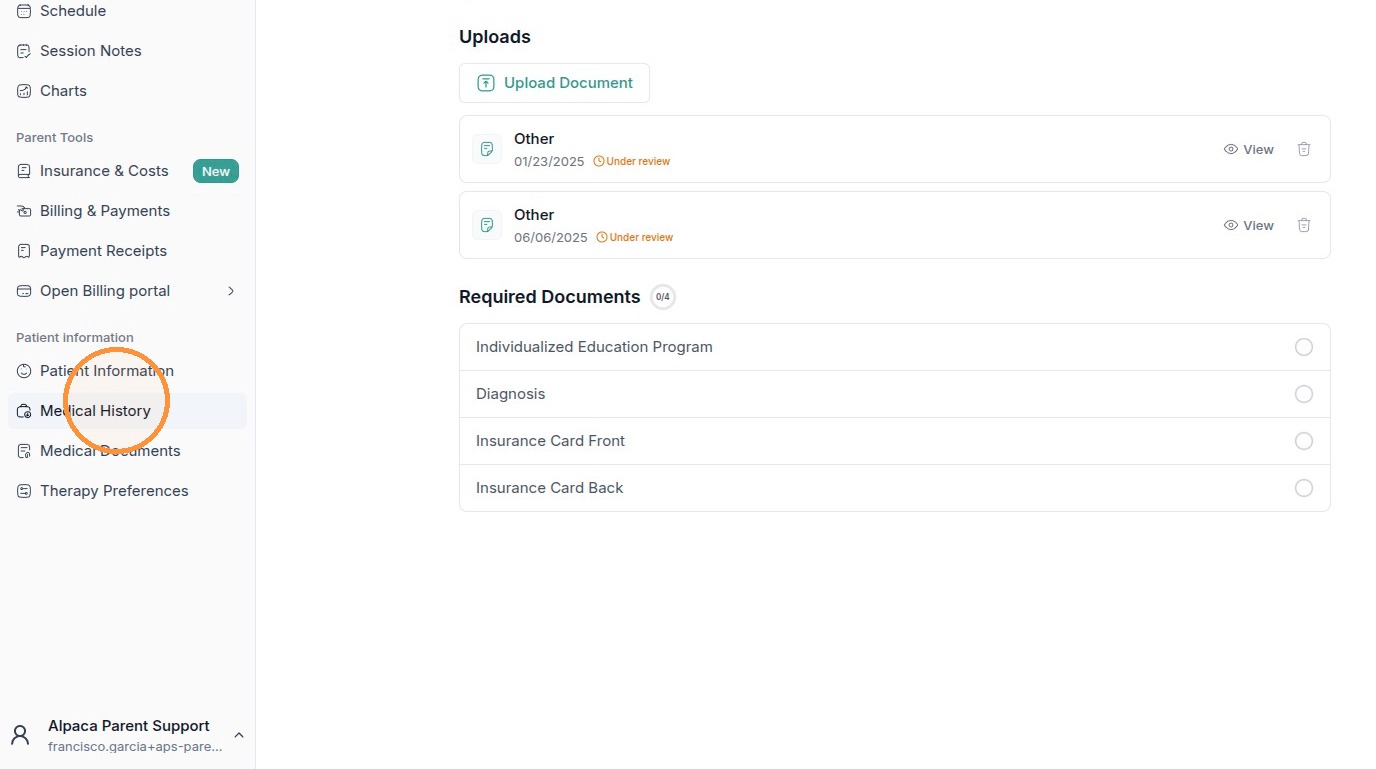
Patient Diagnoses: This section lists your child's diagnoses (for example, “F84.0 – Childhood autism”). These come from your child's records. If something looks wrong or is missing, contact your Alpaca care team — you can't edit diagnoses directly on this page.
Add a medication
Under “Medications,” find the “Add a medication” box. If none are listed yet, you'll see “No medications registered.”
Click the box and type the medication name — and the dose if you know it (for example, “ibuprofen 100mg”).
Click the green “Add” button to save it. Repeat for each medication your child takes.
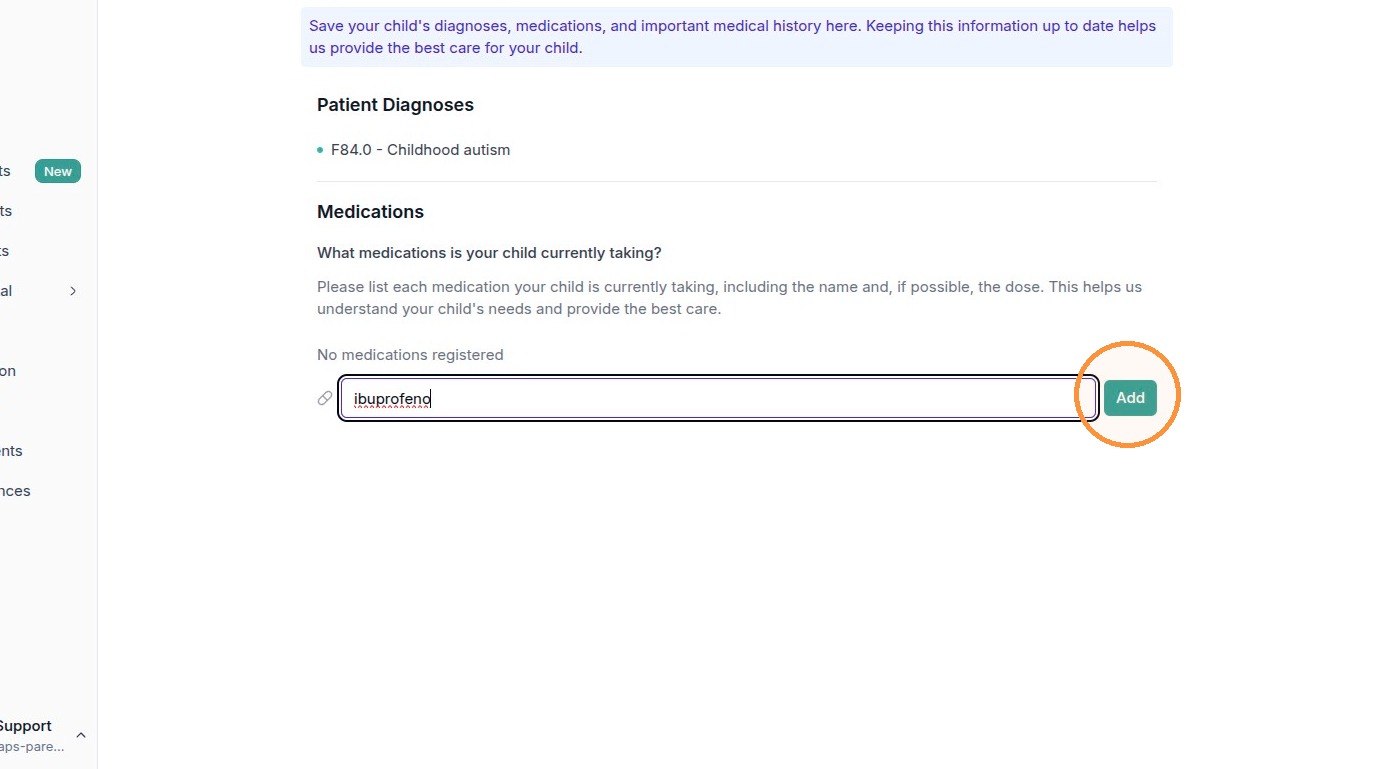
TipList each medication separately so your care team can see everything your child is taking.
Part 3: Medical Documents (view & upload)
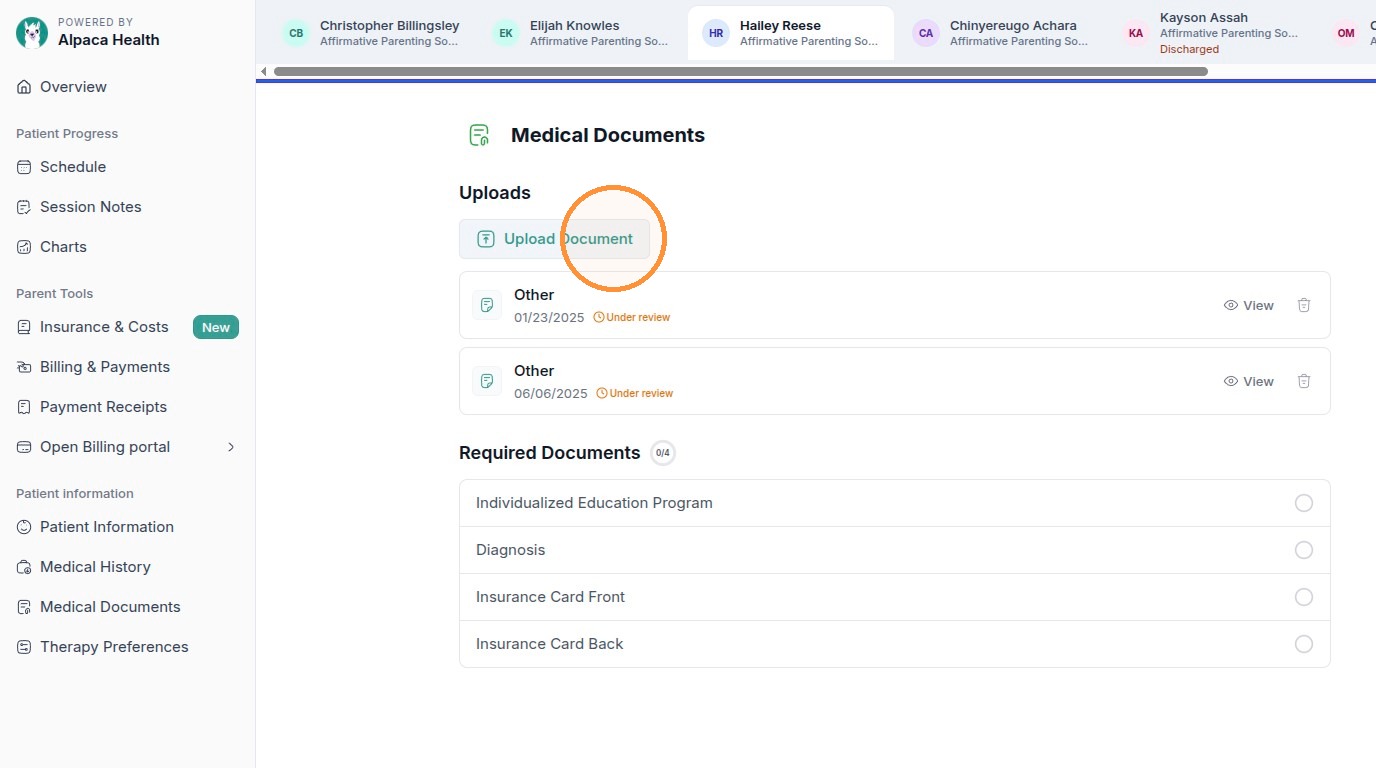
In the left menu, under “Patient information,” click “Medical Documents.” This page has two parts: “Uploads” (documents you've added) and “Required Documents” (items Alpaca still needs from you).
View a document you've already uploaded
In the “Uploads” list, click “View” on the right side of any document to open it in a preview window. When you're finished, click “Close” in the top-right corner to return to the page. You can also click “Download” to save a copy to your device.
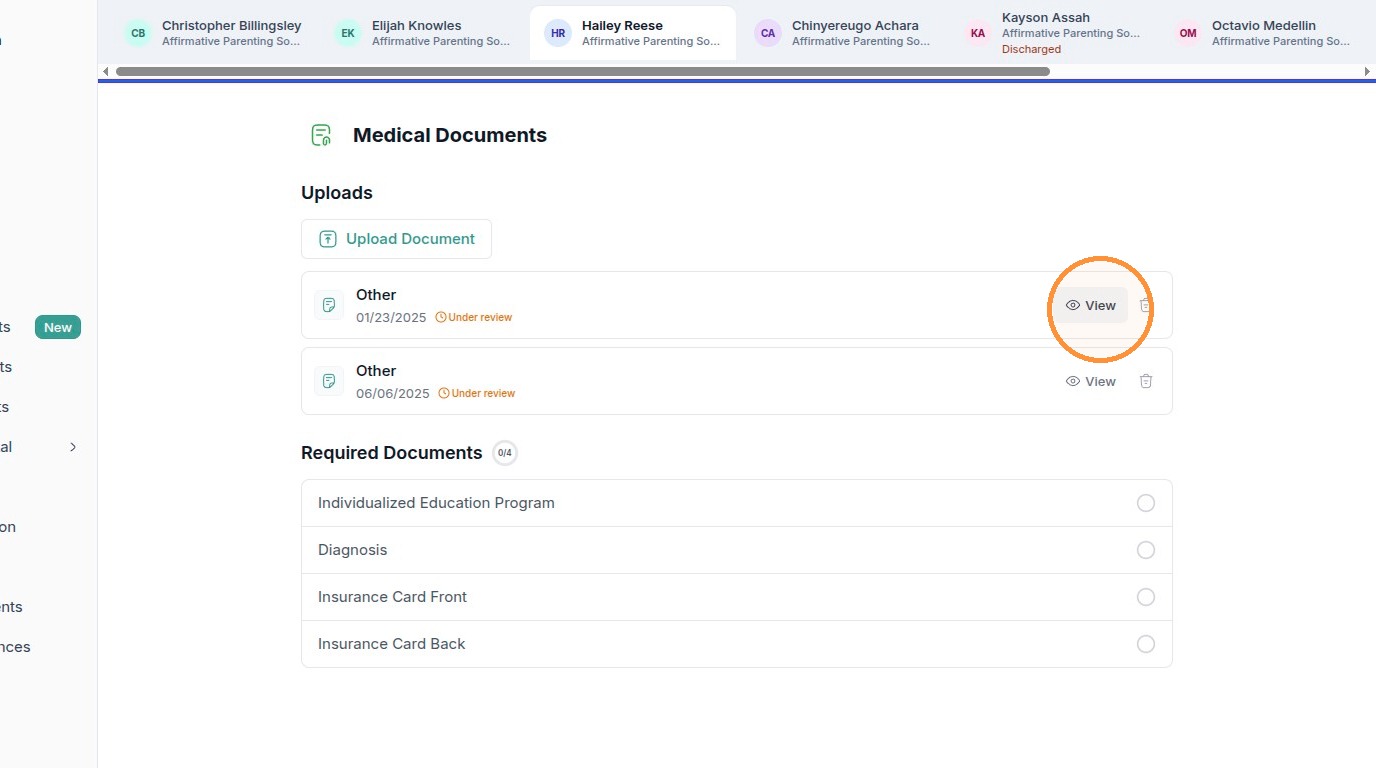
Click “View” next to a document to preview it.
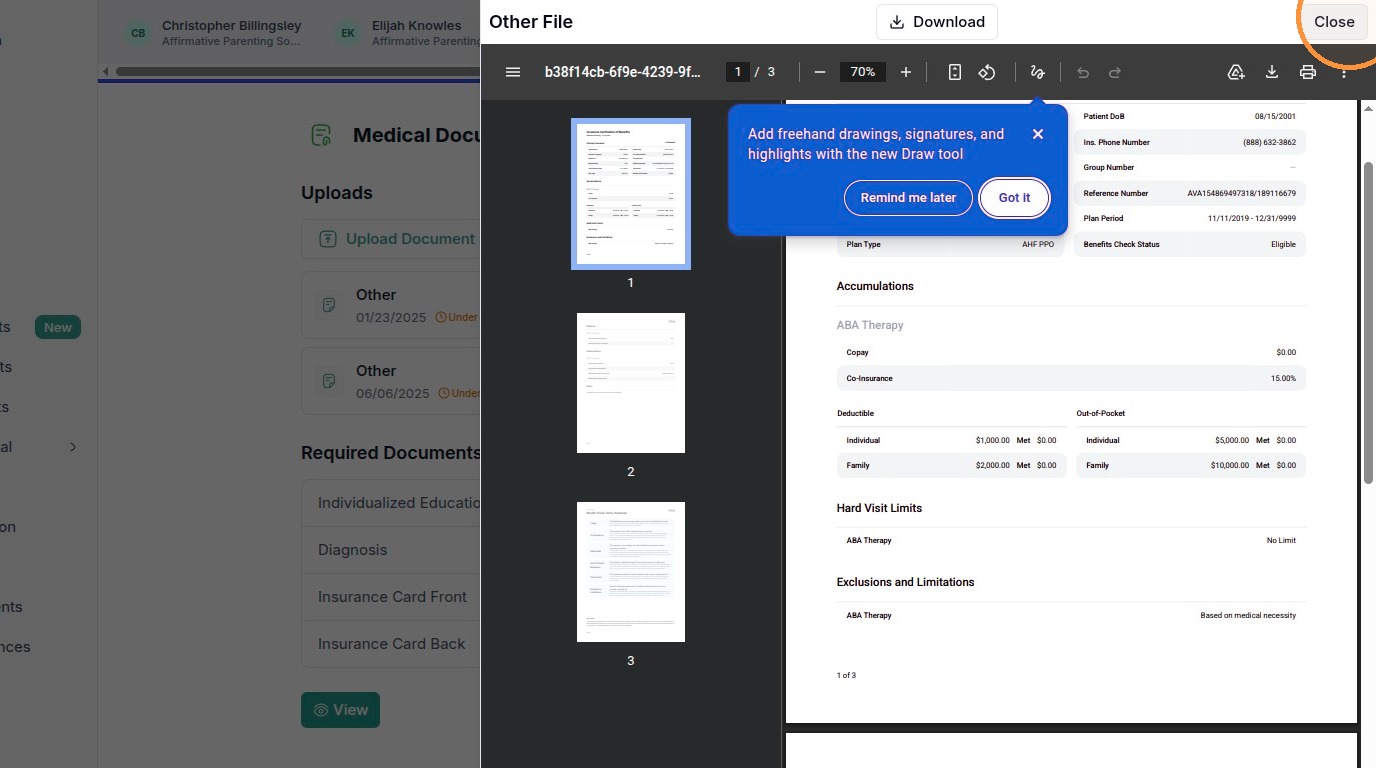
Click “Close” in the top-right corner when you're done viewing.
Upload a new document
Click “Upload Document” near the top of the page.
In the “Upload Patient Documents” window, click inside the dashed box to choose a file from your device, or drag and drop the file onto it. Files can be up to 50 MB.
Click “Upload Document(s)” to finish. To back out without uploading, click “Cancel.”

About Required Documents: The list at the bottom of the page (Individualized Education Program, Diagnosis, Insurance Card Front, and Insurance Card Back) shows what Alpaca still needs, along with a counter such as “0/4.” Uploading these documents helps move your child's care forward.
NoteNewly uploaded files may show an “Under review” label while the Alpaca team checks them. This is normal and no action is needed on your part.