6.9 Submitting a Treatment Plan: Upload, Review, Sign & Send to Care Readiness
Last updated: August 21, 2026
A step-by-step guide for BCBAs
Once a treatment plan is written, it needs to make its way through Alpaca to become the official record of care and, ultimately, an authorization request to the payer. This guide walks you through that whole journey on a single screen flow:
Upload the treatment plan to the Treatment Plans tab
Review the Treatment Plan against the feedback from Treatment Plan Checker
Request a parent/caregiver signature - only when the client's payer requires one
Submit to Care Readiness, where it becomes part of the authorization request
You'll spend almost the entire time in two tabs on the client's page — Treatment Plans and Care Readiness — so let's start there.
Step 1 — Upload the treatment plan to the Treatment Plans tab
💡 Tip: If you're using Alpaca's Treatment Plan Generation Tool, you can skip this step and go directly to step #2 Review
In Alpaca EHR open the relevant client page, then click the Treatment Plans tab. This is the home for every Treatment Plan or Plan of Care for this patient.
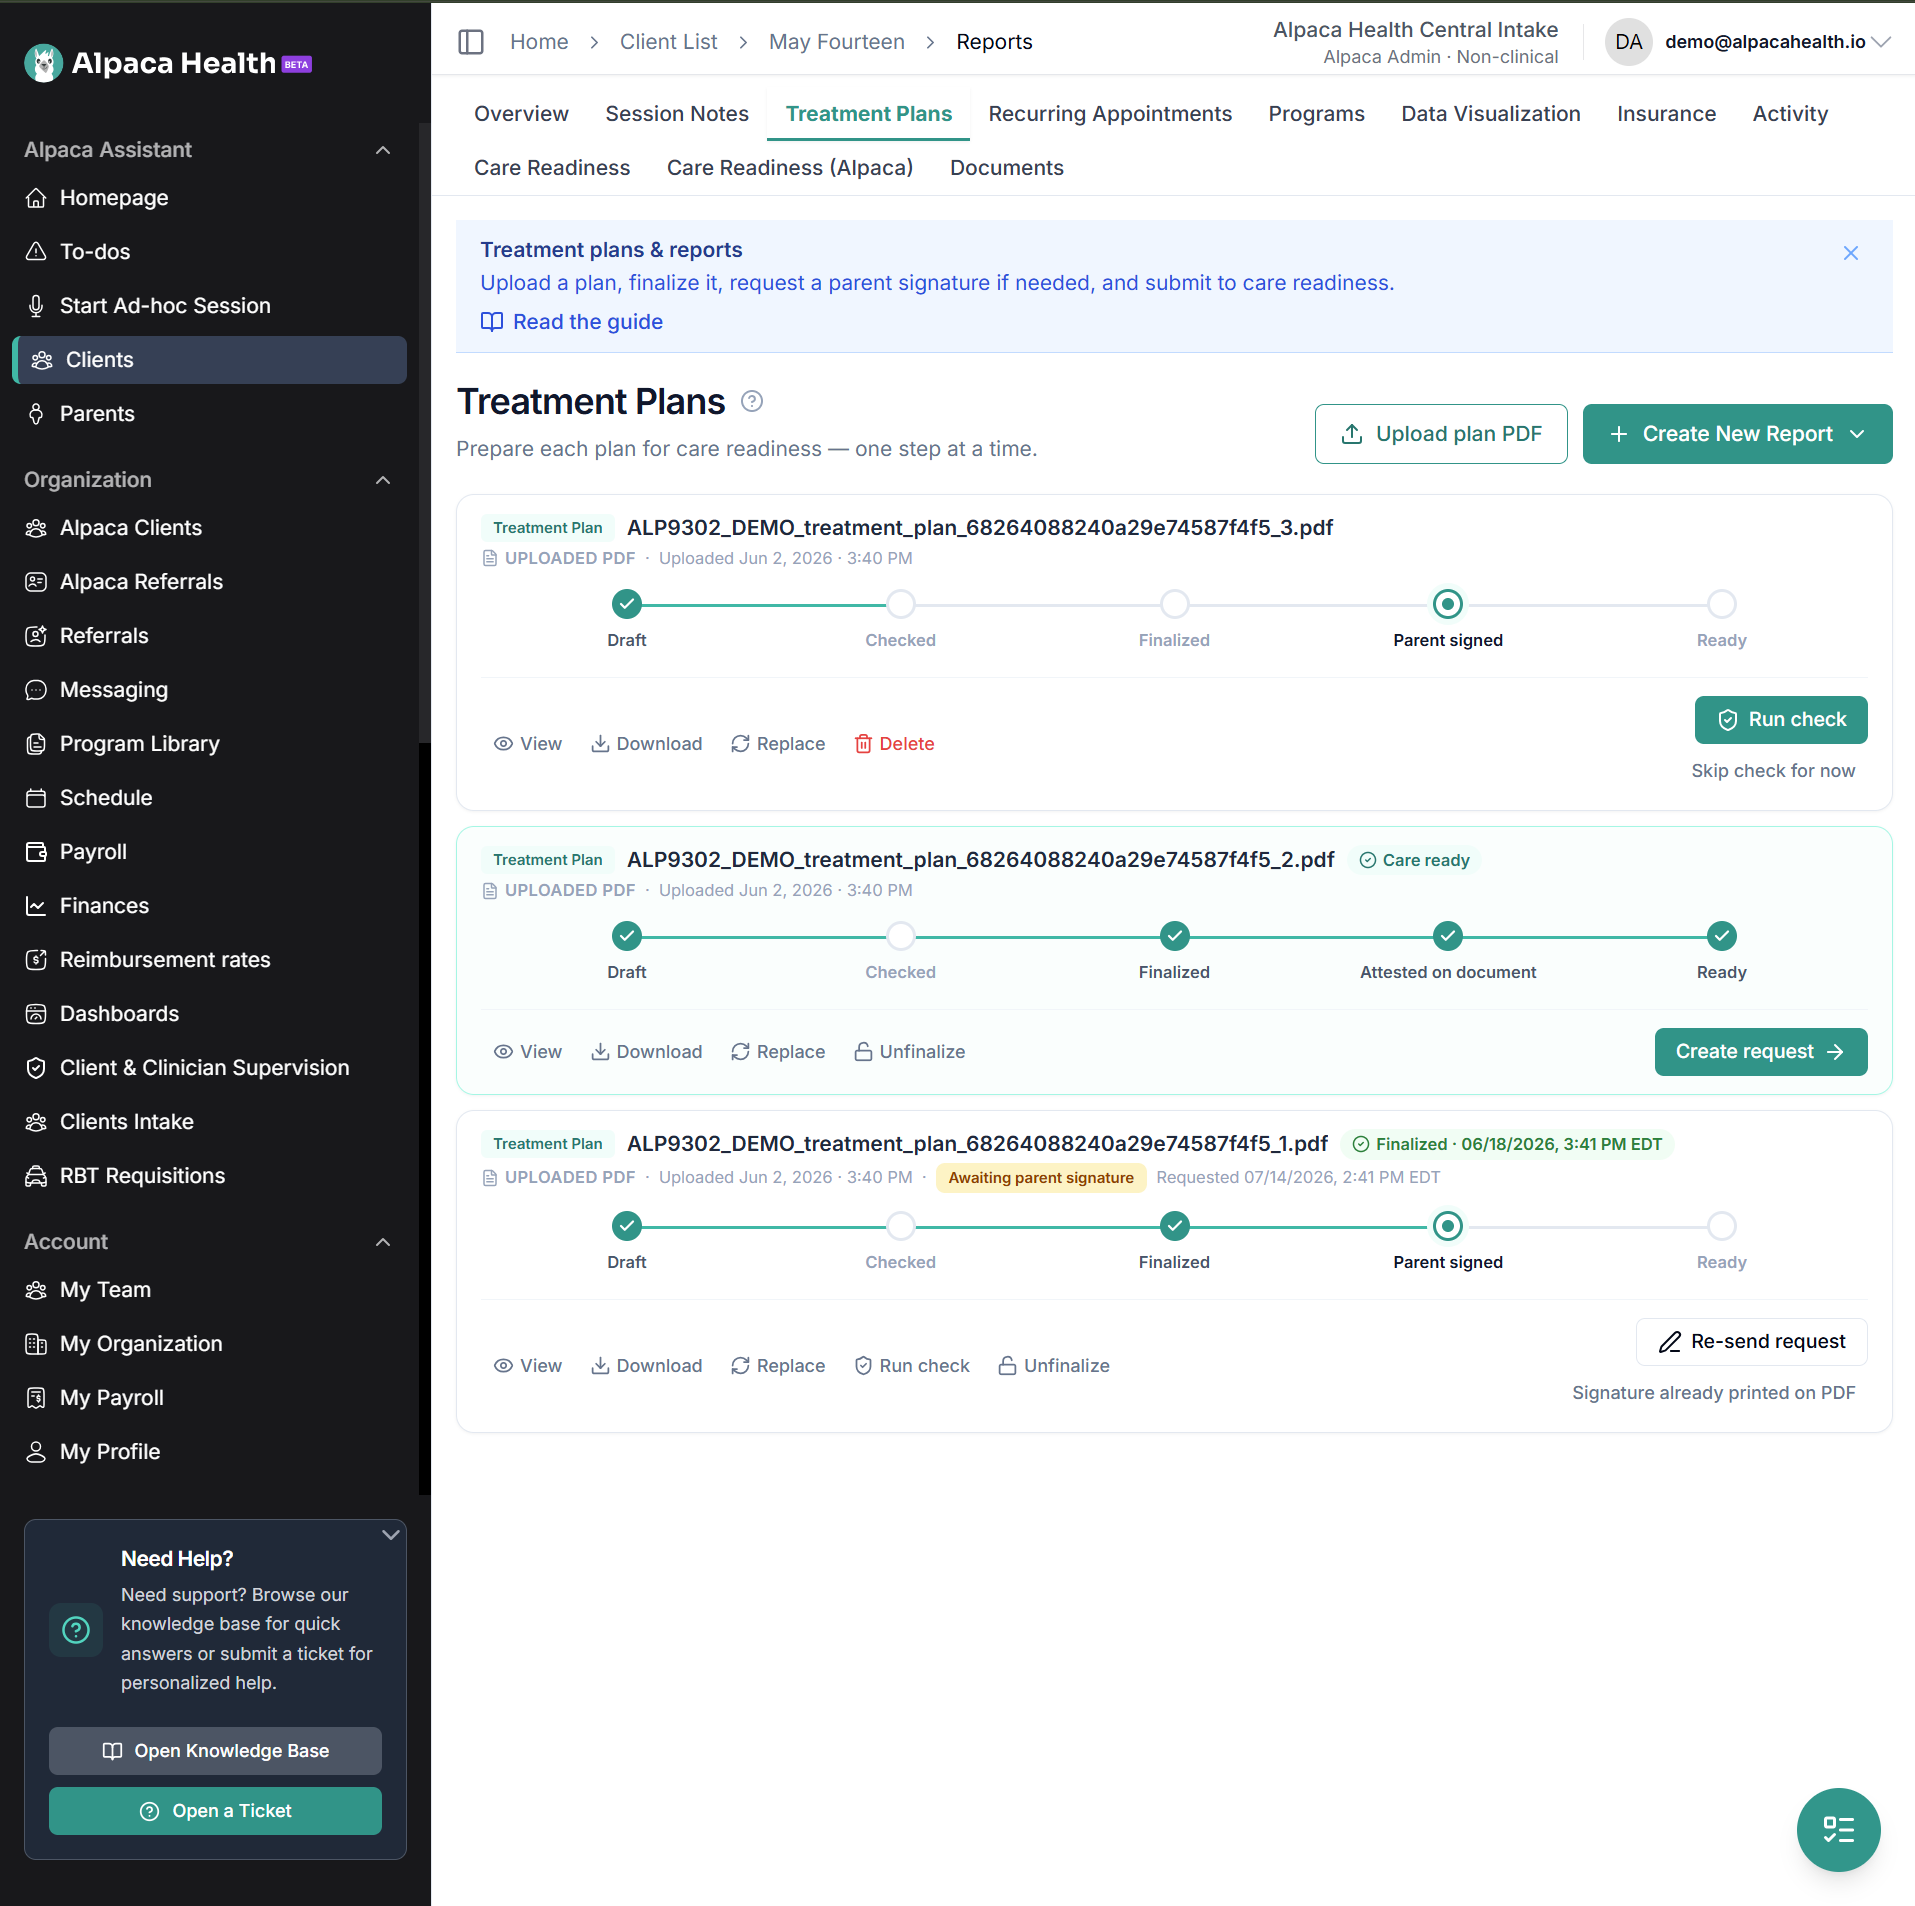
Each box is a report. There you can find everything at a glance: the Report Type, when it was Created or Uploaded, its Checker result, the Signatures status (clinician and parent), whether it's Finalized, and quick Actions (view, download, replace, delete, unfinalized).
To upload your own completed Treatment Plan, click Upload plan PDF in the top-right.
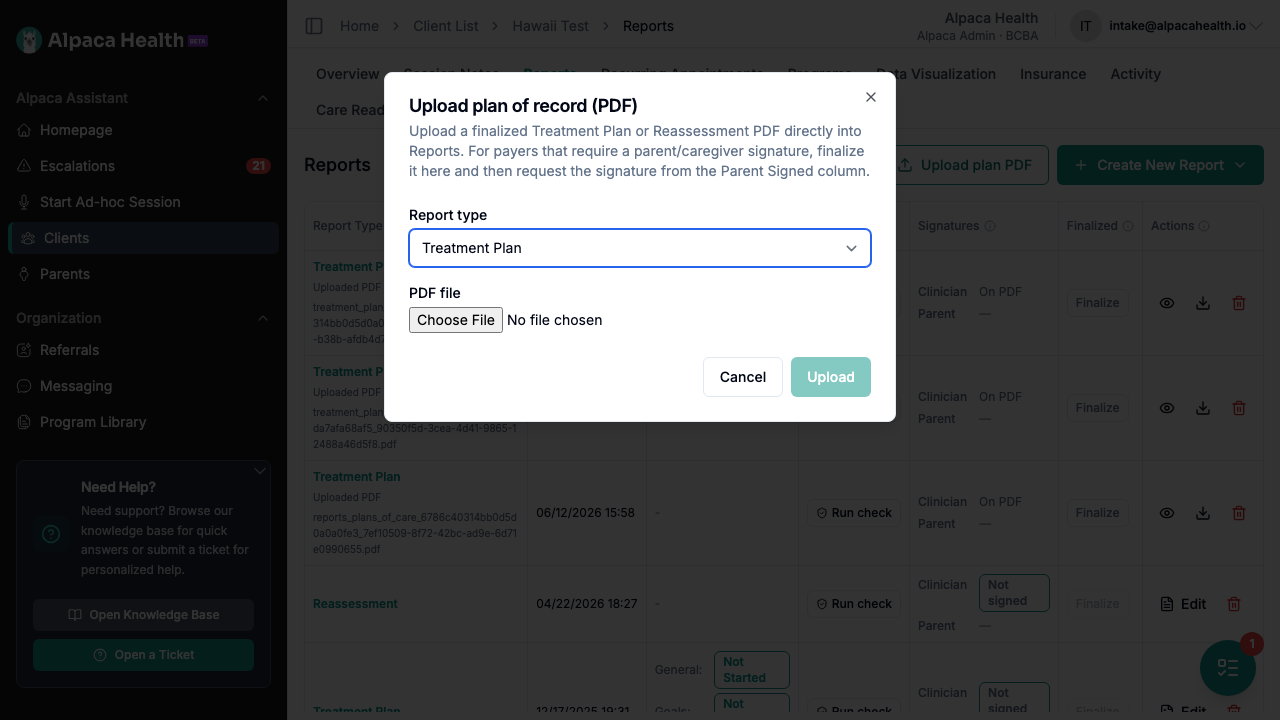
In the dialog:
Choose the Report type
For Initial Authorization Requests select Initial Treatment Plan
For Further Treatment Authorization Request select Further Treatment Plan
Click Choose File and select correct file. Note that you can only upload .pdf files or .docx files
Click Upload.
You'll see a confirmation that the plan was uploaded, and a new box appears at the top of the view
💡 Tip: The dialog itself reminds you of the next steps — "For payers that require a parent/caregiver signature, finalize it here and then request the signature from the Parent Signed column." That's exactly what we'll do next.
Step 2 - Review the plan with the Treatment Plan Checker
As soon as a plan is uploaded, the Treatment Plan Checker audits it against the rules for that client's payer and authorization type. The rules come from real payer feedback on past pends and denials.
A badge appears on the plan card when the audit finishes, for example Audited: 1 required fix, 9 warnings to review. Click it to open the results.
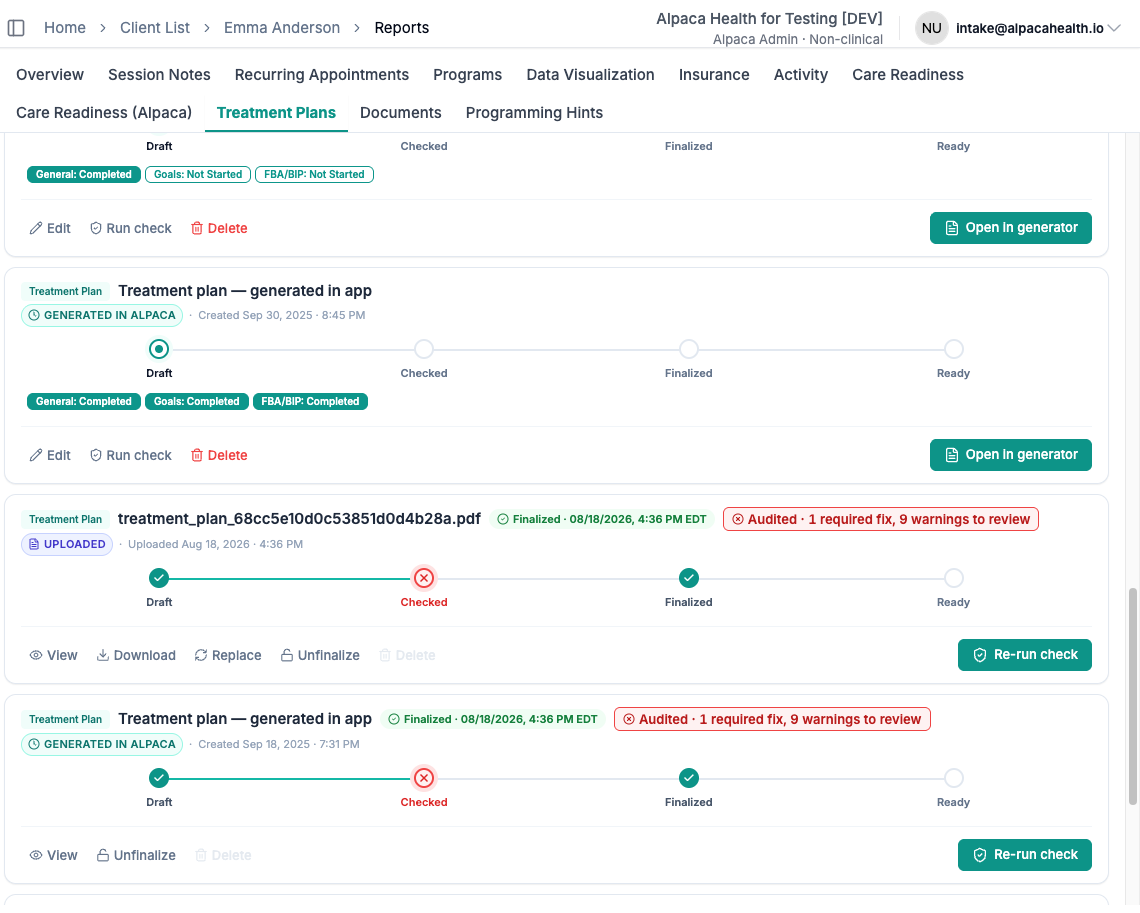
Checker tiers and remediation labels
The Treatment Plan Reviewer panel names the payer it checked against, then groups findings into sections, each with a count:
Section | What it means | Fix label | Blocks submission |
|---|---|---|---|
Required fixes | Very likely to cause a pend or denial | To resolve | Yes |
Warnings | Payer requirements that improve first-pass approval; use clinical judgment | Recommended | No |
Suggestions | Lower-confidence quality notes; not every payer has them | Consider | No |
Passed | Rules the plan already meets (collapsed) | none | No |
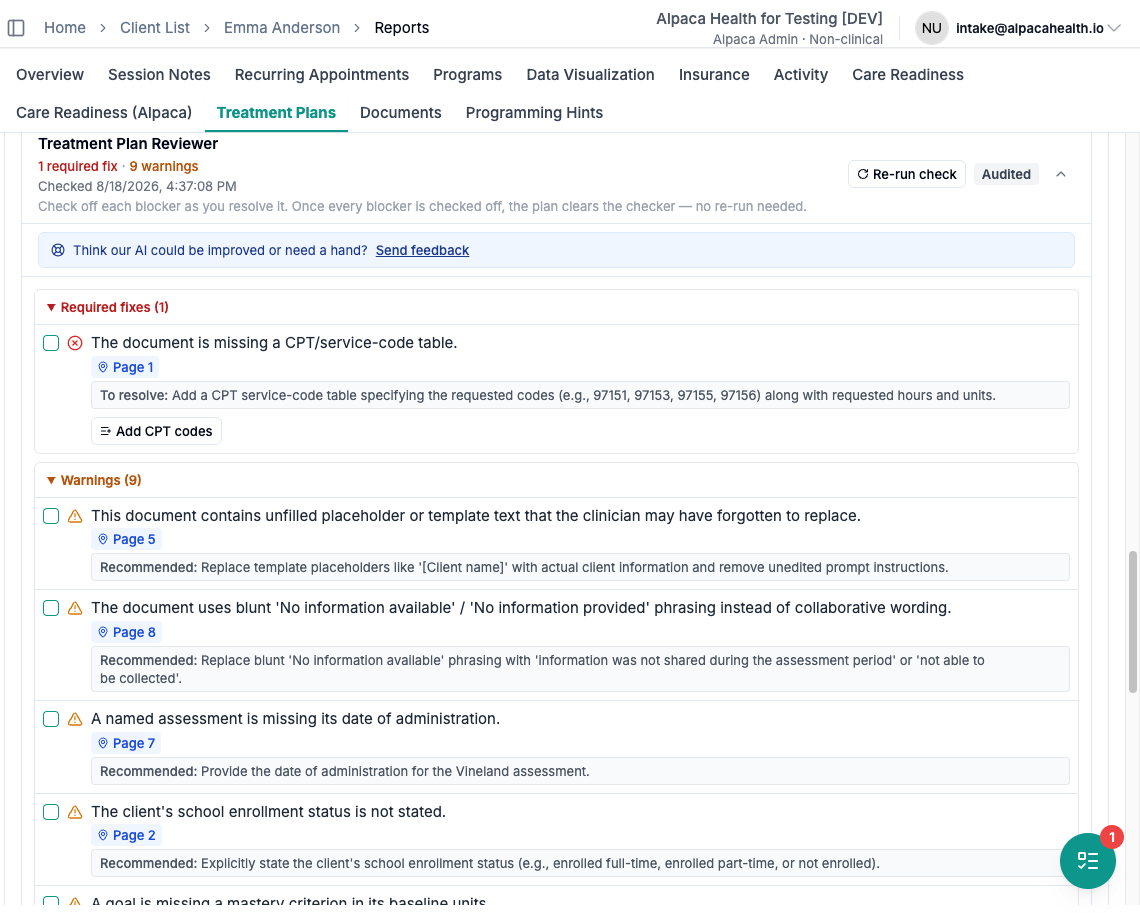
Most findings link to the page of the PDF they came from. Some offer a one-click fix: a plan missing its CPT code table shows an Add CPT codes button.
Dismissing a finding
Check off a finding once you have fixed it, or confirmed it does not apply.
It moves into the Resolved group at the bottom. Un-checking puts it back.
Check-offs save to the client's record and survive a re-run.
When every required fix is checked off, the plan clears the Checker. No re-run needed.
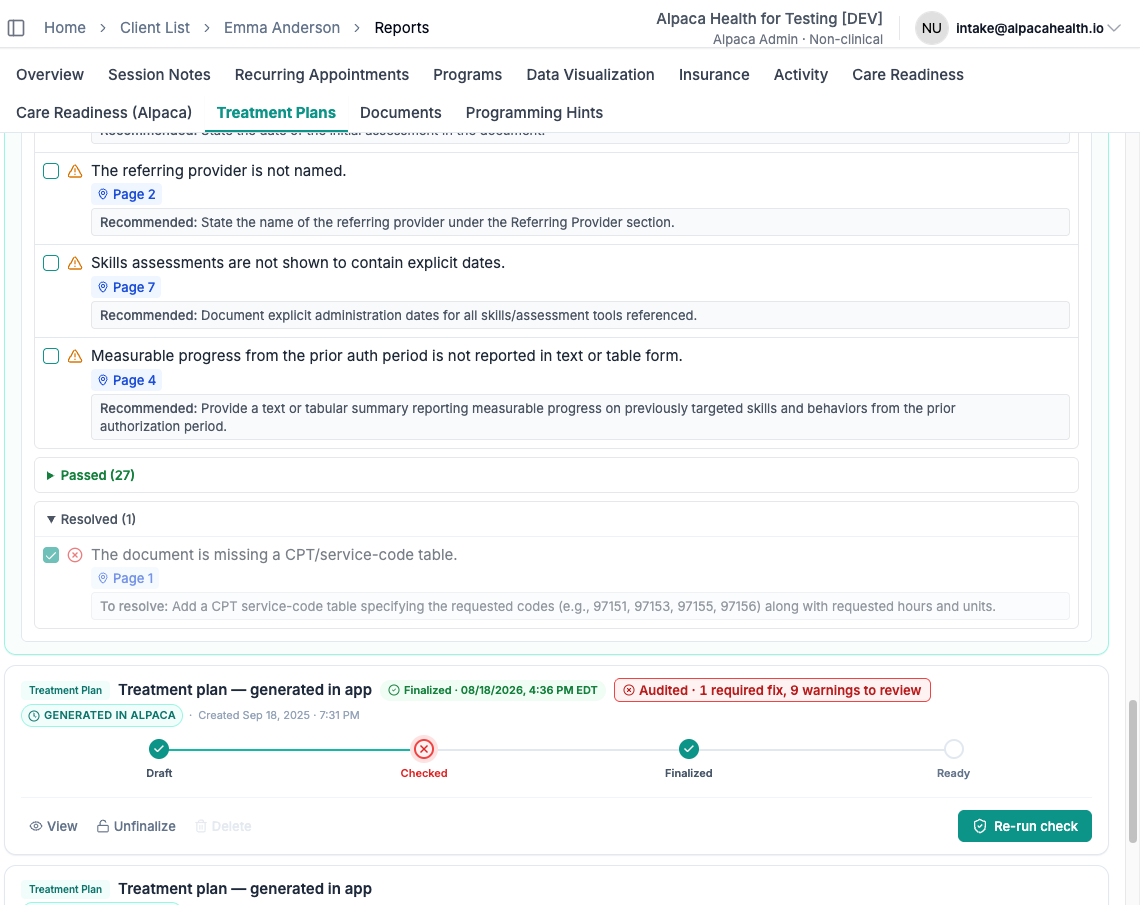
Check off a required fix only when the document you will actually submit is fixed. Dismissing clears Alpaca's gate, not the payer's review.
Recommended workflow
Open your editable plan beside the results.
Work top-down from Required fixes, using the page links.
Check off each finding as you resolve it.
Save as PDF, then Replace the plan on this tab.
Optionally Re-run check, then move to Step 3.
Rules differ by payer: every payer starts from a shared default set and adds, overrides, or excludes rules from there. If a rule looks wrong for a payer, use Send feedback in the panel or email Support@Alpacahealth.io.
Step 3 — Request a parent/caregiver signature (only if needed)
For payors that require a CMS-compliant parent/caregiver signature (Tricare, Cigna, ChampVA/Spina Bifida) on the treatment plan, Alpaca offers BCBA's the ability to send plans directly to the Parent Portal for caregiver signatures. This allows the caregiver to eSign their Treatment Plan without having to log into any third party software provider. If this is not required for your Treatment Plan, you can skip straight to Step 4.
Once your Treatment Plan is finalized and ready for signature, the Signatures selection appears a Signature needed badge and two action buttons:

Request signature - emails the caregiver a signature request in their parent portal. (If a request was already sent, this becomes Re-send request.)
Signature already on document - use this when the parent has already physically signed the uploaded PDF; it marks the plan parent-signed without sending anything.
Click Request signature and you'll get a confirmation prompt:
Request parent signature? Only send this if the parent hasn't already signed this document. It emails the caregiver a signature request in their portal. If the parent's signature is already on the document, choose "Signature already on document" instead.
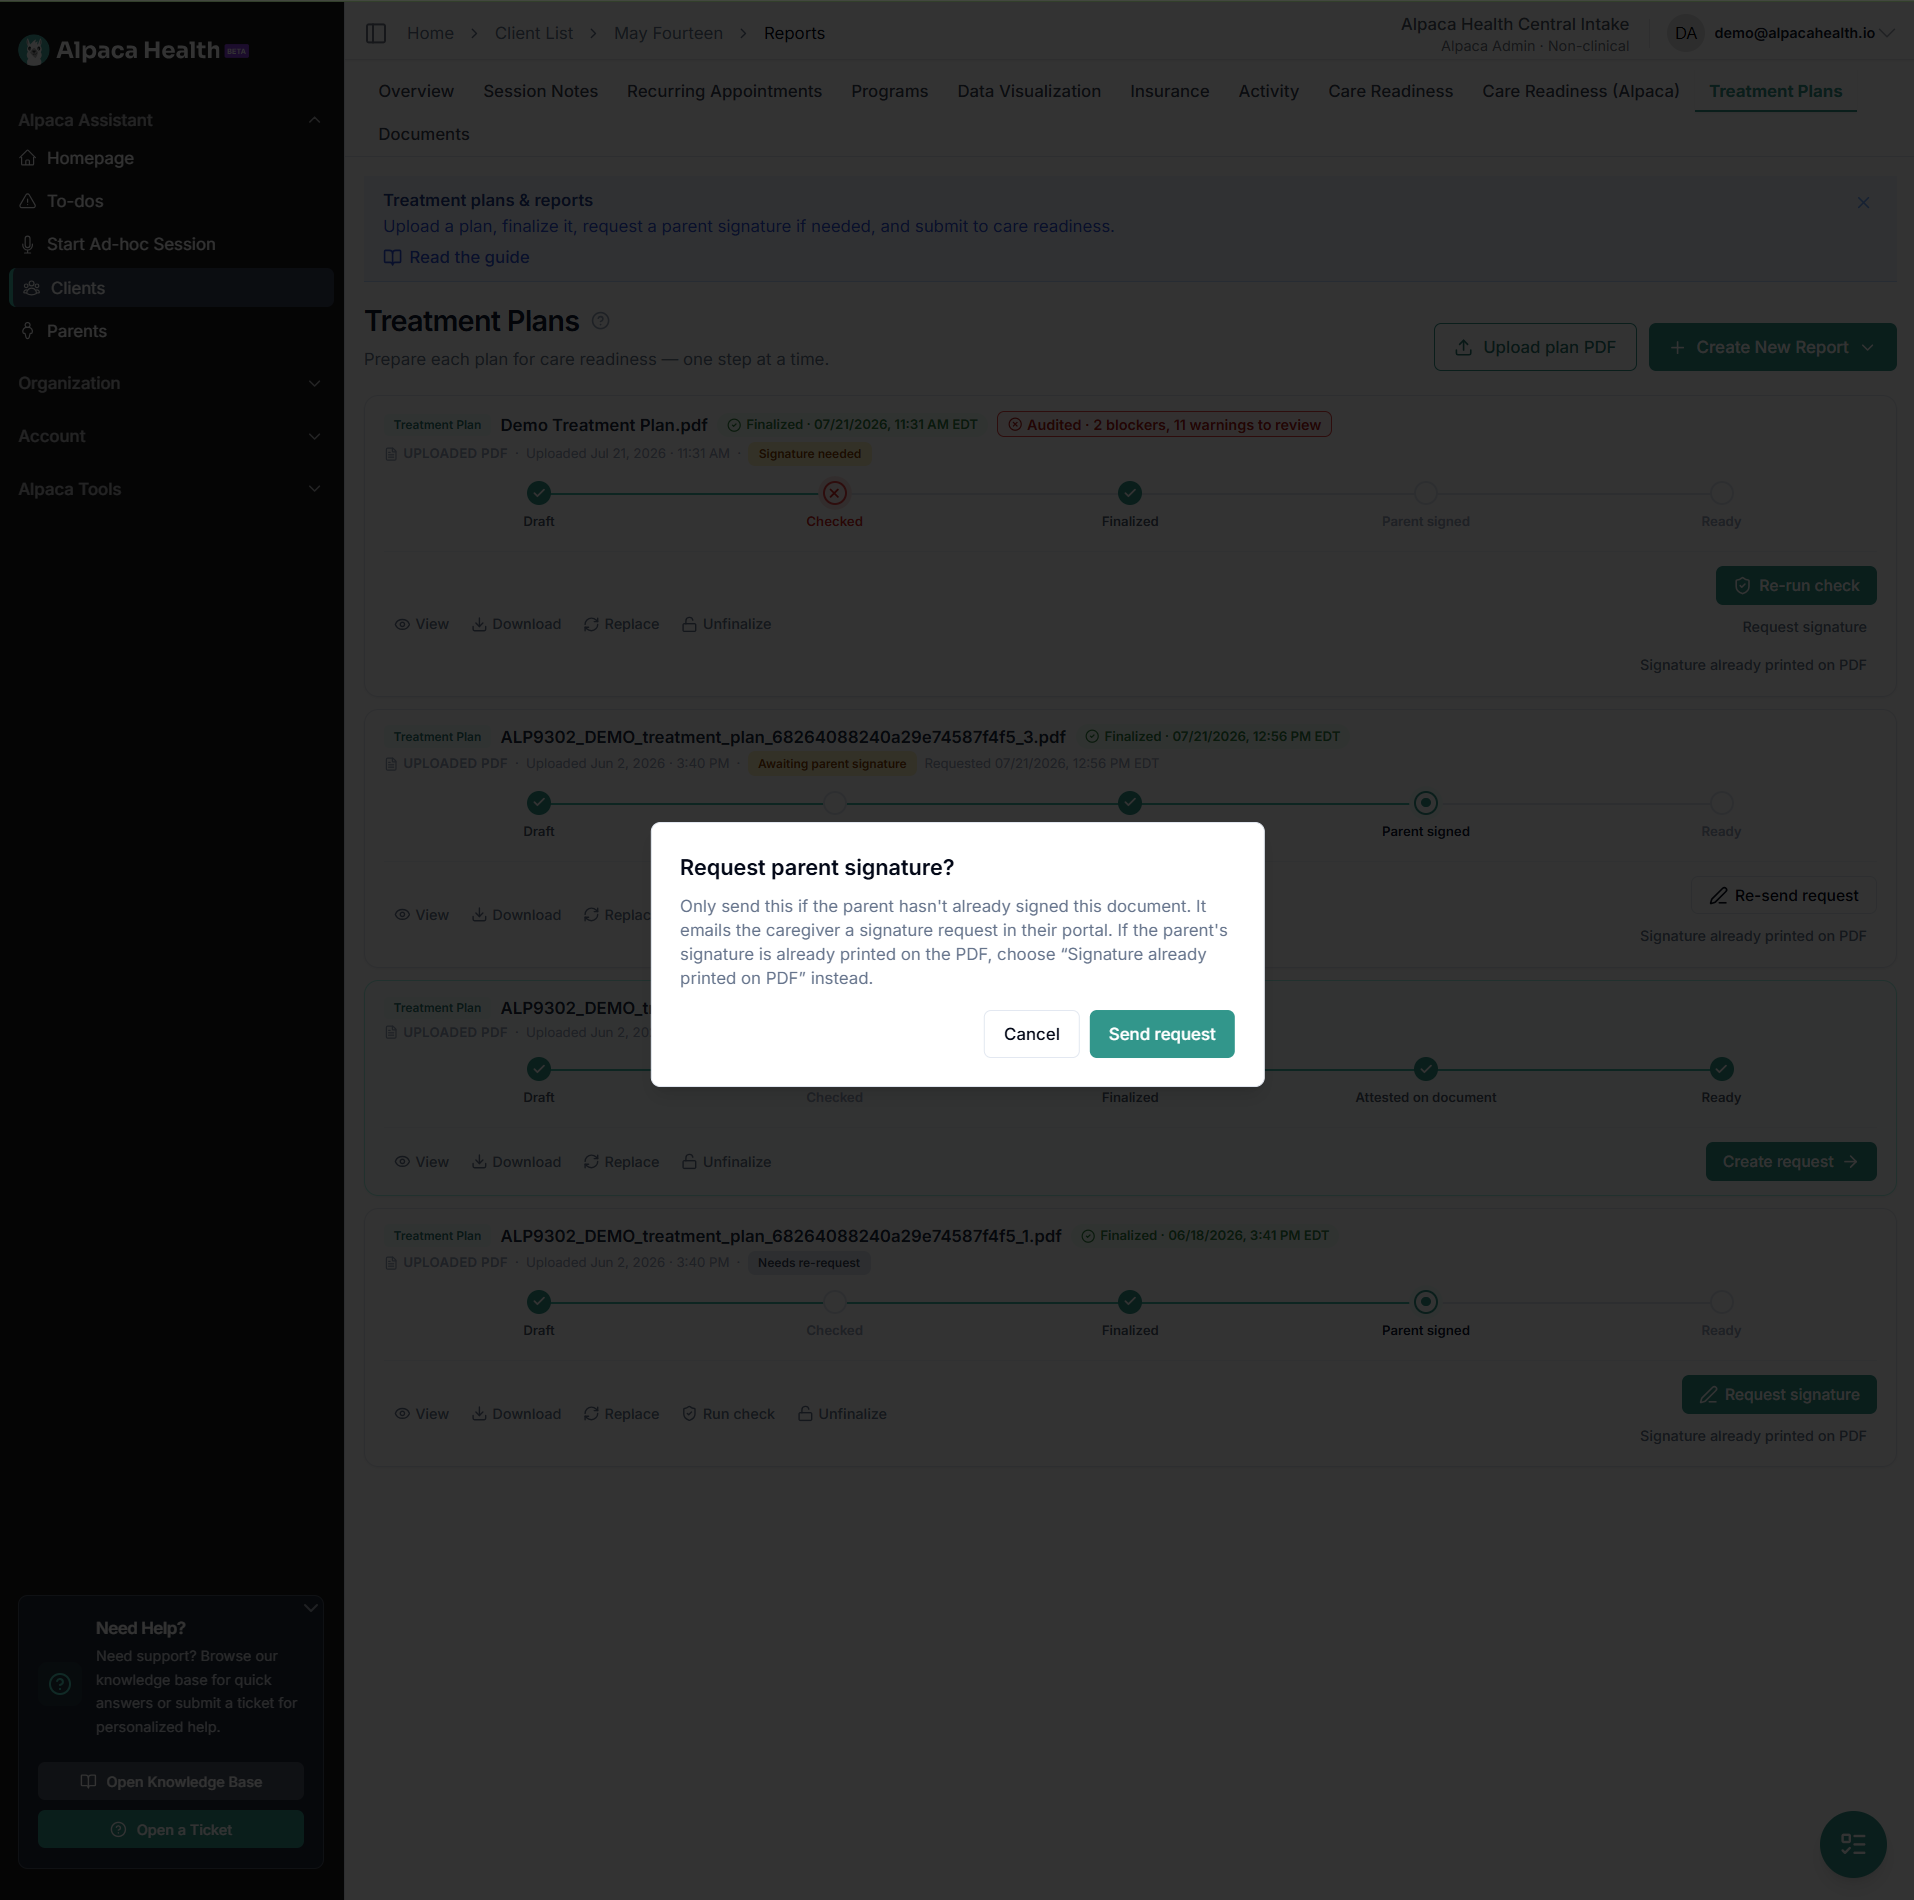
Click Send request to send it. The caregiver receives the request in their portal, and the row updates to Awaiting parent signature. When they sign, it flips to Parent signed automatically.
⚠ Two buttons, two very different actions. Request signature sends an email to the caregiver. Signature already on document sends nothing — it just records a signature you've verified is already on the PDF.
Follow-up's and Notifications
If the parent does NOT sign the Treatment Plan within 24 hours Alpaca automatically sends the Caregiver a follow-up request. If the parent still doesn't take action within 48 hours Alpaca automatically sends a notification in to the provider via email & text message.
You can also manually re-send the request at any time by selecting the "Re-send request" button

Step 4 — Submit to Care Readiness
With the plan finalized (and signed, if required), it's ready to become part of an authorization request. You can either submit the Authorization request by:
On the Treatment Plan's Tab find the relevant plan and select the "Create request"

Or alternatively, on the Care Readiness Tab, in the Benefits and Prior Authorizations Requests section, select "Create Request"

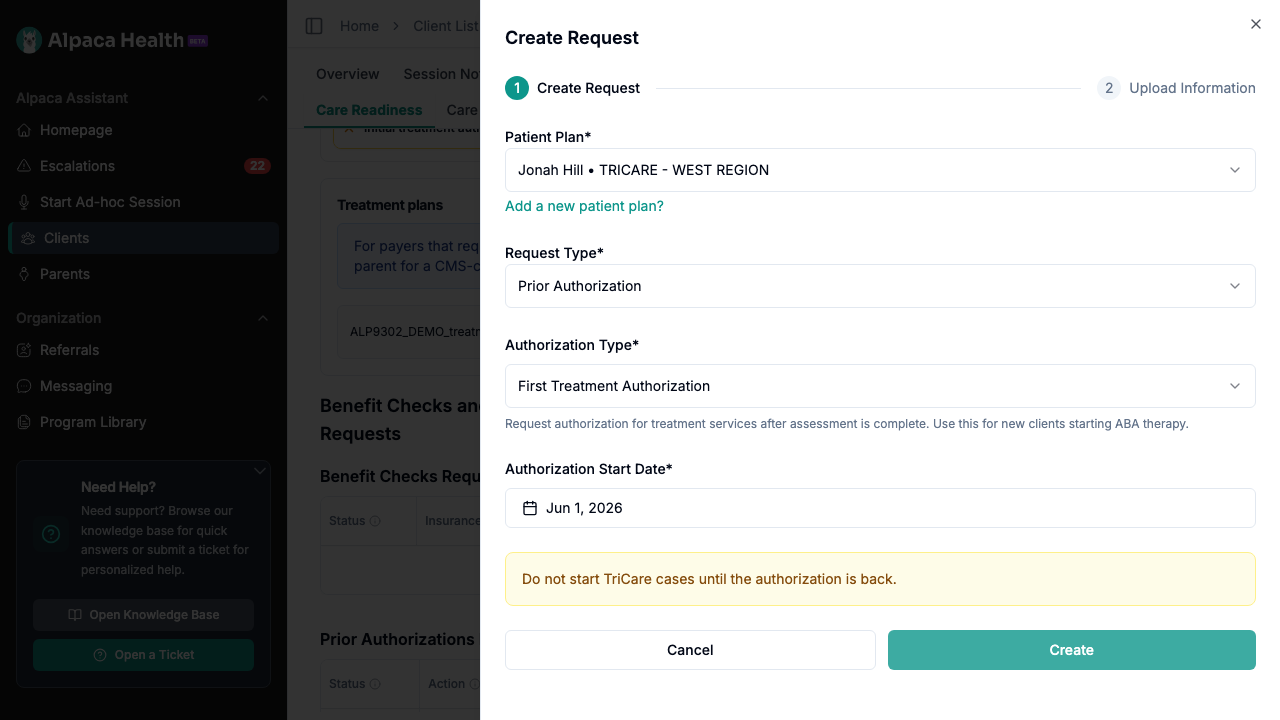
Create the request
Follow the Authorization Request Workflow by filling in:
Patient Plan - Select the patient insurance plan you are submitting this Authorization Request for
Note: If the patient has both primary and secondary insurance coverage, you must submit separate authorization requests for each plan. Complete this entire process once for the primary insurance, then repeat it to create a second authorization request for the secondary insurance.
Request Type - Select Prior Authorization
Authorization Type - Select Initial Treatment Authorization or Further Treatment Authorization
Authorization Start Date - select which date you are looking to start treatment. If you have already started treatment and require an authorization to be backdated, select the first date of treatment.
Then click Create.
Attach your finalized plan and submit
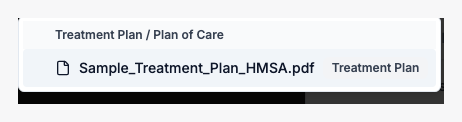
On the Upload Information step, go to Required Documents → Treatment Plan/Plan of Care. Click Select treatment plan/plan of care and choose your finalized plan from the list — it appears here because you finalized it in Step 2. (You can also use Upload Document to add a new file.)
(The exact required documents depend on the client's payer. Attach any other documents the payer requires.)
Then click Submit to send the request to the payer.
💡 On a treatment authorization (First or Further Treatment), this same Upload Information step also auto-extracts the requested service codes from the plan for you to review before submitting — for any payer. HMSA (BCBS Hawaii) adds an extra Modifiers column and HMSA-specific checks on top. The whole service-codes flow is walked through end-to-end in the companion guide: "Service-Code Extraction for HMSA Authorizations."
If you have any questions please feel free to reach out to the Prior Authorizations team at Support@Alpacahealth.io