Diagnosis concierge and the dual-track portal
Last updated: August 21, 2026
⚠ Remove before publishing- review for potential PHI, or is this dummy data?
A parent's guide to getting started with Alpaca Health: upload your child's diagnosis and sign intake paperwork with help from our Diagnosis team, then find your way around the two tracks of the portal — the care side (schedule, session notes, and progress charts) and the money side (insurance, billing, payments, and the separate Billing portal).
Overview
The Alpaca Health parent portal does two jobs at once. It's how you get your child approved and set up for ABA therapy — a guided, concierge-style onboarding where our team reviews your child's diagnosis and helps you over any hurdles — and it's your day-to-day home for everything after that, from watching progress to paying invoices. This guide covers both: the diagnosis concierge that gets you started, and the two tracks you'll use once you're up and running.
NOTE Everything here lives in the parent portal. If you have more than one child, the tabs across the top of the page switch between them — the page always reflects the child whose tab is selected, so confirm the right name is showing before you act.
The dual-track portal at a glance
The left-hand menu is the key to the whole portal. It's split into three groups, and it helps to think of them as two 'tracks' plus your child's records:
Patient Progress (the care track) — Schedule, Session Notes, and Charts. This is where you follow what happens in therapy.
Parent Tools (the money track) — Insurance & Costs, Billing & Payments, Payment Receipts, and Open Billing portal. This is where you understand and pay for care.
Patient information — Patient Information, Medical History, Medical Documents, and Therapy Preferences: your child's details and documents.
The parent portal Overview. The left menu is grouped into Patient Progress (care), Parent Tools (billing), and Patient information. The Overview page ties both tracks together with your balance at the top and an Action Required checklist below.

WARNING There are two different 'portals' in play. Most pages — Insurance & Costs, Billing & Payments, Payment Receipts — live inside Alpaca. “Open Billing portal” is different: it opens a separate, secure billing site (you'll see a “Return to Alpaca Health” link to come back). More on that in the last section.
1. The diagnosis concierge: getting approved for ABA
Before therapy can start, your insurance needs proof of an official diagnosis, and a few documents and consent forms have to be on file. The Overview page gathers all of this into one Action Required checklist so you always know what's outstanding.
Step 1. On the Overview page, find the Action Required card. The heading shows how many items are left (for example, “Action Required (7)”), with the message “Please provide the required information and documents below to move forward with ABA care.”
Step 2. Start with the Diagnosis item, then click Upload to add your child's diagnosis report. Alpaca lists exactly what makes a report acceptable to your insurer: it's longer than one page, it describes the testing done to reach an autism diagnosis, and it's signed by an approved medical provider (MD, DO, or PsyD).
The Diagnosis item in the Action Required checklist. It spells out what a valid report needs, has an Upload button, and explains that Alpaca's team reviews your report before scheduling.
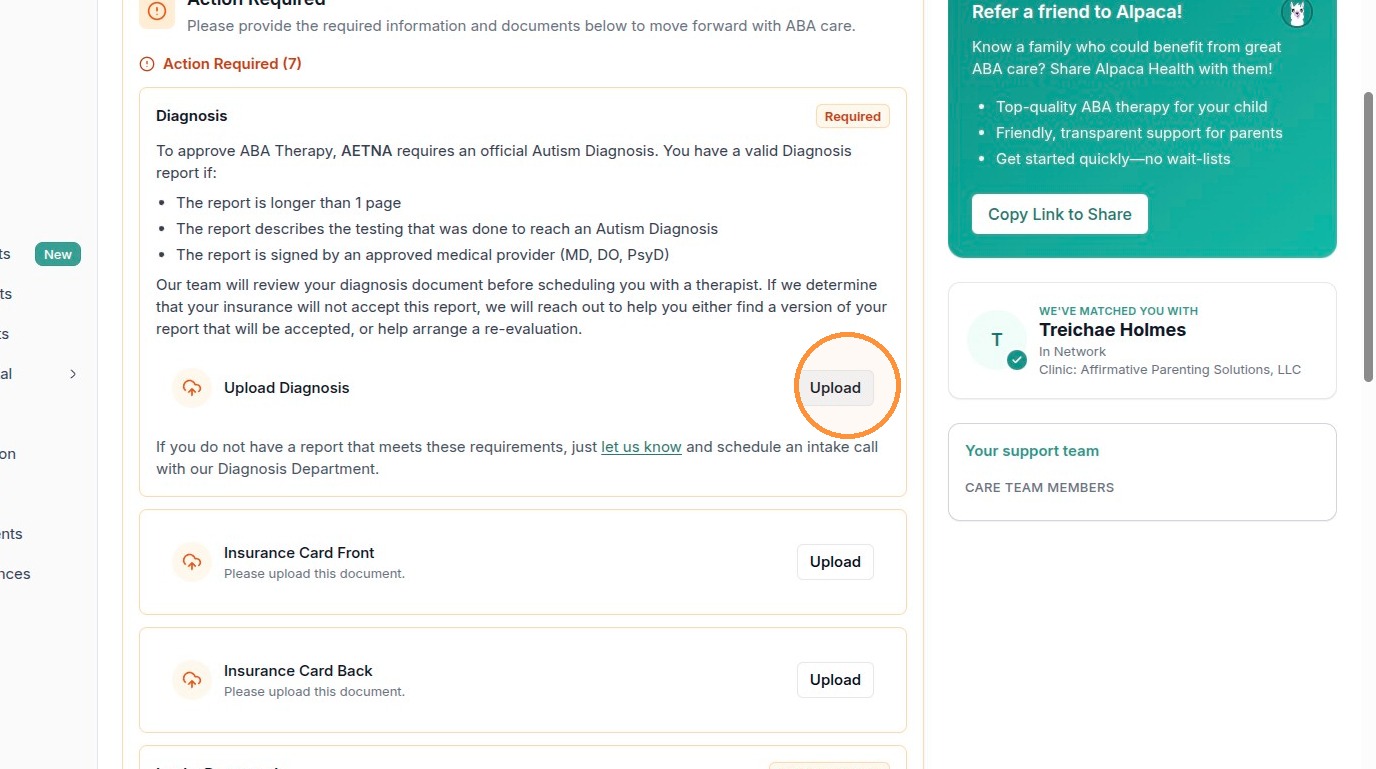
NOTE This is the concierge part. After you upload, Alpaca's team reviews the report before you're scheduled with a therapist. If they find your insurance won't accept it, they reach out to help you find a version that will be accepted, or help arrange a re-evaluation. If you don't have a report that meets the requirements, use the “let us know” option on that card to schedule an intake call with the Diagnosis Department.
Step 3. Work down the rest of the checklist — for example, Insurance Card Front and Insurance Card Back. Each item has its own Upload button. The checklist count drops as you complete items.
Sign your intake paperwork
The checklist also includes intake forms you sign electronically. There are four: Consent to Treat, Telehealth Informed Consent, Assignment of Benefits / Financial Responsibility, and Release of Information.
The Intake Paperwork card lists the four forms and shows how many remain. You can sign one child's forms with “Sign All Documents,” or handle every child at once with “Sign for All Children.”
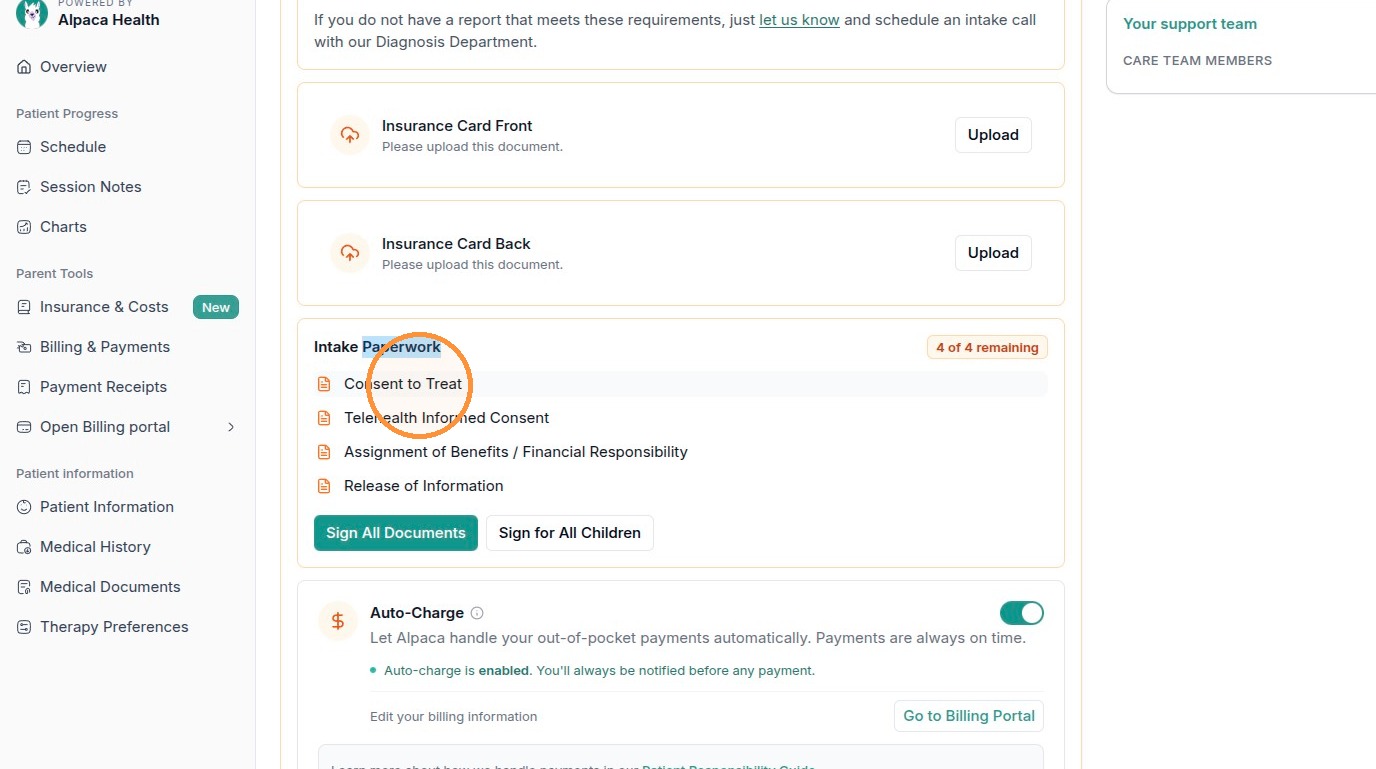
Step 1. Click a document name (for example, Consent to Treat) to open it. The form opens in a window with the full legal text to review.
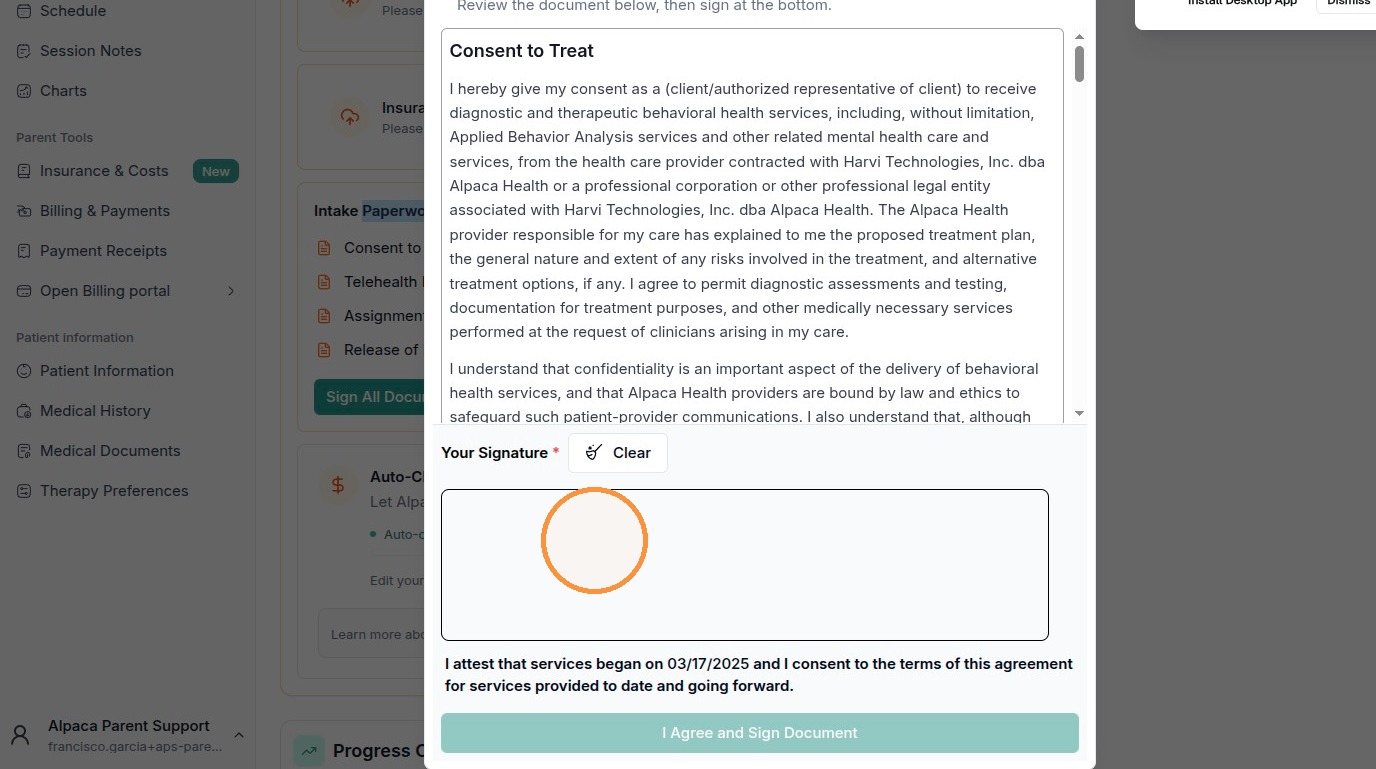
Step 2. Read the form, draw your signature in the signature box, and confirm the attestation. Below the signature there's an attestation that names the date services began — check that date is correct before you agree.
Step 3. Click “I Agree and Sign Document” to sign. The button stays greyed out until you've actually signed in the box.
A consent form open for signing: draw your signature, confirm the attestation, then click “I Agree and Sign Document.”
Step 4. Signing for more than one child? Use “Sign for All Children” instead. This opens a single window that applies one signature across every child's forms at once — useful when you have several children (the example shown has 32 unsigned documents across 8 children). Review the list, sign once, and it applies to all.
The “Sign Intake Documents for All Children” window applies one signature to every child's forms in a single step.
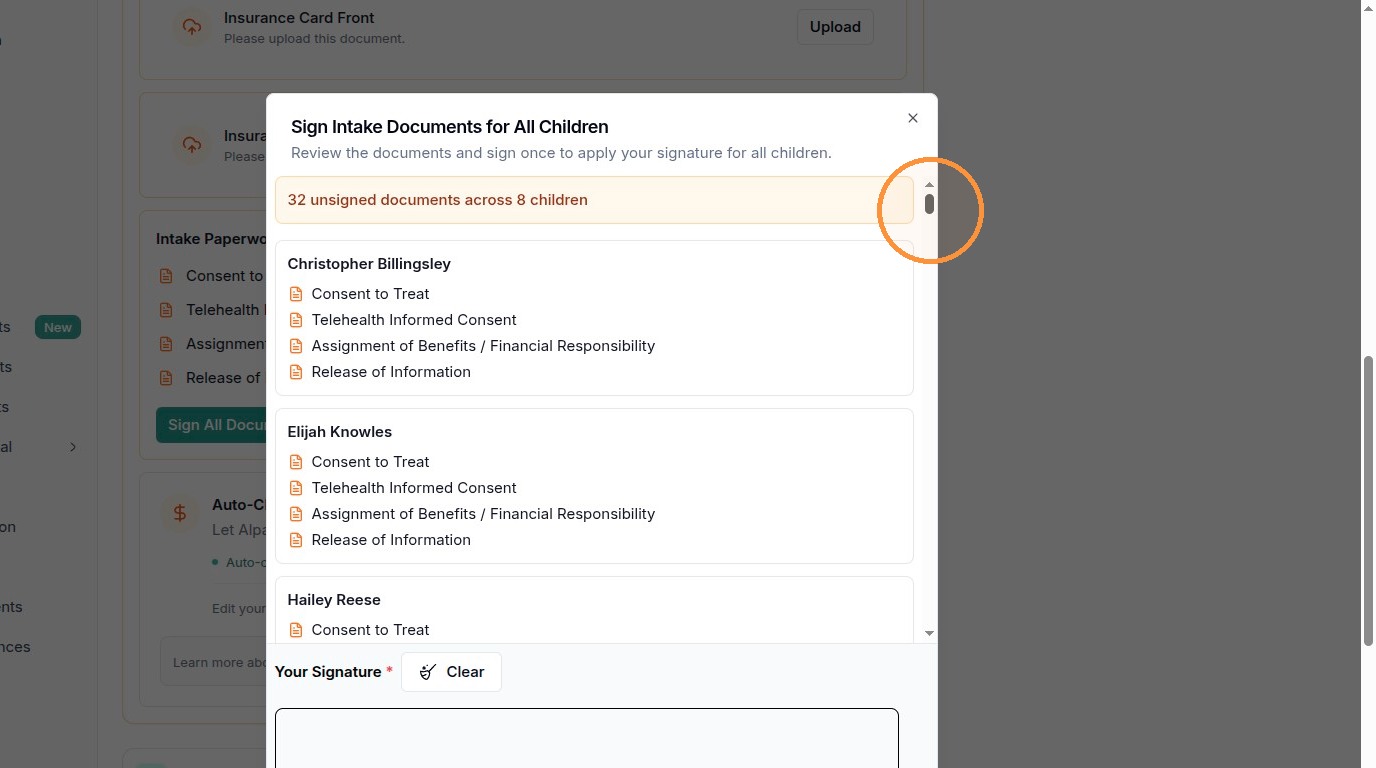
WARNING Don't confuse the two signing buttons. “Sign All Documents” signs the four forms for the child you're currently viewing only. “Sign for All Children” signs across all of your children at once.
2. Track one — your child's care (Patient Progress)
Once therapy is underway, the Patient Progress group is where you follow along. It has three pages: Schedule, Session Notes, and Charts. This article covers Schedule and Session Notes; for the graphs on the Charts page, see the companion article, “Progress charts.”
Schedule
In the left menu, under Patient Progress, click Schedule to see your child's upcoming and past appointments. Use it to check when the next session is and confirm what's already happened.
Session Notes
Step 1. Under Patient Progress, click Session Notes. Each session appears in a list on the left — date, time, and a type badge such as Direct Session, Assessment, Protocol Modification, or Parent Training. Click a session to open its note on the right.
The Session Notes page: pick a session on the left to read its note on the right. Each note opens on the Session Note tab, with Collected Data, Timeline, and User Notes tabs beside it.

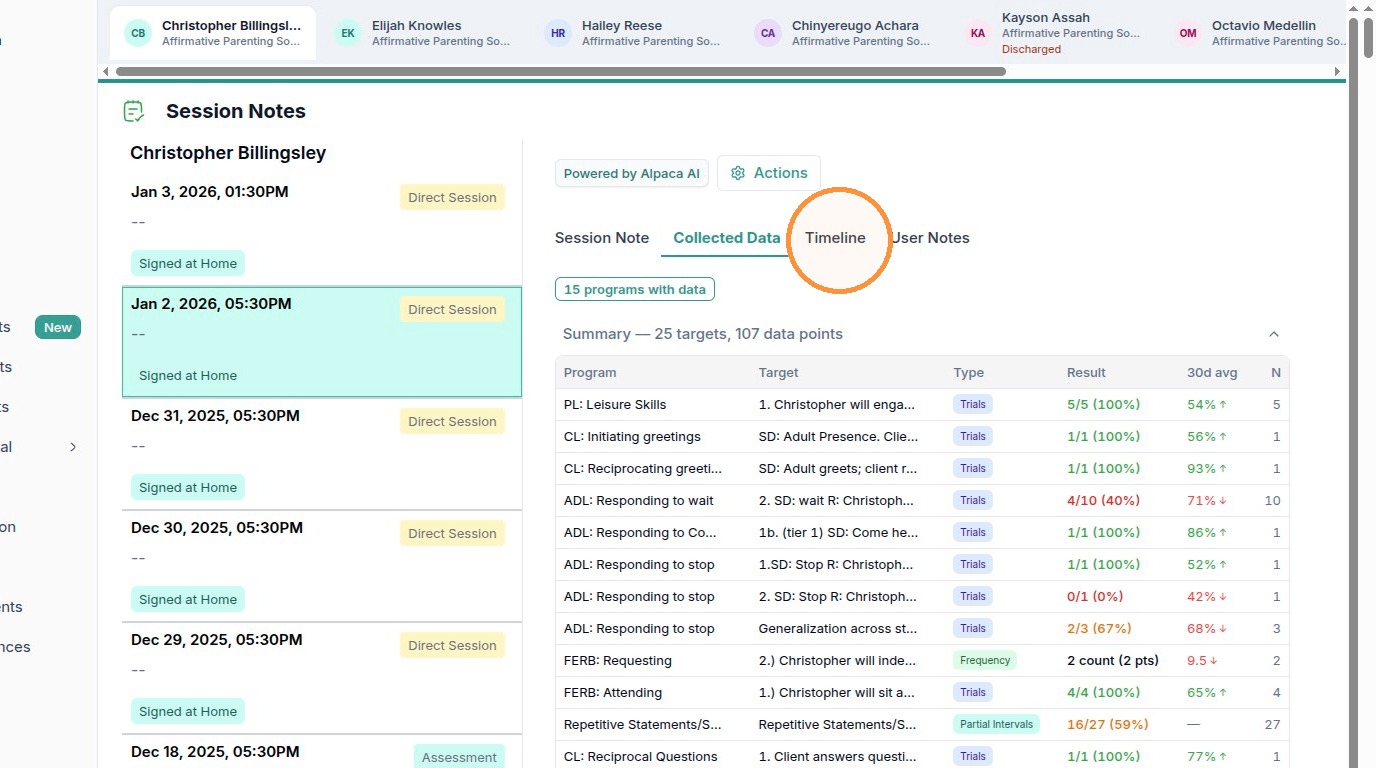
Step 2. Use the tabs above a note to see different views. Session Note is the written summary (clinical status, interventions used, and more). Collected Data shows the numbers behind the session — programs, targets, and trial results. Timeline lays the session out in order. User Notes holds short free-text notes.
The Collected Data tab turns a session into a table of programs, targets, results, and a 30-day average — the data view behind the written note.
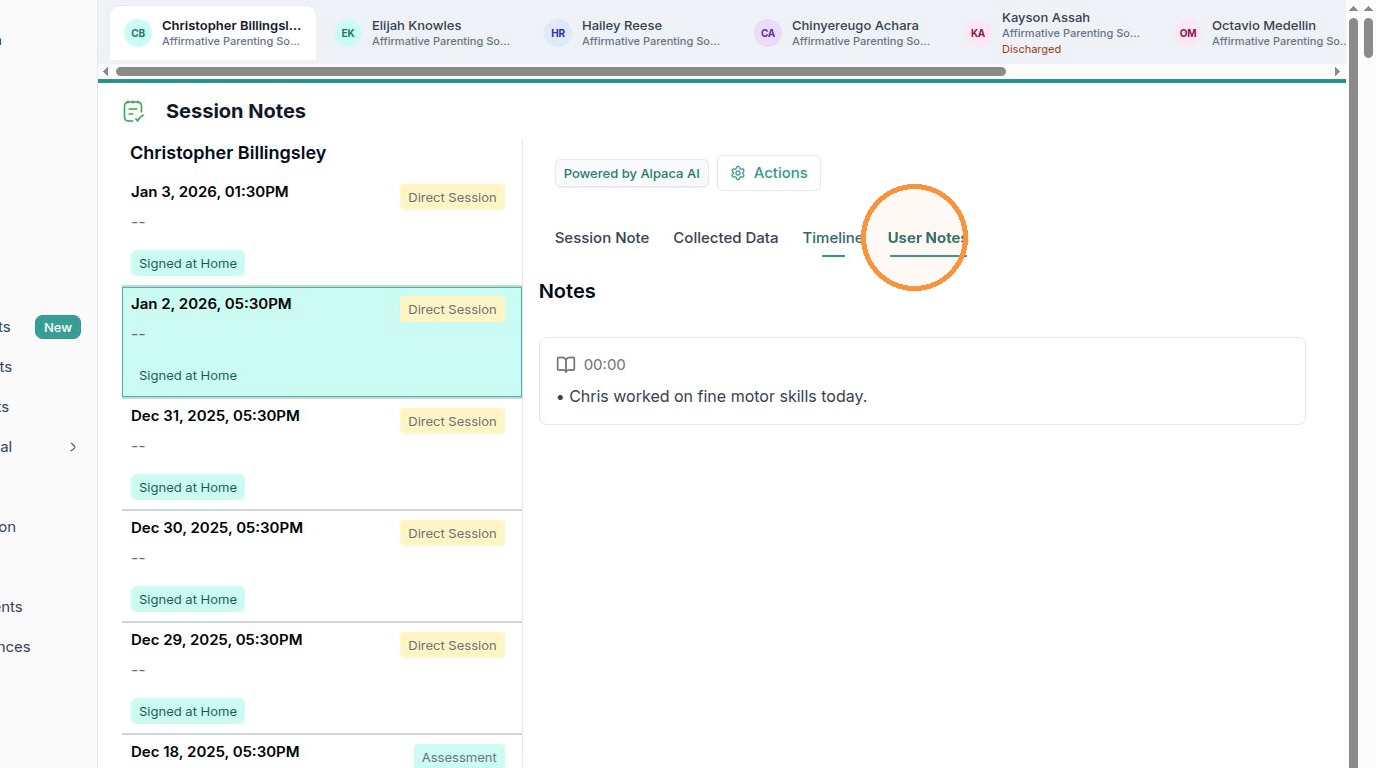
The User Notes tab holds brief, timestamped notes attached to the session.
Step 3. To save a copy, click Actions (top right of the note), then “Export Session Note to PDF.” The export lives inside the Actions menu, not as a separate button.
“Export Session Note to PDF” is inside the Actions menu at the top right of a note.
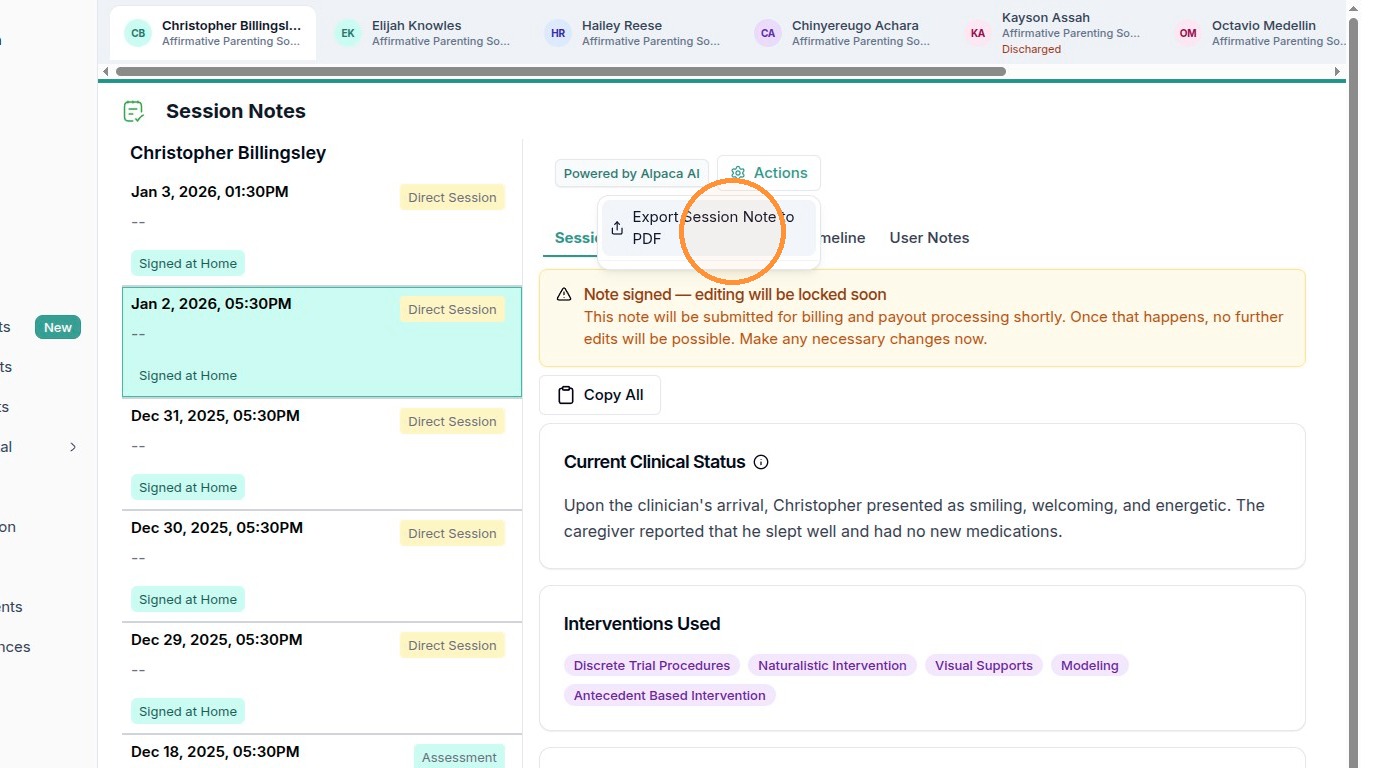
NOTE A note may show “Note signed — editing will be locked soon.” That means it's on its way to billing and can still change for now, but will become read-only once it's paid out. A note that's already locked will say so and can't be edited — contact your clinician if a locked note needs a correction.
3. Track two — insurance & payments (Parent Tools)
The Parent Tools group is the money side of the portal: understand your coverage, see what you owe, pay it, and keep receipts.
Insurance & Costs
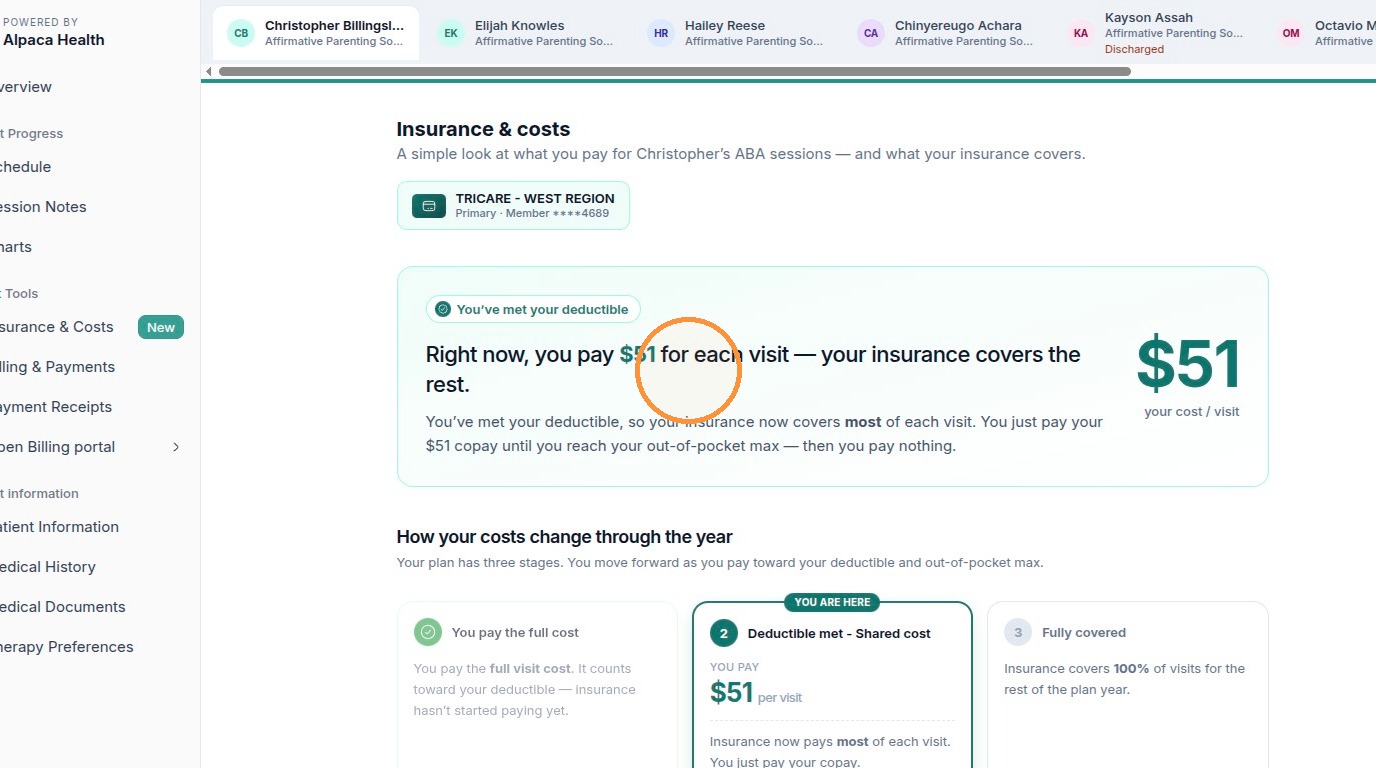
Step 1. Under Parent Tools, click Insurance & Costs. This page is a plain-English summary of what you pay for your child's sessions and what insurance covers. It names your plan and shows your cost per visit right now.
A key feature is the “How your costs change through the year” explainer, which shows the three stages of your plan and marks where you are with a “YOU ARE HERE” tag. What you see depends on where you are:
Before you meet your deductible — you pay the full visit cost (for example, about $144), and it counts toward your deductible. Insurance hasn't started paying yet.
After you meet your deductible — insurance covers most of each visit and you pay a smaller copay or coinsurance (for example, $51).
After you reach your out-of-pocket maximum — insurance covers 100% of visits for the rest of the plan year.
Insurance & Costs before the deductible is met: you pay the full visit cost, and the “YOU ARE HERE” tag sits on stage one. The page also defines “deductible” and “out-of-pocket maximum” in plain language.
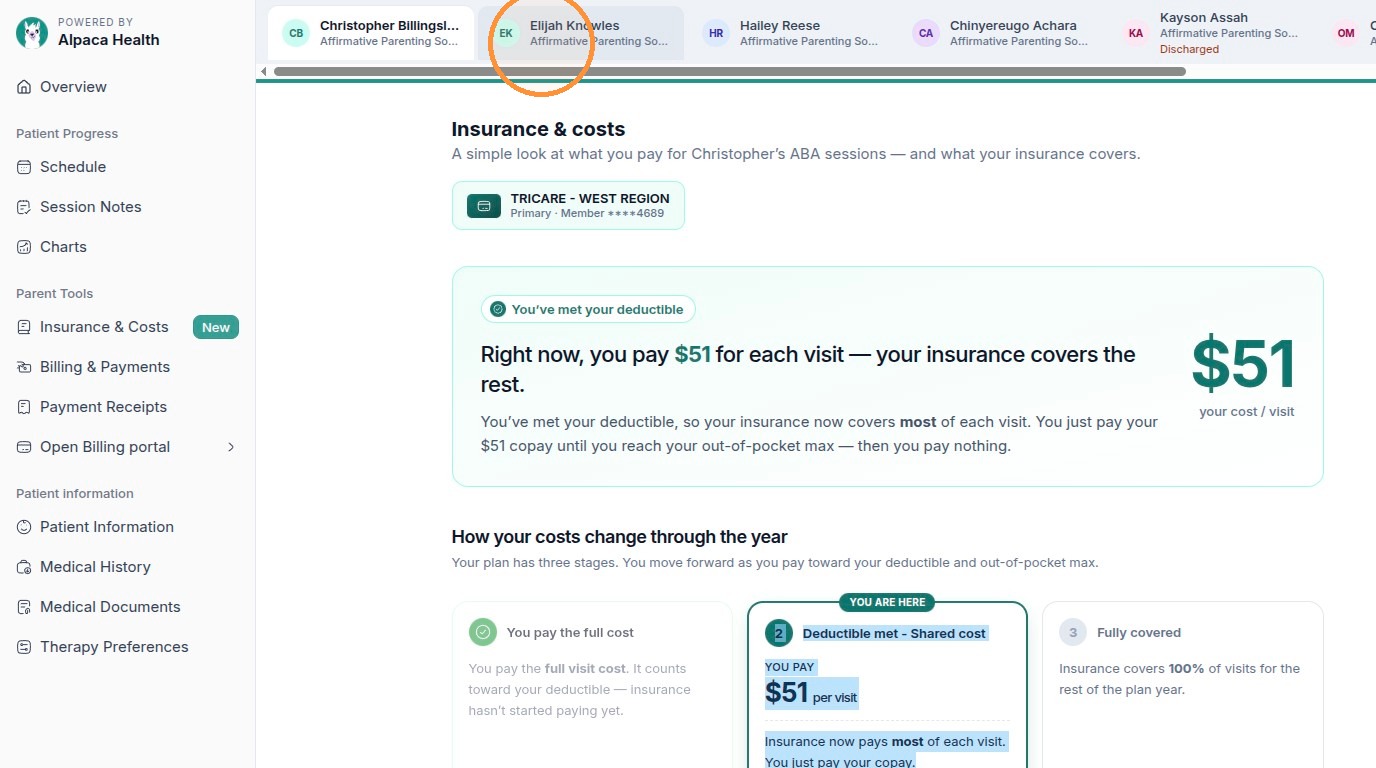
The same page for a plan where the deductible is already met: the tag moves to stage two and your cost drops to a copay. The numbers are specific to each child's plan.
TIP Costs are per child and per plan. To check a different child, switch tabs at the top of the page — the coverage summary updates for whoever is selected.
Billing & Payments
Step 1. Under Parent Tools, click Billing & Payments. The top of the page shows your family's share of care: the balance remaining, how much you've paid, and the total. Below that, invoices are grouped by month.
The Billing & Payments page: balance remaining at the top, then a breakdown of total cost, paid so far, and what's still due.
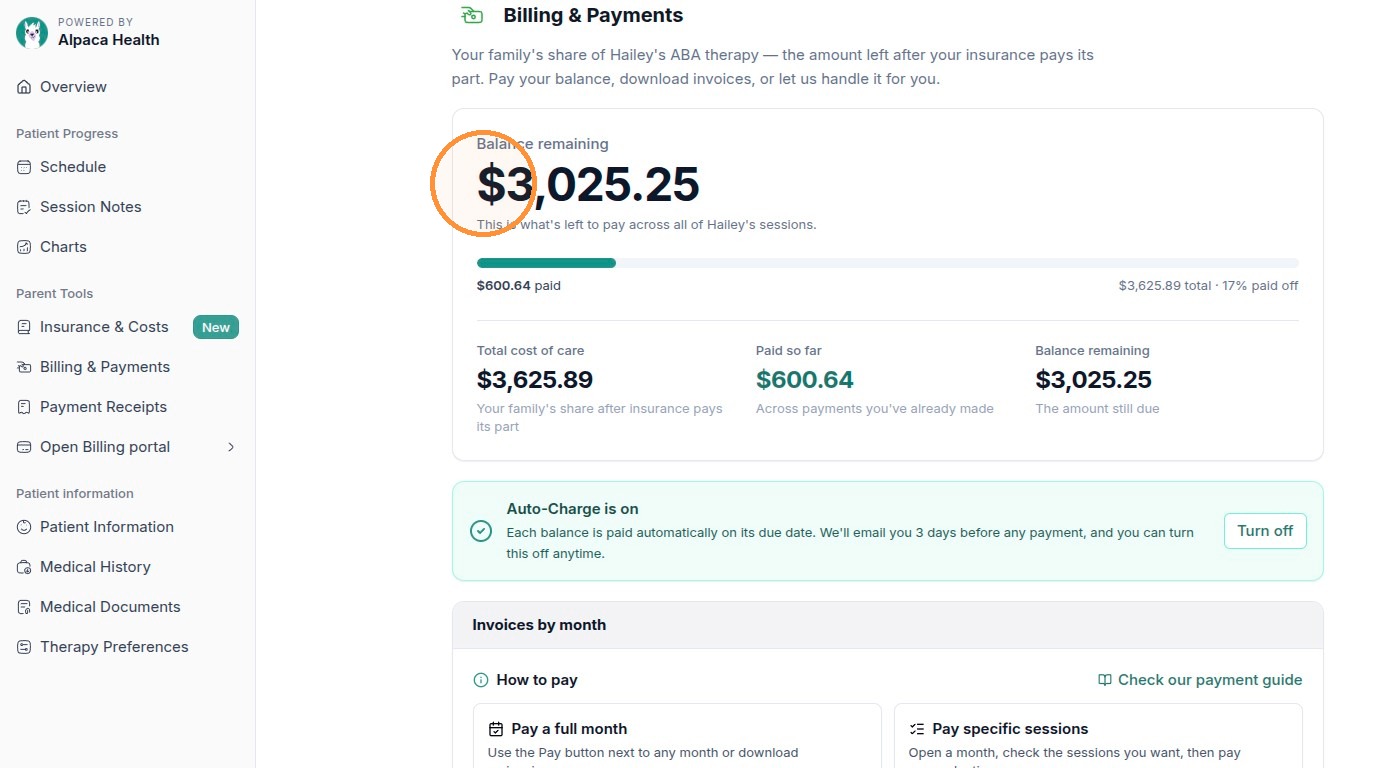
Step 2. Decide how you want to pay: let Auto-Charge handle it, pay a whole month, or pay specific sessions. Auto-Charge pays each balance automatically on its due date and emails you three days beforehand. When it's on, you'll see “Auto-Charge is on” with a “Turn off” button; when it's off, you'll see a “Turn on Auto-Charge” button instead.
Auto-Charge turned off. Click “Turn on Auto-Charge” to have balances paid automatically on their due dates, with an email three days before each payment.

Step 3. To pay a whole month, use the “Pay” button next to that month; to pay only certain sessions, open the month and check the ones you want. When you check individual sessions, a bar appears at the bottom with your running total and a “Pay” button for just that selection. Sessions marked “No charge / $0.00” can't be selected. You can also download a month's invoice with the “Invoice” button.
Paying specific sessions: tick the sessions you want and the bar at the bottom totals your selection, then click Pay for just those.

Payment Receipts
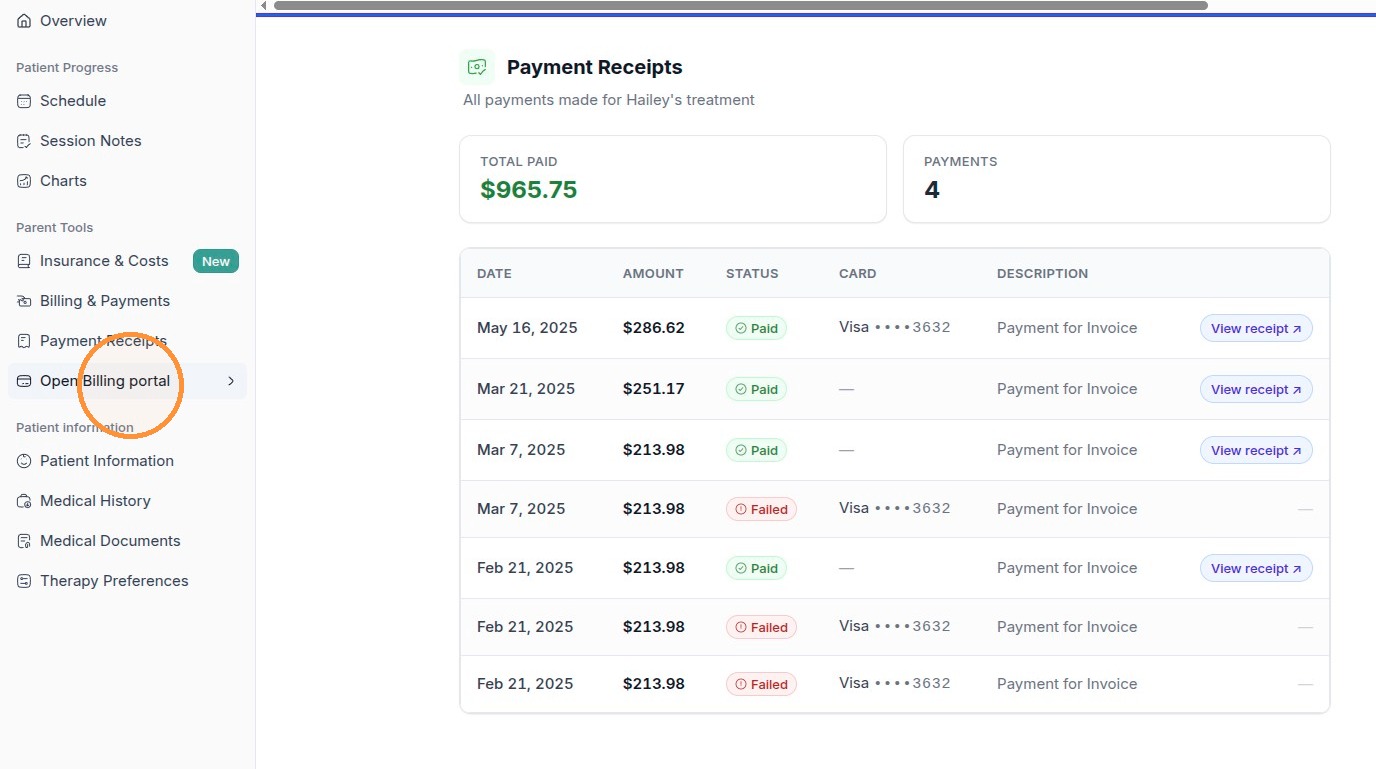
Step 1. Under Parent Tools, click Payment Receipts to see every payment you've made. Each row shows the date, amount, status, card, and description, with totals at the top. Successful payments have a “View receipt” link; failed attempts don't. Note the “Payments” count reflects successful payments, not failed attempts.
The Payment Receipts page lists past payments with their status. Click “View receipt” on a paid row to open that receipt.

The Billing portal — a separate, secure site
Some billing tasks happen on a dedicated Billing portal outside the Alpaca pages. This is where you view your full invoice history, see any past-due amount, manage your saved payment method, and pay an outstanding invoice.
Step 1. Under Parent Tools, click “Open Billing portal.” This leaves the Alpaca pages and opens the secure Billing portal in its place.
“Open Billing portal” in the Parent Tools menu opens the separate billing site.
Step 2. In the Billing portal, review what's outstanding and click “Pay invoice” to pay. The portal shows your outstanding balance (with how long it's been due), your invoice history, and your payment method. Use “View more” to expand the full invoice list.
Step 3. When you're done, click “Return to Alpaca Health” to come back. That link is in the top-left panel of the Billing portal. Use it rather than your browser's back button so you land back in the right place.
The Billing portal: the outstanding invoice with a “Pay invoice” button, and the “Return to Alpaca Health” link (top-left) that brings you back to the portal.
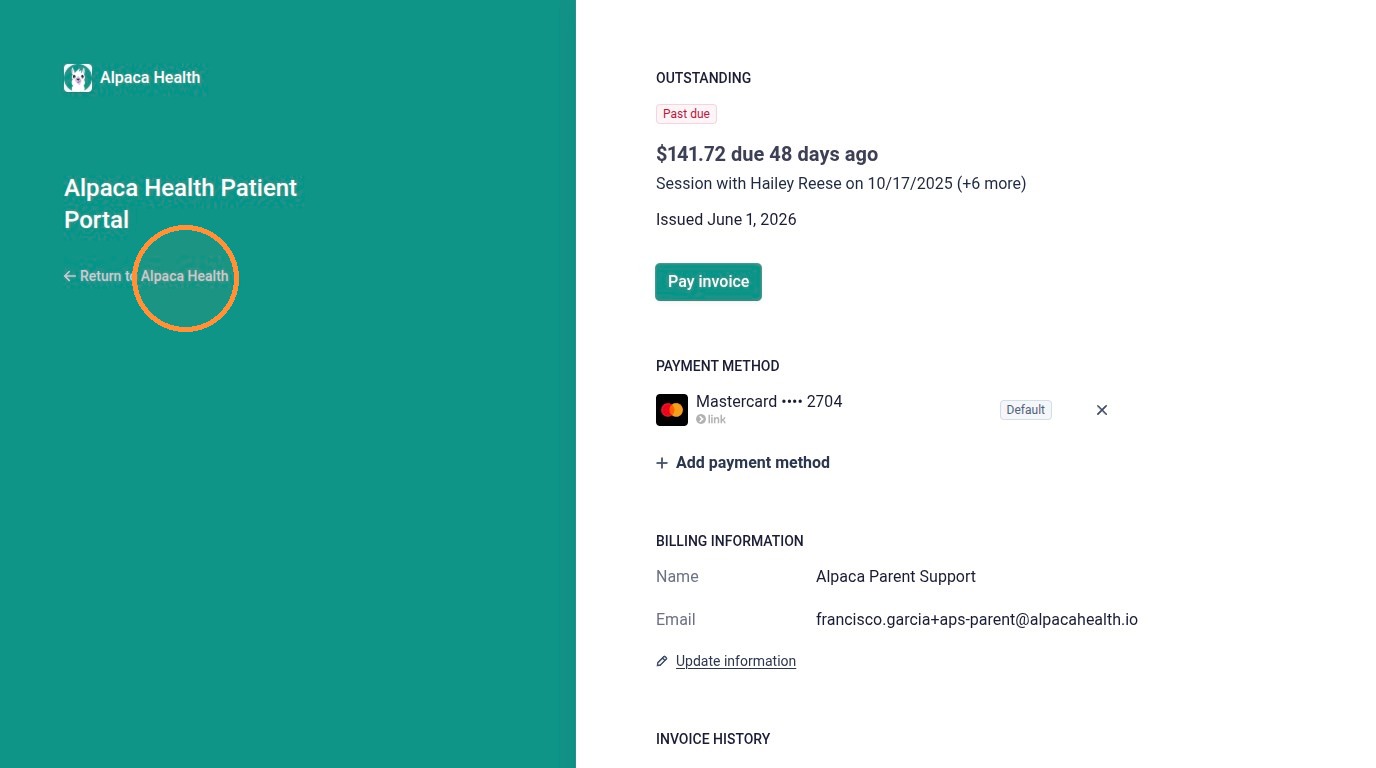
WARNING The Billing portal is a different site from the in-app Billing & Payments page, even though both let you pay. If you get lost, the “Return to Alpaca Health” link always brings you back to the main portal.
Frequently asked questions
Q: What is the “diagnosis concierge,” exactly?
A: It's the guided onboarding on your Overview page. You upload your child's diagnosis report, and Alpaca's team reviews it before you're scheduled. If your insurance won't accept the report, they reach out to help you find one that works or arrange a re-evaluation — and if you don't have a qualifying report at all, you can schedule an intake call with the Diagnosis Department. The Action Required checklist tracks everything still needed to move forward.
Q: What makes a diagnosis report acceptable?
A: Alpaca lists three things insurers look for: the report is longer than one page, it describes the testing done to reach an autism diagnosis, and it's signed by an approved medical provider (MD, DO, or PsyD). If yours doesn't meet these, use the “let us know” option to schedule an intake call.
Q: What's the difference between “Sign All Documents” and “Sign for All Children”?
A: “Sign All Documents” signs the four intake forms for the one child you're currently viewing. “Sign for All Children” opens a single window that applies your signature across every child's forms at once — the faster choice if you have more than one child.
Q: Why are the numbers on Insurance & Costs different for each of my children?
A: Coverage is per child and per plan, so the cost per visit, deductible, and out-of-pocket figures reflect that specific child's insurance. Switch children using the tabs at the top of the page and the summary updates. Early in the year you pay the full visit cost toward your deductible; after you meet it, insurance covers most of each visit; after your out-of-pocket max, it covers everything for the rest of the plan year.
Q: Should I turn on Auto-Charge?
A: Auto-Charge pays each balance automatically on its due date and emails you three days before every payment, so you don't have to track due dates. You can turn it off any time. If you'd rather pay manually, leave it off and use the per-month “Pay” button or select specific sessions to pay.
Q: Is the Billing portal the same as Billing & Payments?
A: No. Billing & Payments is a page inside Alpaca for your balance, invoices, and Auto-Charge. The Billing portal is a separate secure site (opened with “Open Billing portal”) for your full invoice history, saved payment method, and paying outstanding invoices. Use “Return to Alpaca Health” to come back.